You are using an out of date browser. It may not display this or other websites correctly.
You should upgrade or use an alternative browser.
You should upgrade or use an alternative browser.
Craftsman Carb Gasket
- Thread starter Reggie
- Start date


Help Support Arborist Forum:
This site may earn a commission from merchant affiliate
links, including eBay, Amazon, and others.


dougand3
Addicted to ArboristSite
Carb looks ok but that doesn't mean much. Can't tell the routing. In short: Purge bulb long/fat tube goes to tank hole near clutch - inserted 1" or so. Purge bulb short/thin tube goes to carb brass tube nearer metering diaphragm side (4 little screws). Fuel supply line: Pickup in tank - thru hole under carb - carb brass tube nearest fuel pump diaphragm side (1 big center screw)
Reggie
ArboristSite Lurker
I double checked the fuel lines and they are correct. I put a half eye dropper full of fuel in crankcase....with the fuel tank dry, and it tried to fire....but it was weak. I put some gas in the tank and pushed the primer bulb about 8 times because it seems like nothing is happening until you press it that many times. I tried to start again and nothing. When I poured the gas out of the tank, I took also took out spark plug and tried to pour gas from the crank case out. The gas came instead from carb end of the exhaust manifold (on the manifold side of the connector plate) - like it was readily leaking out of the crank case...and there was quite a bit of it. Is this leaking gas an indicator of anything. By the way dougand3, thanks for the clear, concise description of the fuel line routing. With that to refer back to, I don't think I need to worry about getting them crossed up!
Chainsaw Jim
CJ Saws, LLC
How are you determining you have the correct pump gasket? Are you sure you're not confusing two that are very similar?
I've only ever experienced this problem when saws show up with the wrong pump gasket. You'll always get about a pop and a half before the plug floods out.
I've only ever experienced this problem when saws show up with the wrong pump gasket. You'll always get about a pop and a half before the plug floods out.
dougand3
Addicted to ArboristSite
Could be bad needle or needle is worn and letting fuel seep thru. Needle lever height could be too high, so needle is always a little open. For far less frustration - buy a new carb.
Reggie
ArboristSite Lurker
Ya know, the fuel pump gasket is the only thing I haven't double checked. I bought a Walbro Carb kit that had a bunch of different gaskets in there, and the fuel pump gasket I took off was this blue cellophane like material. The gasket in the kit was regular gasket material, but I assumed that I matched it up correctly by shape... but maybe that's it. Would that account for all of the gas leaking out of the back end of the manifold when I turn the saw upside down? dougand3, I put the new needle from the carb kit into the rebuild, but I'm not giving up. Before I take it to "Cosmic Knowledge," I'm going to buy the Partner 350 Carb and try again. I bought this saw to get me free when my other gets bound up. This happened several weeks ago and I had to lug my heavy scissor jack way into the woods to get it free!
cedarshark
Addicted to ArboristSite
A bit of advice when rebuilding carbs: As gasket kits normally include the diaphrams and gaskets to fit multiple carbs, lay all your old gaskets out in the order taken out and topside up, then match the new gasket with the old one looking at shape, where the ports are cut and whether the gasket is upside down or not. Some are dead easy to identify and orientate, but some require attention.
Chainsaw Jim
CJ Saws, LLC
Your metering lever looks like it is sitting too low. Either it is adjusted incorrectly or the needle is jammed open. If the needle is ok then you might need to recheck diaphragms. The lever should be flush with the top of that little half circle lip.
Can you get the numbers of the side of the carb? They'll likely be very hard to read without holding up to see their reflection if they aren't stamped. They should be on the side where the choke lever is.
With the numbers we can better guide you. The factory specs on the saw don't tell you if someone has changed the carb or not because more than one carb was used in production.
Reggie
ArboristSite Lurker
Woo Hoo!
Got me a Partner 350 carb off of Ebay for $10. Put it in there and it started right up. The cosmic knowledge must has been mysteriously conveyed....by accident! One thing I noticed though, is that the primer bulb had immediate suction to it with the new carb; and on the one I rebuilt, I could tell that it wasn't really working right. The fuel lines were absolutely correct on the rebuilt carb so I would be grateful if anyone had advice about what I may have done wrong in the carb rebuild for there to be no suction in the primer bulb. Shoot, the carb rebuild kit cost me $8.
Forgot to mention....many thanks to everyone for staying with me and providing excellent advice! It took awhile, but it was well worth doing!
Cheers, Reggie
Chainsaw Jim
CJ Saws, LLC
If you want to figure out what went wrong then you'll need to take the pump side apart and lay the gaskets next to the carb for a good clear pic so we can see if there is a problem there.
Reggie
ArboristSite Lurker
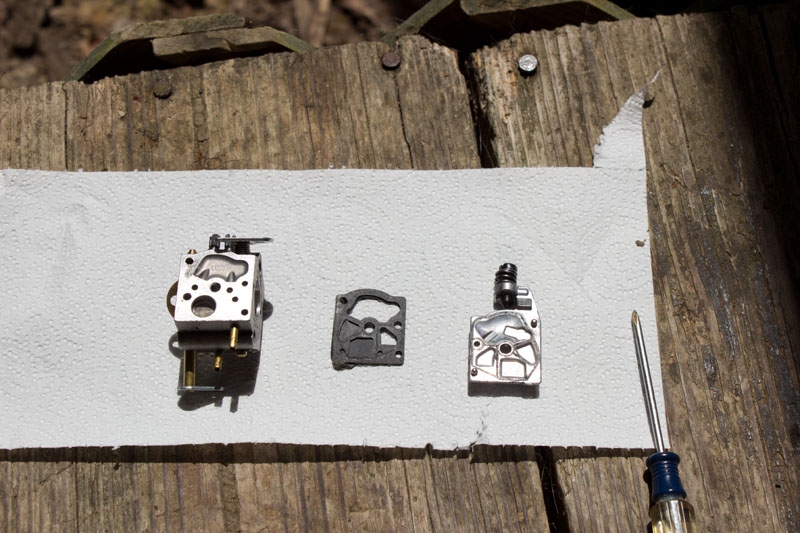
I took a picture of the gasket and diaphragm on on the fuel pump side, but I get an error message when I try to upload it. This happened with the first set of pictures and even though they are less than 100k, I needed a forum admin to put them up there for me. The gasket and diaphragm look correct though, and I have the diaphragm touching the body of the carb with the gasket on the outside touching the cover. I'll try to get the picture put up there.
Thank you for replying, Reggie
Thank you for replying, Reggie
On the opposite side of the carb, the gasket touches the carb, and the diaphragm touches the cover. If reversed, it could explain the excess fuelI took a picture of the gasket and diaphragm on on the fuel pump side, but I get an error message when I try to upload it. This happened with the first set of pictures and even though they are less than 100k, I needed a forum admin to put them up there for me. The gasket and diaphragm look correct though, and I have the diaphragm touching the body of the carb with the gasket on the outside touching the cover. I'll try to get the picture put up there.
Thank you for replying, Reggie
Reggie
ArboristSite Lurker
Wow, once again, I don't mind sounding like an idiot, for two reasons....First, I know that I am an idiot, but second, I am also ever so grateful for this response because I'll bet you are correct about that! So, gasket side to body of carb and membrane facing out toward the cover! When I get the ability to upload the pic I will do it. Thanks again huskihl!
I have another question about this. The old fuel pump side diaphragm I took off of this carb was a blue cellophane type material. The replacement from the carb kit was more like a thin sheet of fabric material. I read somewhere where you could "re-condition" the diaphragm from the needle side of the carb by immersing it in brake fluid. Is this true? Also, what about the blue cellophane diaphragms....is there any way to recondition those?
I have another question about this. The old fuel pump side diaphragm I took off of this carb was a blue cellophane type material. The replacement from the carb kit was more like a thin sheet of fabric material. I read somewhere where you could "re-condition" the diaphragm from the needle side of the carb by immersing it in brake fluid. Is this true? Also, what about the blue cellophane diaphragms....is there any way to recondition those?
Reggie
ArboristSite Lurker
I don't know about reconditioning them. I figured a kit was only $10 so I always replaced everything. It would be nice to know though in a pinch.
I have also seen the blue diaphragms you speak of. As well as brown and black. I believe some are more resistant to ethanol but not sure.
The way you have that carb, put the diaphragm on the carb first, then the gasket. Reverse the order for the needle side
dougand3
Addicted to ArboristSite
+1 on it looks right in pic. I've soaked metering diaphragms in brake fluid and do think it makes them a LITTLE more pliable but not as good as a new one.
The fuel pump "plastic" diaphragms - I know of no way to recondition. Once they get a formed "bulge", they just don't work well. You could experiment with some chemicals that melt plastic...maybe wipe acetone on for 30 secs and rinse? PBlaster? Some kits are so high priced - $10-$12, that I just get a new AM carb.
The fuel pump "plastic" diaphragms - I know of no way to recondition. Once they get a formed "bulge", they just don't work well. You could experiment with some chemicals that melt plastic...maybe wipe acetone on for 30 secs and rinse? PBlaster? Some kits are so high priced - $10-$12, that I just get a new AM carb.
Similar threads
- Replies
- 1
- Views
- 443
- Replies
- 3
- Views
- 360