Can anyone help? I have a Federal Airtight 264cl(r). My Baffle is broken and I'm looking to try to replace it. I'm trying to find a part number for it but, I cant find and prints or layouts for my stove anywhere on the web. Everything comes back with the 264CCl, and the baffle for the two stoves are very different. Any suggestions?
You are using an out of date browser. It may not display this or other websites correctly.
You should upgrade or use an alternative browser.
You should upgrade or use an alternative browser.
Federal Airtight 264CCL Questions
- Thread starter bsearcey
- Start date


Help Support Arborist Forum:
This site may earn a commission from merchant affiliate
links, including eBay, Amazon, and others.
Black Swan? That use to be a buzz word for Federal Airtight parts. Try Google.
jamesbrough
ArboristSite Lurker
- Joined
- Sep 21, 2014
- Messages
- 12
- Reaction score
- 0
Finally up and running

How necessary aee the rocker grate covers to burn wood ?
Got a good burn last nite
Alot of fall through of little stuff and ash
Maybe that stops this ?
How necessary aee the rocker grate covers to burn wood ?
Got a good burn last nite
Alot of fall through of little stuff and ash
Maybe that stops this ?
So I have not made it all the way through this thread, but I thought I would post pics of the early 1980s FA288 that came with my new house. Still trying to learn about catalytic stoves and the best way to run them (family has always had non-cat stoves). Based on my understanding my stove currently doesnt have a catalytic combustor in it.


Yes, that is a catalytic stove. The cylindrical combustor cartridge is missing in the first picture above. It rests on that collar lip. You may have also received a cast iron plate that rests there and is recommended when burning coal. These burn out in time, along with the collar. If your collar is till intact, you can make a choke, similar to the coal burning plate that will increase efficiency immensely and operate almost as well as a combustor cartridge. In my case and as shown in earlier posts, I replaced the burned out collar and designed a plate steel choke with numerous holes drilled to encourage secondary combustion. Otherwise, you will be letting most of your heat escape up the chimney and virtually no secondary combustion will exist.
Here is the choke that came with the stove for burning coal:
Without the combustor, this is far better than nothing at all. It will get red hot and burn off smoke gases.
The main flue block-off in the back swivels and allows you to close off the start-up flue so that when the fire gets hot, these gases are forced through the combustor (or my steel choke). That produces the secondary combustion that cleans the smoke before it goes through the main stove pipe. You will find that if it works properly, there will be no need to close off the damper. The top of the stove will get very hot and boil water without difficulty. Your thermometer will sometimes reach 1500 F.
Here is the choke that came with the stove for burning coal:

Without the combustor, this is far better than nothing at all. It will get red hot and burn off smoke gases.
The main flue block-off in the back swivels and allows you to close off the start-up flue so that when the fire gets hot, these gases are forced through the combustor (or my steel choke). That produces the secondary combustion that cleans the smoke before it goes through the main stove pipe. You will find that if it works properly, there will be no need to close off the damper. The top of the stove will get very hot and boil water without difficulty. Your thermometer will sometimes reach 1500 F.
jamesbrough
ArboristSite Lurker
- Joined
- Sep 21, 2014
- Messages
- 12
- Reaction score
- 0
Do you have the grate covers in your stove wood doctor?
I don't think so. I just have the swivels that dump the ashes into the ash pan below. They allow air to flow through the front air valve and help keep the fire going along with the side valve above the loading door. I generally leave that front valve and the side valve open about 1/4", and that air flow prevents cinder build up when the fire dies down. Closing them both can almost choke the fire completely out. I also operate without the front vertical grate shown in the last Pic above.Do you have the grate covers in your stove wood doctor?
One of the selling points of this stove was the complete control of the fire without the need of a stove pipe damper. However, it takes some practice, and the amount of your chimney draft is another factor. My draft is enormous because my chimney is so tall and I live near the top of a hill. Many buyers found this stove too complicated to run, and that may have led to its demise. As they criticized Mozart, "too many notes".
jamesbrough
ArboristSite Lurker
- Joined
- Sep 21, 2014
- Messages
- 12
- Reaction score
- 0
Im having a problem with igniting the fire with out smoking out the house
Too much ash in fire box?
I've all ways closed the "coal" intake on the bottom door
Too much ash in fire box?
I've all ways closed the "coal" intake on the bottom door
Keep that bottom center valve open, especially when lighting the fire. In fact, I leave the bottom door ajar for the first five minutes, holding it open with one of the brass/iron handles. The draft will try to pull the bottom door closed. I also dump the ashes almost always between fires. It's the air coming in from below that sets up the draft needed to start the fire and send the smoke up the chimney at start-up.Im having a problem with igniting the fire with out smoking out the house. Too much ash in fire box?
I've all ways closed the "coal" intake on the bottom door.
Another technique that works for me is a top-down fire. Start with two or three logs lying flat to the bottom with nothing underneath. Now add a layer of kindling on top with corrugated cardboard and newspapers. Wrap newspapers around kindling sticks. Then put one or two small logs on that. Open the bottom door a little, keep it ajar, and light side with the loading door open. Close the loading door. The fuel on top burns first, drops hot coals below, and that sets the big bottom logs afire. Now close the the front door completely. Add two more logs in 30 minutes, and you are on your way.
jamesbrough
ArboristSite Lurker
- Joined
- Sep 21, 2014
- Messages
- 12
- Reaction score
- 0
I've been doing a lot of reading trying to figure out how to stop it and the latest thing I will try other than your advice is to start the fire in the far end opposite of loading door I've read these types of stoves like to burn the wood like a cigar start in at the far end and going to the loading door
Do you know if this theory is correct?
My chimney os all inside except for 5' above the roof on a flat roof with nothing around but a tree 40ft or so away
This is my primary heat source
it really Bugs the heck out of me in the am on a hot bed of coals getting it to reignite
Do you know if this theory is correct?
My chimney os all inside except for 5' above the roof on a flat roof with nothing around but a tree 40ft or so away
This is my primary heat source
it really Bugs the heck out of me in the am on a hot bed of coals getting it to reignite
jamesbrough
ArboristSite Lurker
- Joined
- Sep 21, 2014
- Messages
- 12
- Reaction score
- 0
Well I feel pretty stupid
Figured it out and figured I post so no one makes the same stupid mistake I did
Well I bought the triple wall duravent plus stainless chimney 5 3 ft pieces and a cap slightly used for 300$
The cap was missing the spark screen so I decided I have stainless steel screen in the basement
Well a month later and the screen was completely clogged up with creosote the whole chimney is lined with creosote
Creosote starred dripping into the damper I noticed today when I took the lid off today to investigate then cleaned entirely 're assembled and bam smoke pouring out
Dumped water on the just lit kindling and decided t o go onto roof and pull the cap when I noticed it
Just a fyi if anyones ever dumb like me lol
1st wood stove ever but im getting the hang of it
Creosote is caused by cold fires. Even dry wood can cause creosote when you burn a fire without sufficient oxygen that causes cold, smoldering fires. Many people do not know that water is a byproduct of the combustion of any fossil fuel. Moist, green wood with a high water content can produce more creosote, but dry wood can also do it.
Wood Doctor, Thanks for the info. I ordered a new combustor and temperature probe, as my temp probe didn't seem to have any numbers on it (just polished brass on top). I will have to see how it fires once I get all the parts. Thanks again!
DrewUth
Jack of all trades, master of none.
Hi all-
This thread is still alive!
I'm new here, but not really new to these stoves. My grandparents had a 264CCL in their log cabin my whole childhood. When my grandfather passed about 5 years ago, my grandmother decided she wanted a gas log, and I got the 264 to go in my garage. Unfortunately, with my grandfather gone I had no instruction on how to run it and it took 3 seasons to learn how to make it work properly. Part of that was compounded by the fact that the catalyst damper was rusted shut and I was trying to start fires through the catalyst! Being a shop heater only, I simply wired that damper open (as the shaft broke when I tried to free it) and that's how I've run it for the past two years.
Last year, my wife and I happened across a Napoleon insert to try and cut down on our oil bills in our house. I didn't want to install the old family 264 in the house as it was leaky and needed plenty of work. While the Napoleon is a wonderful stove, and burns great, it just did not have nearly the output needed to heat our roughly 2000 square foot, poorly laid out and poorly insulated home. It was a huge help through last winter, but I wanted something a bit bigger that I could install as a free standing unit for this season.
So I've been hunting Craigslist for months, and about a month ago found the right deal and snapped up a lightly used 264CCL for $150. It was in need of some good TLC,(center fixed grate replacement, new gaskets, etc) but thankfully having a "parts stove" in the shop has made my "restoration" process much easier. I am very excited to install it in a few weeks! The catalyst is in great shape, and it needed the same damper door that was rusted shut on my other one freed up. Luckily, with a few years more patience and wisdom under my belt I spent 3 evenings with a propane torch and PB Blaster, and was able to free the frozen shafts and remove them. Cleaned on the wire wheel and lubed with Anti-Seize, everything works good as new again. This thread helped me figure out the proper way to re-seal the top of the stove- waiting on my tub of cement to arrive as we speak, as the bead I laid on with the tube of gasket cement was definitely not going to do the trick haha!
Anyway, sorry for the novel. One quick question- thoughts on whether I should seal off the opening to the fireplace behind it? I am inclined to mount a steel plate there and seal it off tight, I don't want to lose any radiant heat.
Thanks again for the great thread! I can't wait to tear into my garage stove now and get it tuned up and heating better with all the knowledge I've gained restoring the one for inside my house. Cheers from Southern NJ.
My Federal 288 is sealed off:
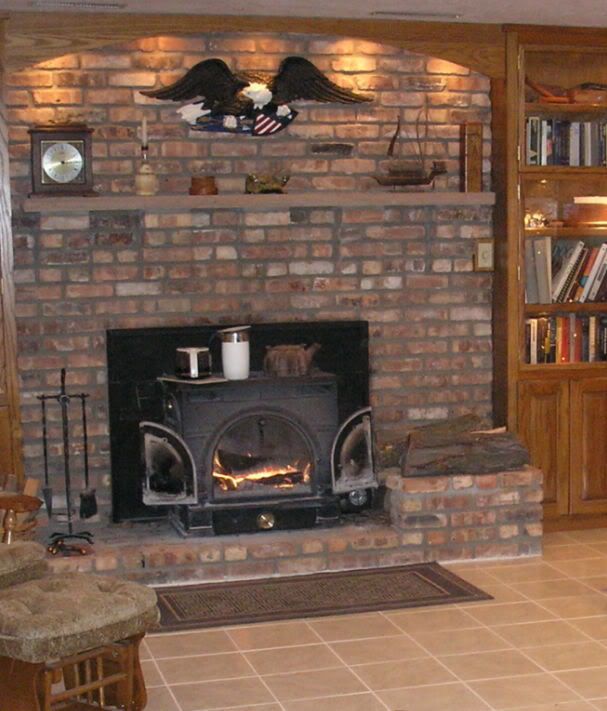
Otherwise you will lose warm air up the chimney. Most of the time my stove's doors are closed as it heats the house.

Otherwise you will lose warm air up the chimney. Most of the time my stove's doors are closed as it heats the house.
DrewUth
Jack of all trades, master of none.
Just lit mine up outside for the first fire last evening after the "restoration". Sorry for no pics- it was dark, I will get some today or tomorrow. Burned great! It took a bit to break past 400*, but I think that was due to the wood I loaded in it at first. I loaded some more in, it got to 550* in good time, then I closed the damper to see if the catalyst would light. It did, and the temps JUMPED to about 850* in about 15 mins, but then just kind of hung there between 800-850 for a while. So I opened the damper back up and packed if full of more wood, let it burn for about 5 minutes that way and then shut it again (probe still at about 800*). Then it REALLY started cookin'- shot right up to 1100* and hung there. I was very happy.
Don't worry- I let it take it's time getting to 400*, about two hours. I needed to cure the cement used for the top and all the new gaskets. I already seasoned the new center grate in the oven to 500*, so I knew that would be ok. I ran the blower too to make sure there were no internal leaks and I am happy to say that once the paint baked, there were no fumes or funny smells at all. All of that was done by about the time it hit 600*. All of this happened in the driveway with only 5' of stovepipe as well, I can't wait to see how it pulls when I connect it to my 35"+ liner in the house chimney!
I am beyond excited to get it installed and feel the heat inside, however it may have to wait a week. Wife and I are headed to Gettysburg this weekend for the Apple Harvest Festival, and I have to get the truck and camper ready for the ride- the camper is still winterized from last year! seems silly to flush it out for a weekend only to winterize it again right after, but oh well.
When it gets cold and the wind blows out of the north, I can sometimes reach 1450 F. The stronger the north wind, the stronger the draft and the hotter the stove burns. Melting aluminum cans down to nothing with this stove is no problem when you go over 1200 F.
Butterstove
New Member
Hello Everyone,
This is my first post. I've enjoyed reading this thread, lots of good information! I recently bought a 264ccl off of Craigslist for $250. Seems to be in good shape with plenty of life left on the cat combustor. I would like to install it in my fireplace and will need to line the chimney first with a stainless steel liner. The two questions I have are: 1) What size chimney liner is needed? The plate on the back of the stove says "vent into a minimum 6" stove pipe"; the manual says the stove "can vent into an 8" diameter chimney flue or 8"x8" masonry flue". I would like to install the 6" diameter liner if this is acceptable, no ovalizing and less expensive. I will insulate the liner. Question 2) What kind of Tee do you guys have behind your stoves that makes the transition from horizontal (about 6" oval) to vertical chimney liner? I can only find round tees online or tees that are oval on the upside with round snouts. The picture attached shows a tee but I would like to replace it. I don't think I will have room to do an oval to round adapter behind the stove. What did you guys do? Thanks in advance! I will attach a few pics. I will be cleaning it up, painting, sealing and polishing before install and will upload pics then.
This is my first post. I've enjoyed reading this thread, lots of good information! I recently bought a 264ccl off of Craigslist for $250. Seems to be in good shape with plenty of life left on the cat combustor. I would like to install it in my fireplace and will need to line the chimney first with a stainless steel liner. The two questions I have are: 1) What size chimney liner is needed? The plate on the back of the stove says "vent into a minimum 6" stove pipe"; the manual says the stove "can vent into an 8" diameter chimney flue or 8"x8" masonry flue". I would like to install the 6" diameter liner if this is acceptable, no ovalizing and less expensive. I will insulate the liner. Question 2) What kind of Tee do you guys have behind your stoves that makes the transition from horizontal (about 6" oval) to vertical chimney liner? I can only find round tees online or tees that are oval on the upside with round snouts. The picture attached shows a tee but I would like to replace it. I don't think I will have room to do an oval to round adapter behind the stove. What did you guys do? Thanks in advance! I will attach a few pics. I will be cleaning it up, painting, sealing and polishing before install and will upload pics then.
Attachments


DrewUth
Jack of all trades, master of none.
I have a few questions after running mine for a few days now: (Please help Mr. Wood Doctor!)
1. Is there any harm in running it without the cat? Keeping it around 600* or so? The cat operation is a lot for the wife to wrap her head around just yet, so when she is home on her own it just runs like a regular stove.
2. When I am going to leave it for hours- like if I go out, or when I go to bed, is there any harm in leaving the cat engaged, knowing that it may drop down to below 500* before I get back to relight it? For example...Sunday night before bed, the stove was running at 900* with the cat (needed to be reloaded). I disengaged the cat, loaded it up and dampered it down, and went to bed (toasty warm) at 11:00. When I came down at 6:30 the next morning, the stove was around 250* with a nice bed of coals. Now yesterday, I ran the cat all afternoon (happily cooking away at 1200-1400*), loaded the stove at 11 before bed, and it was at 1250* or so when I dampered it down and went to bed, leaving the cat engaged this time. 6:45 this morning the stove was 450*+ with about the same amount of coals. Is it ok to leave the cat engaged like this? It seems like it was fine but I want to know if there is any long term damage to the cat possible.
3. When I had it apart, I disassembled, wire brushed/cleaned and reassembled the cat damper pieces with anti-seize so it worked nice and smoothly, as it was all frozen solid when I got it. The anti-seize baked off after the first fire, and now it can be a little crotchety to operate the cat damper. Should I be concerned?
Here are some pictures for your viewing pleasure!
olympyk_999
Addicted to ArboristSite
I don't have a federal...mines a VC Dutch west...basically the same other than primary intake...I have a few questions after running mine for a few days now: (Please help Mr. Wood Doctor!)
1. Is there any harm in running it without the cat? Keeping it around 600* or so? The cat operation is a lot for the wife to wrap her head around just yet, so when she is home on her own it just runs like a regular stove.
2. When I am going to leave it for hours- like if I go out, or when I go to bed, is there any harm in leaving the cat engaged, knowing that it may drop down to below 500* before I get back to relight it? For example...Sunday night before bed, the stove was running at 900* with the cat (needed to be reloaded). I disengaged the cat, loaded it up and dampered it down, and went to bed (toasty warm) at 11:00. When I came down at 6:30 the next morning, the stove was around 250* with a nice bed of coals. Now yesterday, I ran the cat all afternoon (happily cooking away at 1200-1400*), loaded the stove at 11 before bed, and it was at 1250* or so when I dampered it down and went to bed, leaving the cat engaged this time. 6:45 this morning the stove was 450*+ with about the same amount of coals. Is it ok to leave the cat engaged like this? It seems like it was fine but I want to know if there is any long term damage to the cat possible.
3. When I had it apart, I disassembled, wire brushed/cleaned and reassembled the cat damper pieces with anti-seize so it worked nice and smoothly, as it was all frozen solid when I got it. The anti-seize baked off after the first fire, and now it can be a little crotchety to operate the cat damper. Should I be concerned?
Here are some pictures for your viewing pleasure!
View attachment 454804 View attachment 454805 View attachment 454806 View attachment 454807 View attachment 454808 View attachment 454809
these are meant to run with the "cat damper" closed...only to be open when loading/starting the fire...
when I start mine I have it open and I also open the ash door to help get it drafting, then close the ash door and let the wood get going good then shut the cat damper, and control fire with primary intake...secondary stay set at around 1/2- 3/4 of a turn out.
your cat is not always going to be "active" its just the way it works...when its low on wood or temp is down it wont be active...no harm in have the cat damper engaged when its not "active", if it wasn't engaged you would just send all the heat up the stack....
I should also mention my cat has been removed...was removed by previous owner, and I never felt the need to replace it...it still "reburns" even with out the cat just fine...usually just doesn't start working until it hits around 900, and I burn it 24/7 during heating season...no problems.
I would be concerned with operating it at the high end (1200+) for any extended amount of time though, as it likes to warp the baffles...1200 is the hottest I like to run mine...but I usually don't keep it there for long.
as for the cat damper...I don't know what you used for anti seize...but Loctite Nickel anti seize is good up to 2400 degrees, its nickel/graphite...if not then maybe try a graphite base lubricant?
Similar threads
- Replies
- 12
- Views
- 2K
- Replies
- 3
- Views
- 1K
- Replies
- 16
- Views
- 3K