logosol M7/Woodworker Pics/info

Arborist Forum

Help Support Arborist Forum:

This site may earn a commission from merchant affiliate links, including eBay, Amazon, and others.

weisyboy

ArboristSite Member
Joined
Nov 30, 2007
Messages
67
Reaction score
7
Location
upperbrookfield brisbane qld
gday

im a long time listner on here and was recomended to jon in hre by a good bloke im sure yuo all know by the name of BobL i know from the ausie woodworking site.

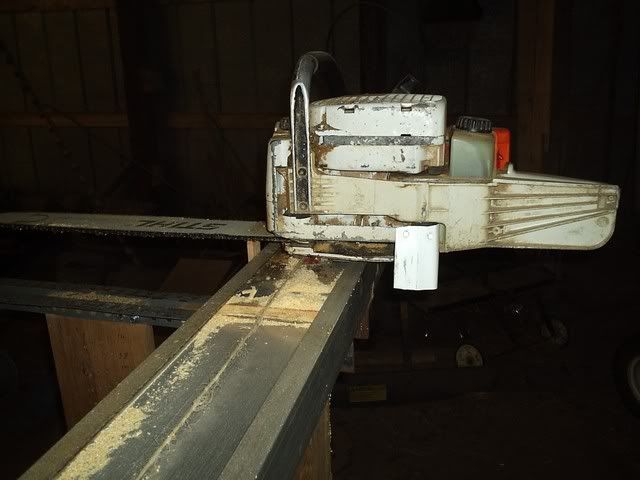
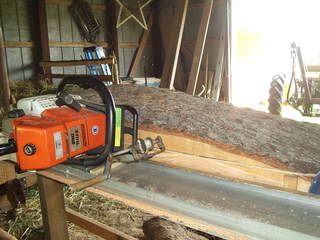
enouh about me. what i really want is some pics or detailed info on the logosol M7 and woodworkers mill. i am about to start making a mill verry similar and am yet to desighn the log lifter or saw mount parts and was wondering if one of you wonderfull blokes could get me some close up pics of the lifter and also the saw mount without the saw on.

i asume the saw mounts via the bar bolts but it is hard to tell from the pic.

thanks in advance

Carl Weiss
 
Welcome to AS... I'm sure Bobl told you that the first thing you have to do here is send at least one full shipping container of some of that unique aussie hard as rock wood to Three Sisters Woodshop here in PA. :clap:

I'm assuming you have looked through the Logosol website to get pics of their equipment and maybe glean some info there? We have more than one person here that did what you are thinking of, build a Logosol type mill, maybe they will chime in. Again, welcome.
 
you supply the container and do the shiping arangements and ill send u a container of hardwood sawdust:)

construction wont be starting for a month or so as i have to finish my tablesaw first.
 
Weisyboy, how about we get together and send them a nice old Ironbark log that came off a hard, dry stony ridge?:dizzy: That ought to sooth their apetite for Australian Hardwoods in double quick time!:cry: :censored:
Dennis Da Menace AKA Hilly Down Under.
 
sounds like sompthing i could arange im on 48 acres that is steep as bugery and ther is a few rocky ridges.

i cut some dead red ironbark last week for fire wood and when i went to splitit the newly sharpend axe just bounces off.

anyhow back to the problem at hand.

i will be begining construction in a week or so so really need more info. i have sortof worked out how to do the height adjuster. (see pic below)

attachment.php


a cable is passed threw the loopes on the legs and back to a boat winch in the middle. a seperate cable for each side woud be needed to make it rise evenly.

its all coming together:chainsaw:
 
and the saw mount/winch i can get teh roller wheel thingys from the local produce store for 50c each but i need to cut a wire loop and pin off them as they are meant for electric fencing insulators. but at that price i can aford to replace them when they get worn.

attachment.php
 
and the saw mount/winch i can get teh roller wheel thingys from the local produce store for 50c each but i need to cut a wire loop and pin off them as they are meant for electric fencing insulators. but at that price i can aford to replace them when they get worn.


Are you planning to make your mill out of metal or wood, It looks to me like you may be planning to make it out of wood. I made mine out of wood and I like it.
 
most will be wood as it is easy to work and free als verry strong, some parts will have to be steel but that is fine all i need to buy is teh 3m lenght of angle for the rails. the wheels are elecrtic fence insulators we use for fencing (my day job) some kind of plastic nice and tough and should ride smooth.
 
would this be ok?

attachment.php


i have a heap of used railway line here and if i turn it over my wheels will fit it perfictly. only problem is that the wheels would only be 75mm apart.

give us your opinion.
 
I used a 2 x 6 aluminum extrusion for my guide rail. I split a 2 x 2 aluminum channel and made a 1 x 2 angle that I fastened to the 2 x 6 extrusion on the sides to form a guide for the sled to ride in. Will post some pics for you to look at. It works very well.

MIll007a.jpg


Satmilll004.jpg
 
if the rails are free, and weight is not an issue, use two of them,with 4 wheels on each.
 
i have decided to use 1 lenght of railway as i only have one short lenght in the whole stack and i can always upgrade later if need be.

built the main frame this arvo and started mounting the rail line got to dark to keep working. but its looking good.

the esay part is done only took 2 hours.


i use sketchup to do my desighning as it is in 3d and i can view it from any angle as if it were finished and iron out any kinks.
 
Looking good Carl,

Thanks for the pix and keep them coming. Like too see how the finished unit looks. I only wonder about the the saw attach? The one pillow block is probably ok for the blade, but only gives that one point of attachment. Something further back towards the handle will offset any lateral forces. A strap or clamp of some type?:cheers:
 
Back
Top