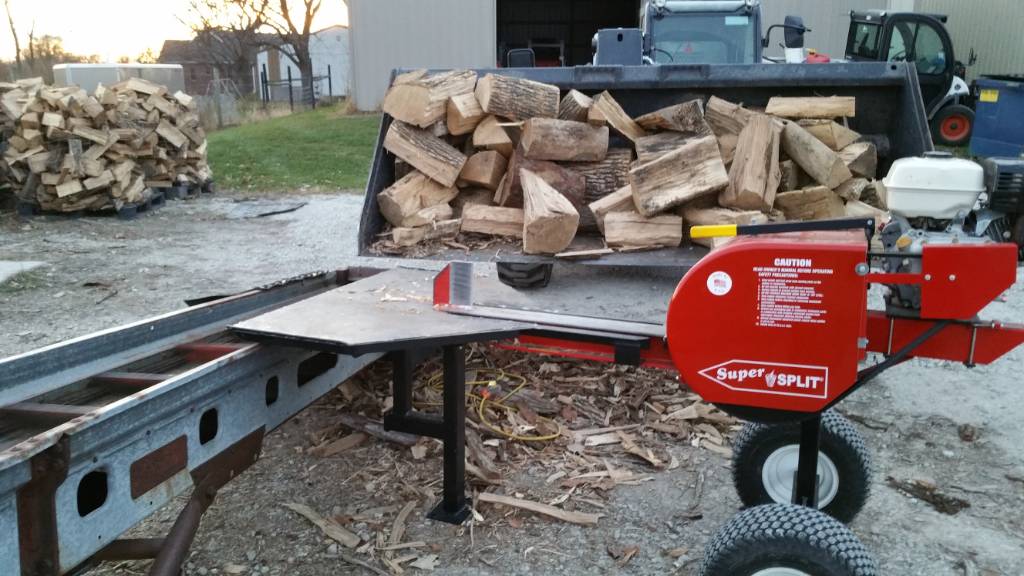
Kinetic Splitter tips and tricks

Arborist Forum

Help Support Arborist Forum:

This site may earn a commission from merchant affiliate links, including eBay, Amazon, and others.
This post is to answer Casey's question.
Relating it to the SS, is that rounds split on a kinetic splitter should be cut square on at least one end, the push plate end, and a saw bench helps do that.

The saw table is nothing special. Started with two saw horses that held three or four small logs and I hand loaded it, lifting one end of the log at a time.

This one is an extension of that. Would love to get a regular hydraulic log deck about 20' long at some point. I move mine two or three times a year with extension forks to clear bark out that builds up under it.

4" x 4" legs; 4" x 6" rails; 4" x 6" sacrificial cutting deck and front stop (these get replaced once a year or so). The front stop is extra long and has holes drilled in the top at each end for the tip of a peavey, to pull or push a log to the end stop. Sides are 3/4" ply fastened with a ton of heavy screws and fender washers. Cross pieces were 2" x 12's bolted to prevent racking. Landscape timbers on top rails are to level it out with the front, and the vertical uprights capture the log when backing out with forks. Basically piece mealed together with material on hand. The front legs are set back out of the way.

Caution....The less you put on it the better. Loading too full, logs can roll off the front of the deck when loading and when using. Keep your saws and equipment out of the way when loading. Be sure logs are not able to shift in the pile when cutting, or working around deck. Loading too full just makes for more work and creates serious hazards, which should be apparent in some of these photos. I also use plastic wedges when finishing a cut if binding occurs. This too can also be dangerous.IMG_3743.jpgIMG_3043.jpgIMG_3487.jpgIMG_3488.jpgIMG_4018.jpgIMG_3895.jpgIMG_3856.jpg
 
Thanks Crane. Right now I just use the tractor and forks to buck but it's painfully slow and inefficient. I like the simplicity of what you've done and it looks to be simplified functionality.


Sent from a field
 
I've found the SuperSplit table a bit crowded at times as the rounds get bigger. Standing one half on end seems to give more space around the wedge. Simple technique, don't know why I have not done this sooner. It works great, to a point, and then a bench or table works better to set larger half round pieces.
Also, I have been loading a couple customer trucks with the conveyor. (related to this thread in that I have to move the SuperSplit first) In my case that means I have to move the conveyor, which has been difficult because of the heavy tongue weight. Raising the tail end full height helps, the wheels move toward the hitch, and that is why I converted it to a hydraulic lift. Several times I've placed two big rounds and run them up the belt for counter weight to save my back also. Tongue weight is maybe 150 pounds, I'm guessing. Two can easily lift it without strain. Now I have a tongue and jack set-up that works good when setting up or moving it back to the Posch alone. I bought a jack and had a 2 1/2" to 2" receiver adapter welded to it to slip on the tongue. A bolt on jack would not work because the removable tongue is mounted very low.IMG_5110.jpgIMG_5111.jpgIMG_5104.jpgIMG_5103.jpg
 
Couple of very simple mods to my SS. Added the electric motor for use around the shop and indoors as needed in the winter or foul weather. The low noise is very much appreciated and it's very easy to swap the gas motor back on if one cared to take to the field. After that I added a rotating caster to the front leg. Makes it pretty easy to roll around the drive. I have towed it behind the lawn tractor for short stints but a different style caster would be required if you intended to put any kind of mileage on it. By pure luck the height of the table meets perfectly the gate of my half ton truck.Screenshot 2017-09-11 at 4.21.26 PM.png
 
I'm considering having a new table fabricated for the SS. Something about 4" wider from the end of the flare to the end of the table, on both sides to give room for bigger half splits to sit while chunking up the other half. Maybe 4" longer than the present table, but same width as it is presently, to fit the conveyor pan. And also, 1/4" lower to accommodate 1/4" uhmwpe (the slippery stuff). None of these changes alone would be worth it, but combined could make a pleasant difference, especially the uhmwpe. I think simply adding it on top of the table as-is would probably get snagged on the leading edge and ripped off.
Seems like someone already did a bigger table last year.

Edit: I'm right at fifty cords so far this year, and as I do more, even the little things matter. I have an old 3" diameter candle I sometimes wax the table with. Makes a huge difference but doesn't last long so I've given up on it. Makes me think uhmwpe would really be worth it for the next fifty cord.
 
Checked the SS table out this morning. It looks like it could be lowered almost a 1/2". At present the legs bolt to the bottom of the beam. The same bolts mount the table on the wedge end, and that mount sits on the top of the bottom flange. The front of the table also mounts to the top of the bottom flange. Moving it to the bottom of the flange would lower it 3/8" to 1/2" without any other apparent changes. Which is perfect for HDPE, uhmwpe, or something slippery.
 
I am very happy with my xl table for SS.

There is a thread somewhere on here.

88e7ddab36ed824fd071787f3d37f4f7.jpg


Sent from my SM-N950U using Tapatalk


2f7d1f79ca4ad1edf58725ed26cba88a.jpg
 
Seen this little guy at the local Lowes yesterday.0912171720.jpg

I thought it might make a pretty good kindling maker for setting up in the basement. $450 price tag, made me buy a new file for my little hatchett instead. If Ii was into making and selling bundles, I might reconsider. I could run everything thru my 6way hyd, and then set that little puppy up for resplits.
 
panolo:
The cutting bench has been though lots of changes. I'll try and get some up to date photos of what's out there now. It works pretty good. Would still love a live deck, but this works and is affordable. One on each side of the SuperSplit has really helped balance the physical part. Last year I could feel it knotting up one side of my body in my shoulder and neck. Now, with two cut tables I can do a cord without much effort. Still takes time though.

There are dangers using a cut table.
-One is rolling, shifting, sliding logs and staying out of their way. Sometimes one rolls off the front of the table and there is not a great deal of room there. They also roll off each other, which is less predictable.
-Also the handle of a cant hook or peavy is now much higher, and can become easily energized, and dangerous to your upper body.
-Another problem is pinching the saw bar. I cut until the kerf starts to close, and then place a plastic felling wedge in the kerf, and finish the cut. I have had a wedge pop me in the nose. Never saw it coming it was so quick. I still wedge, but I keep my nose off to the side when doing so. (I thought I was doing that before I got popped good) Almost every cut needs wedged. Wear eye protection...for real! The wedges get bumped a lot, dropping on the chain after the cut. Generally they go away from you, or summersault and spin. But they get fish hooks of plastic on them also from the cutters.
-With sawing at waist height, kick backs are closer to the vital parts of your body. Don't work when tired, or move to something else less dangerous.
-Chips build up quickly, so you will need a scoop shovel to keep the work area cleared out. I'm guessing 2-3" deep per cord in front of the cut table.

I would say if you have kids, don't build a cut table. There is a danger zone at least 8' in all directions. And kids mimic their parents. Keep it safe for them, and that includes not letting them see you doing anything 'questionable' that they might be tempted to copy, to be like you. The cut table has been a useful tool, but it's a bit like driving a car in a parking lot. Things can change quickly if your not paying attention.
 
Log deck. There is a bump stop to index the log to the cut marks on the front of the bench. There are a series of holes on each end for the tip of the peavy for pushing or pulling the log to the stop. The front 4" x 6" on edge acts as a stop as well. The second one I built has holes in the side to lift it with fork extensions tocsin underneath it and move out of the way when the log trucks deliver. The first photo shows the edge of a table to the right, where I set the saw when splitting (also third picture).IMG_5131.jpgIMG_5132.jpgIMG_5133.jpgIMG_5134.jpgIMG_5135.jpgIMG_5136.jpgIMG_5137.jpg
 
Checked the SS table out this morning. It looks like it could be lowered almost a 1/2". At present the legs bolt to the bottom of the beam. The same bolts mount the table on the wedge end, and that mount sits on the top of the bottom flange. The front of the table also mounts to the top of the bottom flange. Moving it to the bottom of the flange would lower it 3/8" to 1/2" without any other apparent changes. Which is perfect for HDPE, uhmwpe, or something slippery.
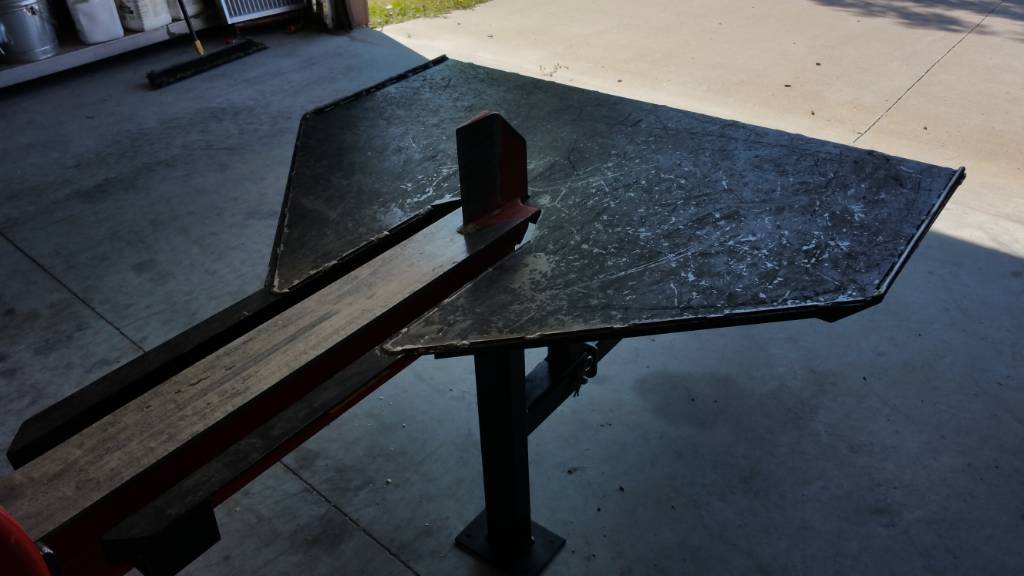
Whatever you choose HMW, UHMW, or HDPE make sure it's UV treated. You will only need HMW, It is very similar too HOME just a bit softer, normally white isn't UV treated but other colours will be. And HE will run you a bit cheaper

Sent from my SM-J320W8 using Tapatalk
 
I question whether the material is UV treated. It is 'virgin natural', and very slippery. Kind of a full day tomorrow but hope to get to it by the end of the day. Get it laid out, cut and maybe fit. Orders are picking up. Need to pull the conveyor out again to load a truck first thing. The new jack set-up for the conveyor works well.
 
Yet to be tested...and I can't wait to resplit on this!
Thanks Kiwibro for the idea.
Don't know how you fastened yours but this was pretty easy. I dropped the table 1/2" by remounting it under the beam vs on top of the beams lower flange. Added 0.500 UHMW and it came out flush. All edges were quite sharp and eased them with a 1/8" round over router bit.IMG_5147.jpgIMG_5149.jpgIMG_5152.jpgIMG_5153.jpgIMG_5154.jpg IMG_5162.jpgIMG_5163.jpg
 
ALSO.....

I realize reading the a manual is not a manly thing to do, and I have a tendency to do so AFTER I have put everything together and started using something.

Ive said it and I have seen many other Super Split owners say the same thing... "it splits even at half throttle."

Well, the owners manual says the maximum flywheel speed should not exceed 310rpm which equals 3000 rpm on the motor. I put a tach/hour meter on mine and 3000 rpm is just over half throttle. So that makes sense.
Reading your post reminds me of Hamilton Marine Hydraulic Steering Gear owners/ operators manual on the first page in red print," You have assembled & fitted this gear & it doesn't work correctly so now strip it down read CAREFULLY the assembly instructions & reassemble correctly it will the work /perform as it should" :clap:
 
Back
Top