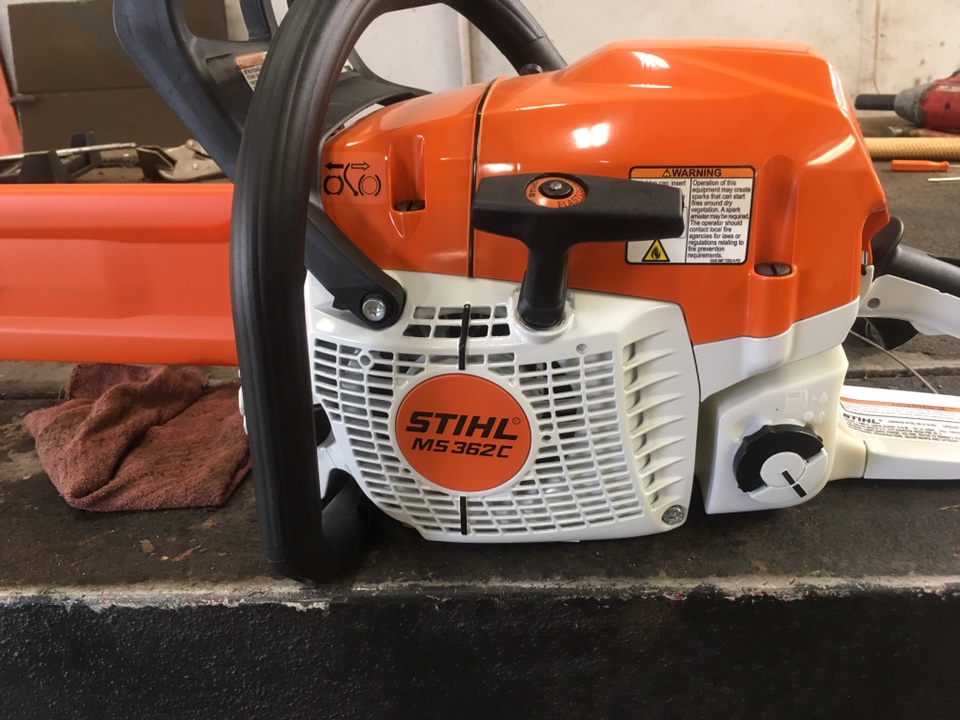
I wonder what the squish clearance is in these saws? The 362 is the lowest comp Stihl I own.
You are using an out of date browser. It may not display this or other websites correctly.
You should upgrade or use an alternative browser.
You should upgrade or use an alternative browser.
Low compression on my new Stihl MS362
- Thread starter James Sawyer
- Start date


Help Support Arborist Forum:
This site may earn a commission from merchant affiliate
links, including eBay, Amazon, and others.
- Status
- Not open for further replies.
James Sawyer
ArboristSite Operative
My 360 consistently 155-160psi... so is my 460, so is my 260.... 110 is low ! If they are trying to say “stihl doesn’t specify their compression” that may be true... however 110psi is NOT normal and a comment like that (without being there to see the entire interaction) is the runaround.... p.s tach idea is awesome! Can you post details on that?
yes...sure I can post something, your the only one who has asked. The tach. was "Trail Tech 743-A00 Orange TTO Digital Tach Hour Meter Gauge Surface Mount" I purchased on Amazon $35 and has good refresh rate. " https://www.amazon.com/gp/product/B07142Q3BL/ref=ppx_yo_dt_b_asin_title_o01_s00?ie=UTF8&psc=1 ". This was not my original idea I saw this on someone else saw but couldn't find anything about it or how to go about recessing the tach. I believe the saw was a MS461 or MS660 with the two piece cover. Newer saw like mine installation or any other I guess is to place the tach where it won't interfere with the carb or the filter. I took some measurement, placed some masking tape under the cover and marked out references. Masking taped the Top of the cover and transferred the location of the tach. to the top. I put masking tape around the bottom sides of the tach so as not to leave perm. Marker ink on the tach. I then used a thin single film double sided sticky tape and stuck the tach down in the desired location and checked square. The double sided tape has to hold the tach solid. I originally tried a silicon base double sided tape because it peel off easier but it didn't hold the tach well enough. The tach would move slightly when I trace around the tach. and I had to peel of the masking tape on top and start over. I would drill the tach mounting locations with a 3mm drill bit, the bore are 4mm. you might want to start with the 4mm to get a slight center location. The 3mm drill could walk, these ear there not a lot of material. Once the outside of the tach is trace well, remove the tach. The tach. has some recess half moons areas on its top, this is where I had to make ears to hold the tach to the cover. I placed some washer on the trace marks so I can mark this material I wanted to leave. Here where I when thru the learning curve ...where it would be most helpful to other. The plastic covers are thick plastic and they are surprisingly strong and machining the plastic accurately isn't easy. Just like porting the direction etc of the cutter matters and the cutter wants to jump. Plus it plastic I tried all kinds of burrs ,double cuts, diamonds, dermal bits, Sand paper etc. If you can make these work to a precision level you got my nod...hats off to you...you have some skills. So if you look close to mine it wasn't perfect because this is tough to do with cutters. Here is what I would suggest and in the end what I did... use a cutter to remove most of the plastic out near the finish outline. Then switch to some files and slowly bring this out to finish line but not quite. Again a mistake I made was I checked the tach to the opening from the top, If I was to do this again I would check the cutout with the tach from the bottom like it going to mount. The tach is curved on the top as is the cover...makes a different. Mount the tach...your should come out much better than mine. Since mine wasn't perfect I took some JB weld mixed it and put it in a syringe with a 18 gauge tip and when around the tach inside the cover and then painted around the tach. The plastic like I said is good and strong you could get away without the JB. How well this hold up I don't know I have .3 hours on this saw. The Tach. has the time like a clock, the instant RPM, the Max RPM and hour meter, there a button on the top of the tach to change screen. The tach is pretty nice. The tach comes with a long lead and its inductive meaning the lead just has to be near the spark plug wire. When I screwed the tach to the cover I install some plastic wire loops to hold the extra wire I wanted to keep. I took a copper alligator clip and modified it to clamp around the spark plug making sure it smooth and it wouldn't damage the rubber spark plug cable. Mount the tach lead to the clamp. I'm going to solder mine but for now it just used the screw that came with the clip. I spiral wrapped the extra wire and place in the cable loops leaving a short lead between the extra wire and clip. You could for go the extra wire but I wasn't sure how all this was going to hold up and I want the extra wire just encase. So when you have to remove the cover just unclip the tach lead. If you want to do this and you send me your address i'll send you a copper alligator clip they might be hard to find. The shop has my saw now and I didn't take pictures or I'd post them. Hope this helps...wish I could have found something on this prior to mine, it sure would have came out much better but as it is its not bad. That tach not coming out and its strong didn't weaken the cover at all.
r1stgei
ArboristSite Operative
yes...sure I can post something, your the only one who has asked. The tach. was "Trail Tech 743-A00 Orange TTO Digital Tach Hour Meter Gauge Surface Mount" I purchased on Amazon $35 and has good refresh rate. " https://www.amazon.com/gp/product/B07142Q3BL/ref=ppx_yo_dt_b_asin_title_o01_s00?ie=UTF8&psc=1 ". This was not my original idea I saw this on someone else saw but couldn't find anything about it or how to go about recessing the tach. I believe the saw was a MS461 or MS660 with the two piece cover. Newer saw like mine installation or any other I guess is to place the tach where it won't interfere with the carb or the filter. I took some measurement, placed some masking tape under the cover and marked out references. Masking taped the Top of the cover and transferred the location of the tach. to the top. I put masking tape around the bottom sides of the tach so as not to leave perm. Marker ink on the tach. I then used a thin single film double sided sticky tape and stuck the tach down in the desired location and checked square. The double sided tape has to hold the tach solid. I originally tried a silicon base double sided tape because it peel off easier but it didn't hold the tach well enough. The tach would move slightly when I trace around the tach. and I had to peel of the masking tape on top and start over. I would drill the tach mounting locations with a 3mm drill bit, the bore are 4mm. you might want to start with the 4mm to get a slight center location. The 3mm drill could walk, these ear there not a lot of material. Once the outside of the tach is trace well, remove the tach. The tach. has some recess half moons areas on its top, this is where I had to make ears to hold the tach to the cover. I placed some washer on the trace marks so I can mark this material I wanted to leave. Here where I when thru the learning curve ...where it would be most helpful to other. The plastic covers are thick plastic and they are surprisingly strong and machining the plastic accurately isn't easy. Just like porting the direction etc of the cutter matters and the cutter wants to jump. Plus it plastic I tried all kinds of burrs ,double cuts, diamonds, dermal bits, Sand paper etc. If you can make these work to a precision level you got my nod...hats off to you...you have some skills. So if you look close to mine it wasn't perfect because this is tough to do with cutters. Here is what I would suggest and in the end what I did... use a cutter to remove most of the plastic out near the finish outline. Then switch to some files and slowly bring this out to finish line but not quite. Again a mistake I made was I checked the tach to the opening from the top, If I was to do this again I would check the cutout with the tach from the bottom like it going to mount. The tach is curved on the top as is the cover...makes a different. Mount the tach...your should come out much better than mine. Since mine wasn't perfect I took some JB weld mixed it and put it in a syringe with a 18 gauge tip and when around the tach inside the cover and then painted around the tach. The plastic like I said is good and strong you could get away without the JB. How well this hold up I don't know I have .3 hours on this saw. The Tach. has the time like a clock, the instant RPM, the Max RPM and hour meter, there a button on the top of the tach to change screen. The tach is pretty nice. The tach comes with a long lead and its inductive meaning the lead just has to be near the spark plug wire. When I screwed the tach to the cover I install some plastic wire loops to hold the extra wire I wanted to keep. I took a copper alligator clip and modified it to clamp around the spark plug making sure it smooth and it wouldn't damage the rubber spark plug cable. Mount the tach lead to the clamp. I'm going to solder mine but for now it just used the screw that came with the clip. I spiral wrapped the extra wire and place in the cable loops leaving a short lead between the extra wire and clip. You could for go the extra wire but I wasn't sure how all this was going to hold up and I want the extra wire just encase. So when you have to remove the cover just unclip the tach lead. If you want to do this and you send me your address i'll send you a copper alligator clip they might be hard to find. The shop has my saw now and I didn't take pictures or I'd post them. Hope this helps...wish I could have found something on this prior to mine, it sure would have came out much better but as it is its not bad. That tach not coming out and its strong didn't weaken the cover at all.
Awesome! Thank you sir! It looks great.
James Sawyer
ArboristSite Operative
We had a family dinner yesterday and I was talking to my nephew about my MS362 and this warranty repair. He's never heard of anyone having a brand new Stihl needing warranty repair. So, I ran a search on this site and came up with nothing. Has anyone had experience with Stihl warranty...just wondering what to expect?
Yes a good dealer will fix it and a bad dealer will BS you! Thats why I drive 50 miles each way instead of one mile! And it is worth it! The azzholes around here wont even let me Keep the box the saws comes in!We had a family dinner yesterday and I was talking to my nephew about my MS362 and this warranty repair. He's never heard of anyone having a brand new Stihl needing warranty repair. So, I ran a search on this site and came up with nothing. Has anyone had experience with Stihl warranty...just wondering what to expect?
I had one MS440 that had 3 things go wrong with it in its first 3 - months of use, Stihl denied every one but I knew it really was the dealer I was buying from at that time so I cut ties and it went under within a year after. Other dealers would have fought or pushed to have these things looked after but if a dealer would rather shrug off getting things looked after they are not worth buying from. These days I don`t count on warranty work, very seldom ever needed it and I have been running saws since the early 60`s, if I can repair it myself it is more expedient for me to do it. Never had a catastrophic failure on any saw to date, changing a carb or module don`t bother me a bit.
The only saw I've needed warranty support on was a Poulan Super DA I bought new in 1978.We had a family dinner yesterday and I was talking to my nephew about my MS362 and this warranty repair. He's never heard of anyone having a brand new Stihl needing warranty repair. So, I ran a search on this site and came up with nothing. Has anyone had experience with Stihl warranty...just wondering what to expect?
When my saws are brand new I run extra two stroke oil at first so it’s well lubed during break in. At first start up with any new or rebuilt saw I leave the choke on a few seconds longer at every start up. The clear it then cut.
Interesting point... without starting an oil debate I will mention during assembly and first few tanks on a saw a good semi or full synthetic oil can prevent ring seating it seems but all just speculation and applied theories.
James Sawyer
ArboristSite Operative
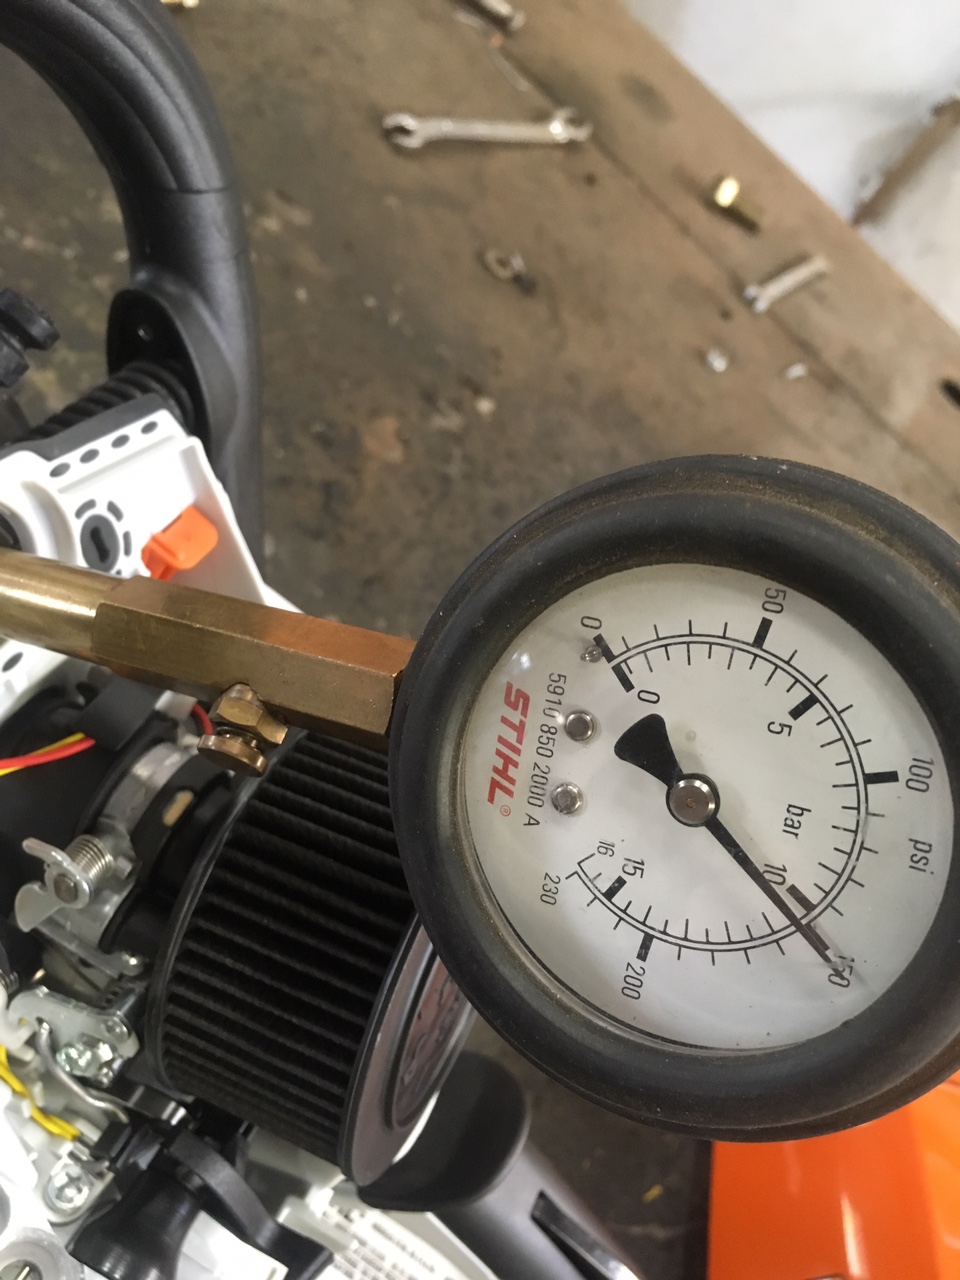
I just hope Stihl take care of it, I'm just sick about the whole thing. I have $1037 in the saw, with the light bar, the tach, the 462 oiler, the dog and the purchase of the saw. If the warranty isn't good then I'll have another $120 for Meteor cylinder/piston, I'm not sure what OEM cylinder/piston would be? I know a OEM kit for my O34 was $320 which is the reason I bought another saw. Who wants a new saw that you just never trust, who to say it doesn't have other problems. I'm sure its an issue with cylinder but I'm still worried I'm might be stuck with the problem. The saw idles and revs fine, when I ran it just didn't have the power. I'll stop at the shop at the end of the week hope for the best see what going to happen with this.
James Sawyer
ArboristSite Operative
I had little time this morning so I decided to do a little research on Stihl Warranty and Stihl chainsaw FAQ... Hope I'm not hosed on this saw, now I'm worried!

Pull the damn muffler and look for your self and post up some clear pics for all of us to look at. I wouldn't count on a dealer for anything unless you have a good relationship with them. I suspect something is wrong with that low number new!Also I say you should spray soapy water on the compression release and spark plug while pull it over.I had little time this morning so I decided to do a little research on Stihl Warranty and Stihl chainsaw FAQ... Hope I'm not hosed on this saw, now I'm worried!
View attachment 725597
James Sawyer
ArboristSite Operative
Pull the damn muffler and look for your self and post up some clear pics for all of us to look at. I wouldn't count on a dealer for anything unless you have a good relationship with them. I suspect something is wrong with that low number new!Also I say you should spray soapy water on the compression release and spark plug while pull it over.
Your right... I wish I ran my camera inside the cylinder or pulled the muffler cover of or insisted the 1st shop do so. But...I didn't and I was so surprised the 2nd shop even said they would take care of it and I ran out as quick as I could and got my saw. The 1st shop I was on my lunch hours so not lot time, the 2nd shop I just stop by on my way home. I was just taken by surprise ...they took my saw and handed me a ticket in matter of minutes. I been thinking about this all day , I had to go to town anyway, drove few miles out my way just to see if they even ran compression test on brand new saw and totally surprised me they knew what kind of number they should have. This has taught me one thing I'll never buy new saw without running a compression test...the 2nd shop said they've seen bad batch of saw with low compression before they were not surprised not concern about having to deal with my saw...just took it and gave me a ticket...so I have some hope. Thinking about this maybe I'll stop on my way home and see what they found or at least check on it.
X 66 Stang347 X
ArboristSite Operative
I just pulled a new 362 off the shelf and it’s got 150psi. Are they using the right 10mm gauge?
That`s right where they should be , never ever heard of 110 being normal and nothing to worry about.
Aha you just reminded me my first attempt to do a test with that small plug did the same thing it turned out to be the wrong adapter OP test other saws or pruners whatever and cross check that gauges accuracy! I ordered a Snap on adapter hose and even that was wrong then I switched the Schrader valve in that and it was 160 PSI!I just pulled a new 362 off the shelf and it’s got 150psi. Are they using the right 10mm gauge?
Derrick Sawyer
ArboristSite Guru
Well at least youll find out which dealer to go to in the future, probably the most important thing moving forward. A good one will make it right and earn your business forever. Pretty obvious you got a dud. I do agree on checking the spark plug and especially the decomp valve, i've had bad ones over the years that roasted one of my builds. After pressurizing and spraying soapy water i could see it coming out the stem. IF it was just squish, that would have to be very high i imagine. Even with a perfect saw, they do take a while to break in now, i too have an 034 super and when i ran 362 for the first time it felt super weak. The 034s is about as untamed and unrefined as any small saw i've ever ran. Good luck
I'm still not convinced the compression tests are accurate! convince me cross check the accuracy with another machine!
Derrick Sawyer
ArboristSite Guru
Even with him and the dealer running tests with different gauges? its unlikely but still a good idea, i would do the same and find my yank your shoulder out non-decomp 066 and see what it reads. You don't even a gauge with some saws, just the hurt your arm test.
Test another machine and you have a real good idea if its the gauge or the saw! Let me see if I can find a thread about this that i started. Good reading in there. A simple thing like a Schrader valve cant screw it up bad!Even with him and the dealer running tests with different gauges? its unlikely but still a good idea, i would do the same and find my yank your shoulder out non-decomp 066 and see what it reads. You don't even a gauge with some saws, just the hurt your arm test.
X 66 Stang347 X
ArboristSite Operative
That’s why I don’t like giving compression #’s on tickets. Only when asked.
Gauges can fail and give a false reading at any time. Or different gauges used on test. I bet we all use a different brand gauge.
It could be off by only 30 psi.
That’s enough to say oh shît my engines toast.
If in doubt pull the muffler.
Gauges can fail and give a false reading at any time. Or different gauges used on test. I bet we all use a different brand gauge.
It could be off by only 30 psi.
That’s enough to say oh shît my engines toast.
If in doubt pull the muffler.
- Status
- Not open for further replies.