511A Grinder - Improvements / Tweaks?

Arborist Forum

Help Support Arborist Forum:

This site may earn a commission from merchant affiliate links, including eBay, Amazon, and others.
The second gen hydraulic clamp is the way to go, all of the leakge issues have supposedly been solved. Unfortunately the 511ax hydraulic is way overpriced, You can get the tecomec for $399 and its a quality setup. My old 511a and my newer one both have the same weak vises, one of them has been upgraded to the stihl cam setup but it wears out fast when your doing 30-100 chains a week. Best thing I ever did was set up 1 grinder with the 1/8 wheel and another with the 3/16 wheel and a third in the middle for doing rakers. The raker grinder is an old foley unit but it works great for rakers. I've heard from other shops that the hydraulic vise will save you 20-30% of your time.

Foot pedal is very akward to use and doesn't give good feedback.
 
I like having hand controll when grinding, just taking small ticks when cutting the tooth.

Marking the first tooth with a red marker helps show where your cutting.


DSC_0018-2.jpg


DSC_0021-2.jpg


.
 
Last edited:
Marking the first tooth with a red marker helps show where your cutting.

I try to keep a marker or lumber crayon with my grinding wheels to mark the first cutter. Sometimes I just place a twist tie around one of the tie straps to mark it - it passes thought without too much trouble, and is hard to miss.

Philbert
 
The manufacturer actually sells a foot pedal option for the grinder. There is a cable that runs up through the hole in the base, and through the holes that I used to thread the boot lace. It seemed like an interesting idea, and could speed things up, but I don't think that I could get the same feel and finesse that I can by hand. Might try it sometime with cord, just to see.

Anyone try the foot pedal?

The self-clamping (hydraulic) vise also seems like a good idea. Some A.S. members seem to really like it. Others said that they had leaks and trouble getting parts. This might be something that a handy guy could rig up using a foot pedal and some hydraulic mountain bike brake parts, or maybe a small pneumatic cylinder?

Philbert

I have often thought of building something like this.... anyone have pics of a their setup?

Thanks!

Dan
 
I have an old Foley 308 with the foot pedal. I took it off. Didn't work for me. For the 308 guys: buy your wheels from Foley they are cheaper there than anywhere I have found.
Shep
 
Technique Tip

This is a technique tip provided by Galde in another thread, that bears re-posting here.

I mentioned that I would like the vise on this grinder to hold the cutters tighter, so that they moved and chattered less while being ground. He noted that he uses an improvised tool to press each cutter down tight against the vise, before locking it in place. Tried it today (with my finger) and it worked surprisingly well. Held the cutters rock solid.

Pulling the chain tight against the chain positioning dog, I realized that the dog tends to lift up the back of each cutter, and I was locking it in this lifted position. Pressing down on the rear of each cutter just before locking made a big difference. Your improvised tool could just be a short dowel rod if you don't want to use your finger. Should get a smoother and more consistent grind. Note that your top plate angles may be a a degree or two different, due to the changed angle of each cutter.

Philbert
 
Video

Here's a YouTube video on using an Oregon grinder, posted by an Australian saw shop:


How to Sharpen Chain Saw Chains, Oregon Chainsaw Sharpening Guide - YouTube


A few things are different than the manual:

- This video indicates to take the grinding wheel down to the bottom of the gullet, while the printed manual says to only take it down until the radius of the shaped wheel curve passes the top edge of the cutter (about as far as a file would go).

- This video also says to shape the wide wheel to match the curve of the depth gauges, which again, is slightly different than the manual.

But a clear video, which would be good for someone new to these grinders. It often helps to see someone do something first.

Philbert
 
Great ideas. Love to see some photos!

A few years back someone posted instructions for making the motor reversible - anybody got it?

Somebody suggested that if they increased the range of motion for the head tilt and vise, you could grind both Left and Right cutters the 'right way' without a reversing motor, and the guarding problems associated with that.

Philbert

That would have been me. It is not complicated, and makes a bunch of difference. PM me, and I can find the info around here somewhere.
 
This is a technique tip provided by Galde in another thread, that bears re-posting here.

I mentioned that I would like the vise on this grinder to hold the cutters tighter, so that they moved and chattered less while being ground. He noted that he uses an improvised tool to press each cutter down tight against the vise, before locking it in place. Tried it today (with my finger) and it worked surprisingly well. Held the cutters rock solid.

Pulling the chain tight against the chain positioning dog, I realized that the dog tends to lift up the back of each cutter, and I was locking it in this lifted position. Pressing down on the rear of each cutter just before locking made a big difference. Your improvised tool could just be a short dowel rod if you don't want to use your finger. Should get a smoother and more consistent grind. Note that your top plate angles may be a a degree or two different, due to the changed angle of each cutter.

Philbert


I had that problem with the vice not holding the cutters tight. I replaced the spacers between the vice halfs with thinner washers, now the vice grips the cutters tight.


.
 
I replaced the spacers between the vice halfs with thinner washers, now the vice grips the cutters tight.

That's a mod worth looking into. Did you see improvements on all gauges of chain, or more noticeable on the thinner stuff?

Anyone using the 511AX (different vise) have issues with how tight the drive links are held?

One of the things that struck me with pressing down the rear of each cutter before locking the vise, is that you probably end up with more consistent angles as well. Might not be enough to make a noticeable difference in cutting, but enough to get the attention of those guys using a DAF (digital angle finder) to set their rakers!

Philbert
 
Here is an improvement I would like them to make: replace the large knobs with 'T'-handles. I have small hands and sometimes find them hard to grip, loosen, and tighten.

FYI - I spent some time searching for these, and they have been surprisingly hard to find.

The threads on these bolts are metric: one is 10mm x 1.5 pitch, and one is 10mm x 1.00 pitch. I can get nuts this size from the little drawers in my local hardware store, but could not find 'T' handles with these threads, after rooting around for some time on the Internet. Might have to improvise with the hardware store nuts.

The newer 511AX model appears to use a quick release lever in the back (head tilt) instead of a star knob.

Philbert
 
Fl136

I have an old Tecomec with reversing motor. I wouldn't have one without reversing capability.
Some of my tweaks:
1) I taped tygon fuel line lengths to the top casting to hold the allen wrenches for the shield and grinding wheel so they are always handy.
2) The head tilt is always either at true vertical or at 30 deg from vertical so I clamped stops at these angles so I don't have to strain my neck to read the scale on the back side every time.
3) By calibrating the depth adjustment (my grinding wheel moves 0.005" for each groove on the knob) and attaching a pointer on the lower friction-adjusting knob, I can uniformly grind all of the depth gauges to within a couple thousandths of the desired depth. I locate zero by running the adjusting knob upward to permit the wheel (stopped, of course) to rest on the top edge of the reference tooth (after sharpening ) and then run the adjuster down until the wheel just picks up and clears the tooth while applying the same downward pressure applied when finishing the actual grind.
4) I attached a flexible gooseneck lamp with a 100-watt brightness CF bulb for illumination. The built in lamp in the newer models is worthless since it is on only while the motor is on.
5) After wearing nearly through the vise rail with the cam clamp, I added a replacable wear plate held in place by the Allen head bolts holding the vise together.
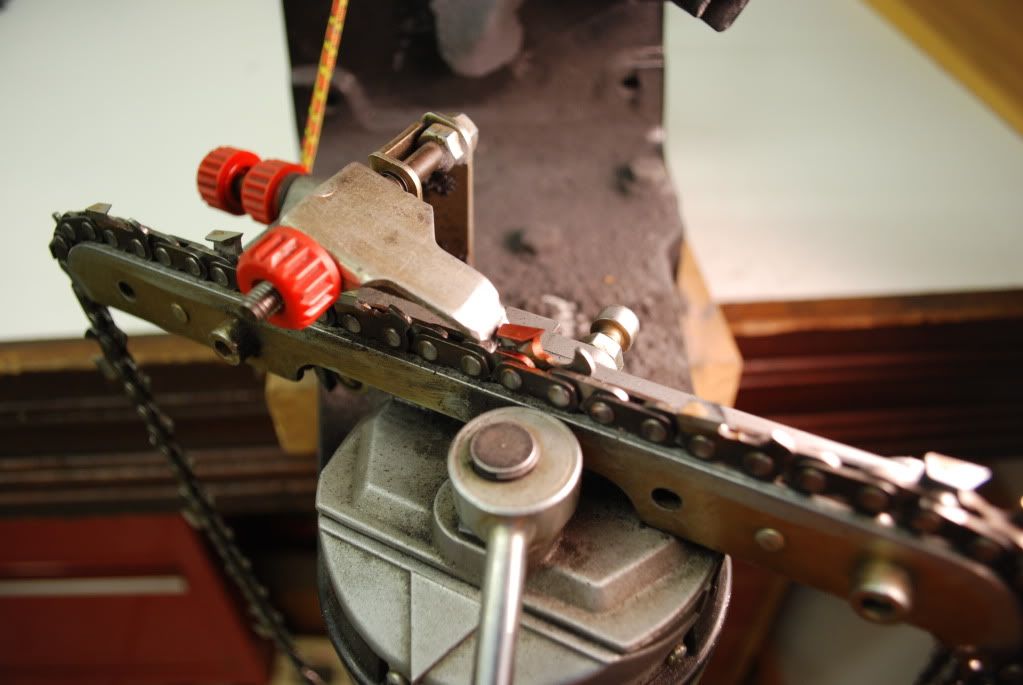
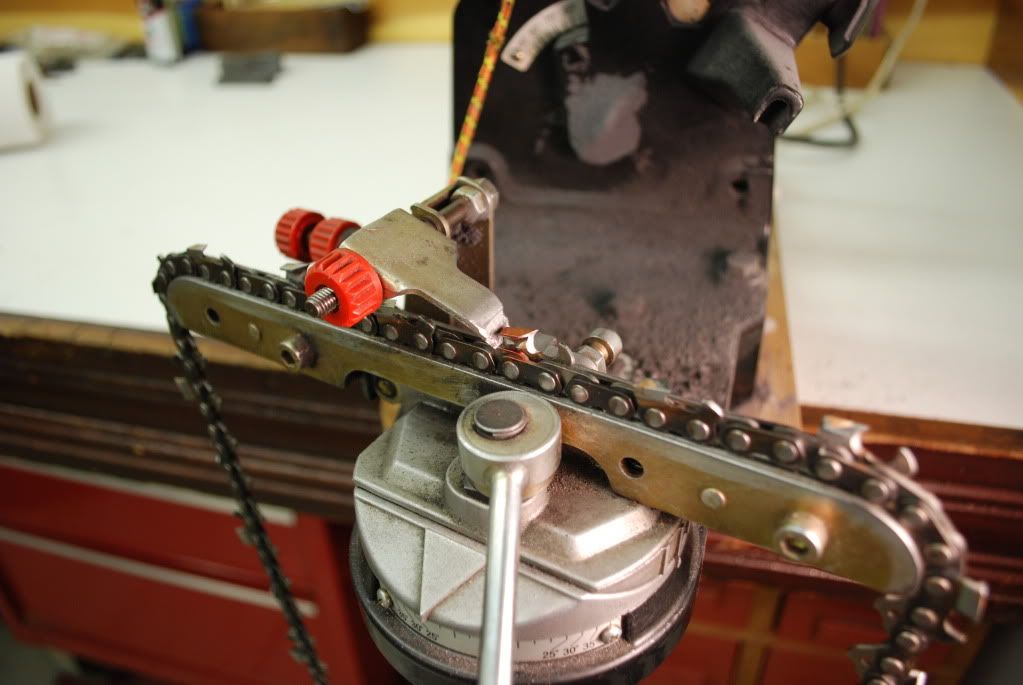
6) To avoid having to readjust the tooth pawl when changing tooth sides, I use a short length of 1/4" fuel hose with a slit in the side to move the pawl back and forth. The slit hose is alternately pushing the pawl rearward or parked on the open side of the pawl bolt.
7) When grinding I use a tool to further stabilize the tooth against moving. The chain vise grips the drive links only, and with well-worn chains there can be wiggle room for the tooth. The tool is like an awl with a slight curl at the tip. I use it to bottom the drive links firmly while clamping, and I hold the tool tip firmly on the tooth while grinding.
8) I made a radial reference mark on the arbor where the wheels mount. I made radial reference marks on all the wheels, with matching marks on both sides of each wheel. When I mount a wheel, I align the marks pointing upward while pulling downward on the wheel while tightening the clamping bolt. This reduces the vibration caused by variations in wheel balance and slop in the arbor hole. If a wheel is smooth running when removed, it can be remounted and it will still run smooth.
8) I have experimented with forced air cooling, but I still don't have the right flexible nozzle rigged up.
9) The wheels I use are vitrified (mole-mab), Stihl diamond, and CBN. Each type has its fit.
10) The grinder is mounted on a length of lumber that can be clamped anywhere as needed.

I have never found that much use for the reverse function,but I use a brason wheel , which is well worth the money.
 
Thought I had posted these tips before: Might have been in another, related thread.

Good lighting is important for seeing the edges. I found that a small cosmetic style mirror is really helpful for looking at the other side of the cutters.

P4222370.jpg

I found a Rubbermaid container that was just the right size to hold all of my wheels (separated by thin sheets of closed cell foam) and small tools I use when grinding (marker, twist ties, wheel gauge, hex wrenches, etc.). Unfortunately, they changed the size of these sandwich containers and the new ones are too small for the wheels! But you get the idea.

P4222375.jpg

Philbert
 
Last edited:
UPDATE - I have tried to replace some of the photos that were lost, and also wanted to give this thread a Bump.

Here is a wheel selection guide from Tecomec - hard to find the non-standard wheels, but they could be a 'tweak' as well (aside from CBN wheels):
Tecomec Wheels.png


Philbert
 
Back
Top