Electric Chainsaw Mill Build

Arborist Forum

Help Support Arborist Forum:

This site may earn a commission from merchant affiliate links, including eBay, Amazon, and others.
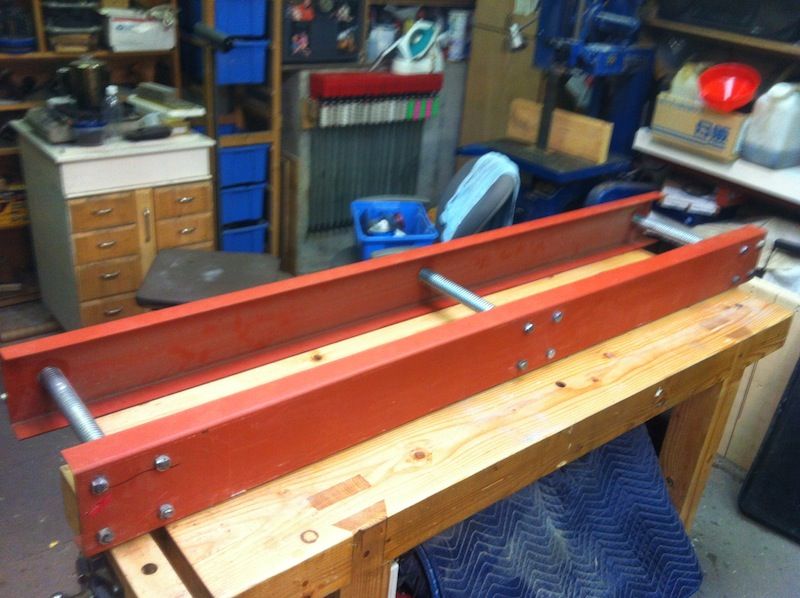
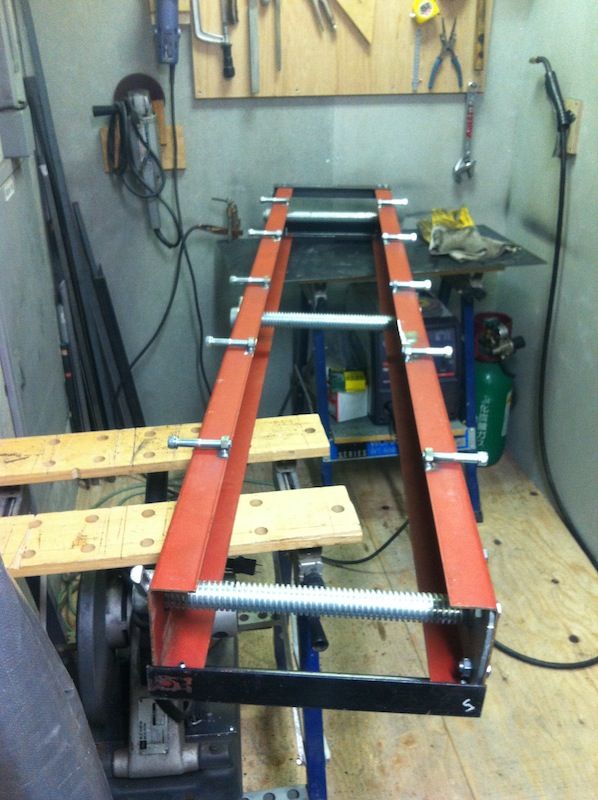
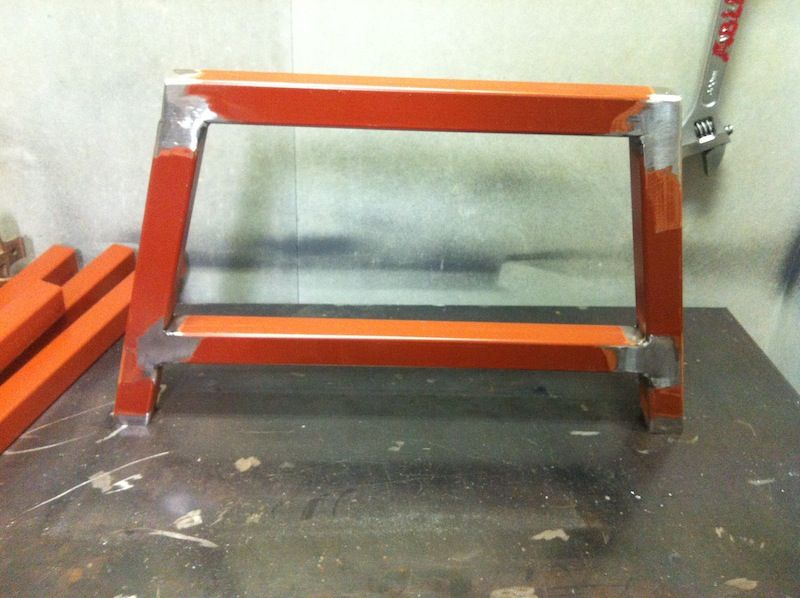
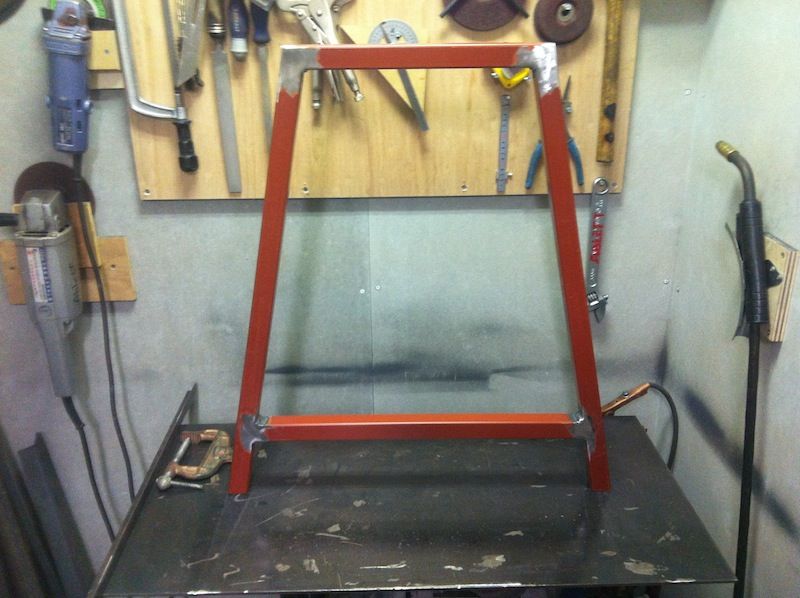
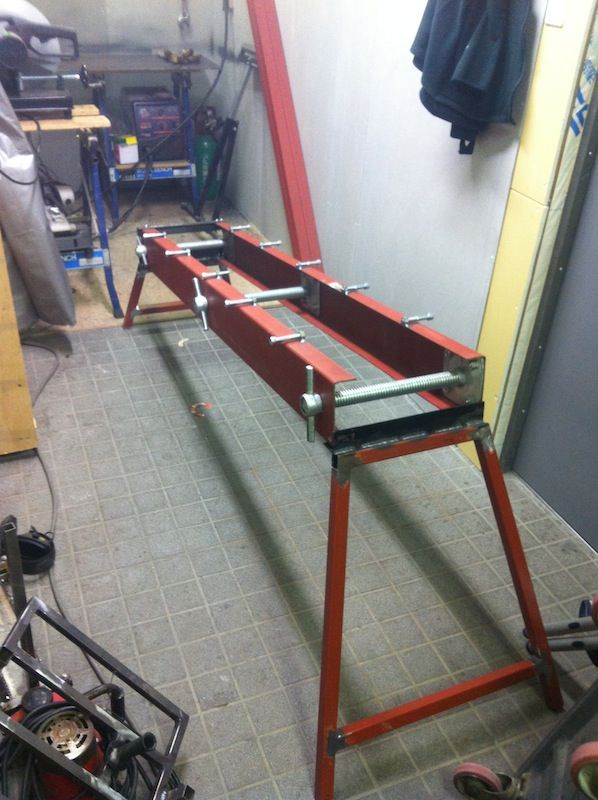
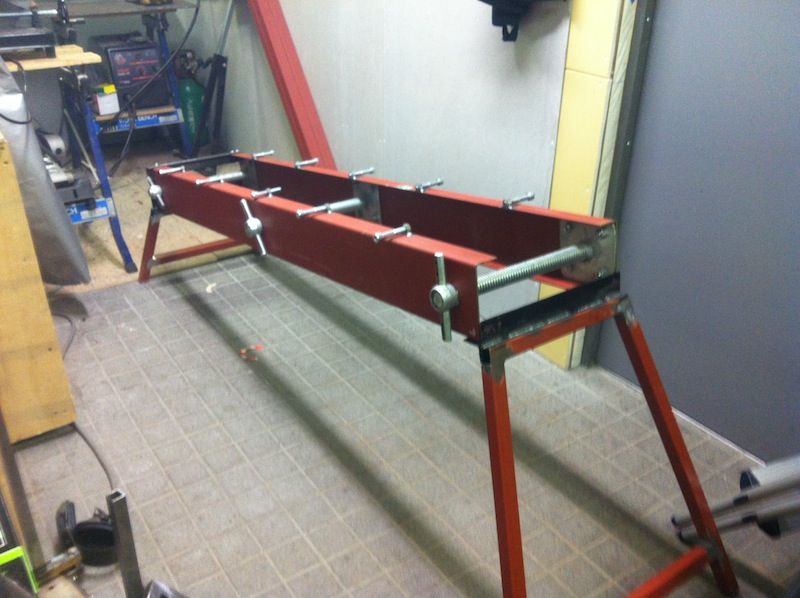
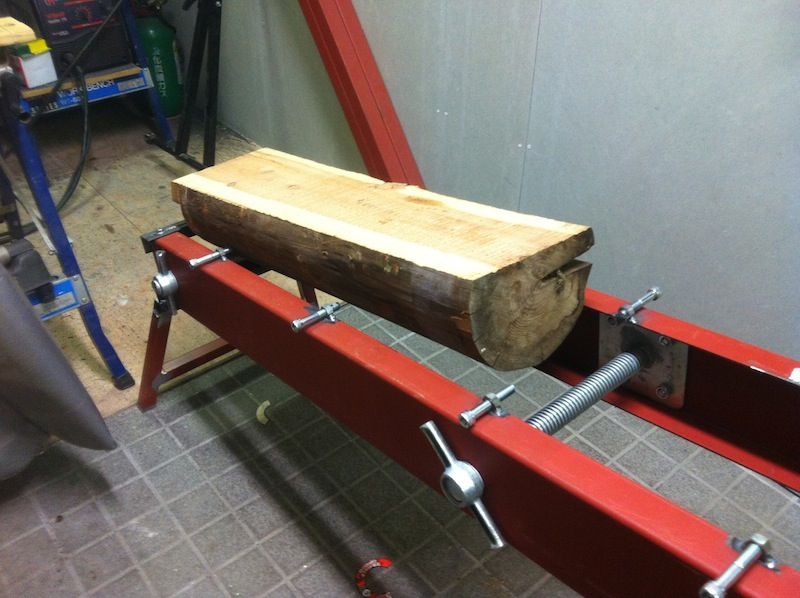
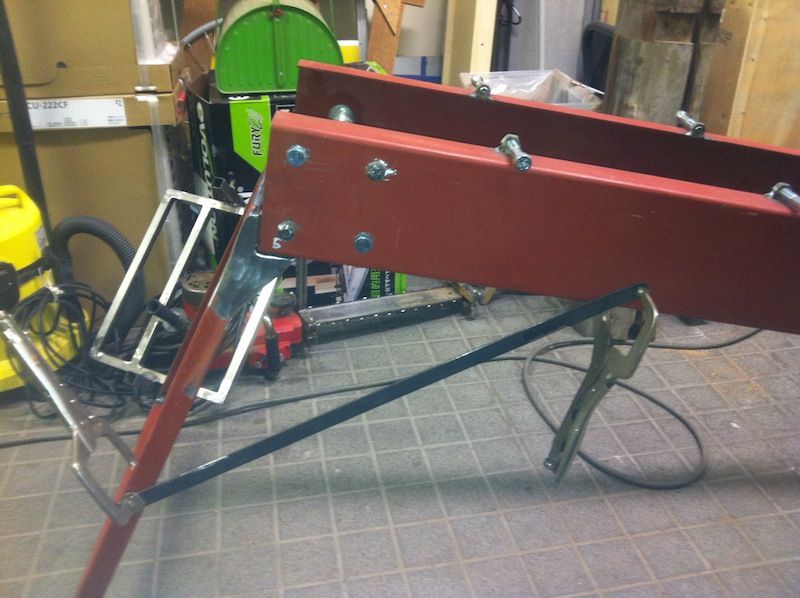
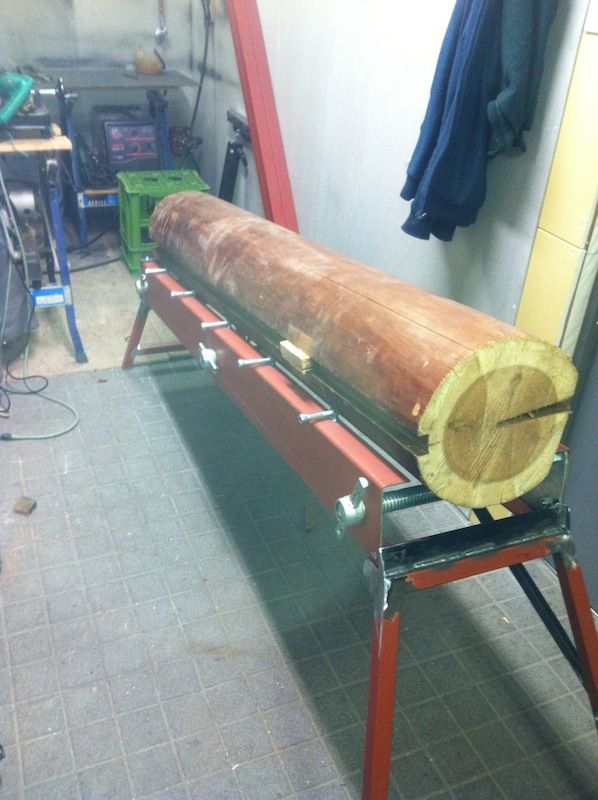
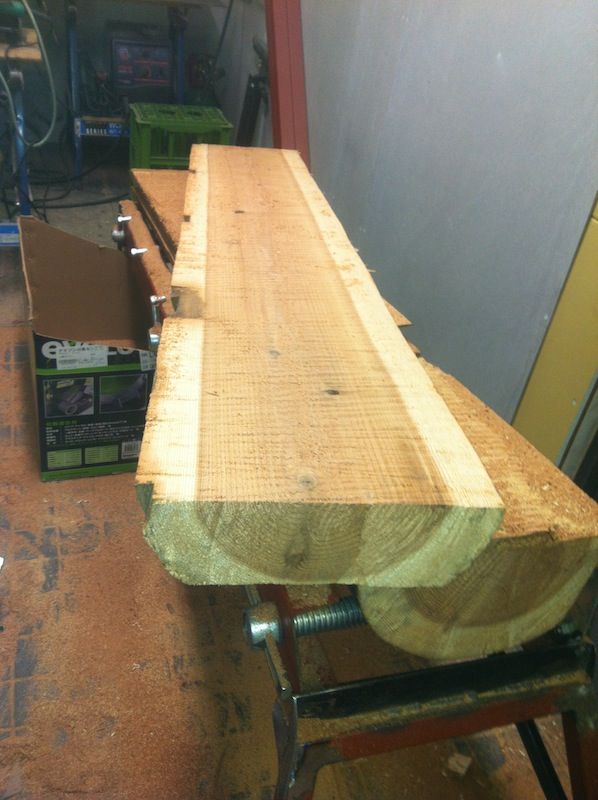
I have some steel sitting around that is just about the right length, and some screw things that are used as leveling legs on scaffolding, add a couple of pieces of angle iron I have and some hole, and welding and I might have a rig that will work......

3E15F2FF-72E5-4FCE-9520-086A2536A7A1-6717-0000049A8B4EA66A_zpsa1d6ee1a.jpg


1DD1739E-8269-4F4D-993A-E270CB612E24-6717-0000049A84946B05_zpse8472682.jpg


F49E51C8-5A4E-4F92-BBDC-928EC80BD4DE-6717-0000049A7DAFFD82_zps10b1649f.jpg


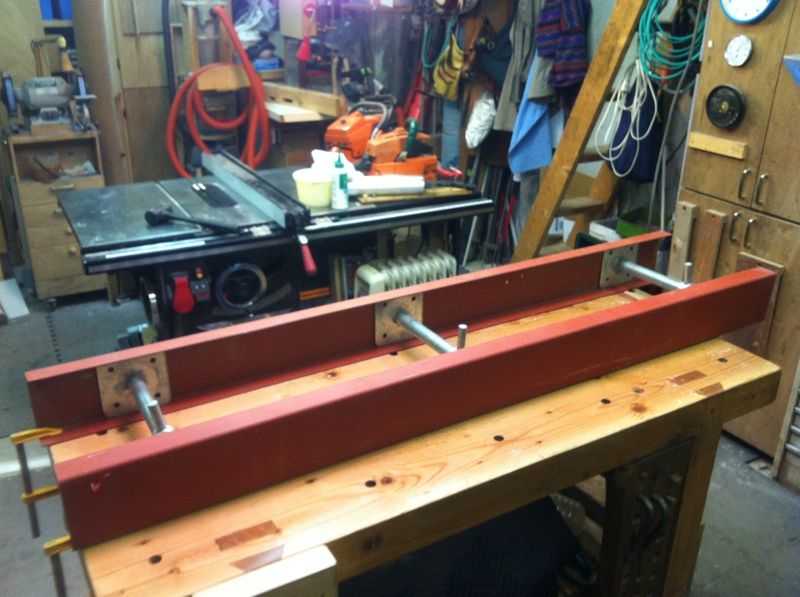
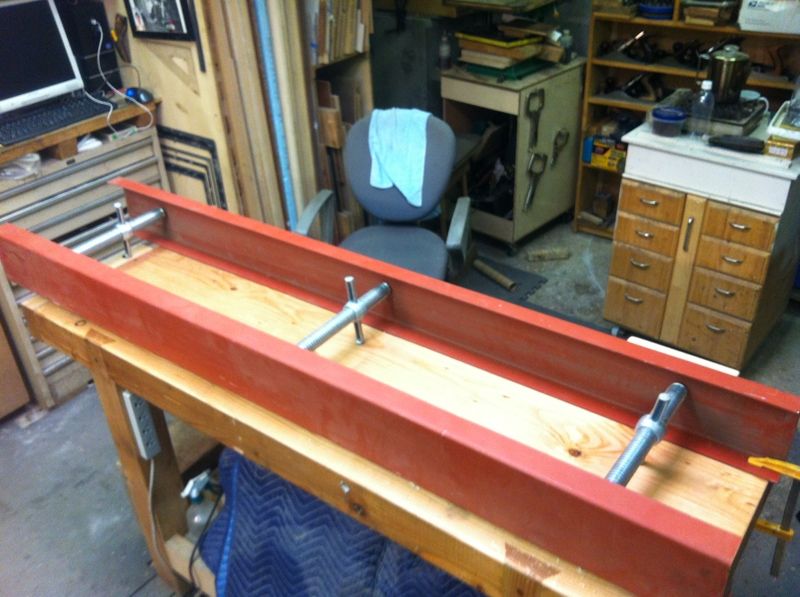
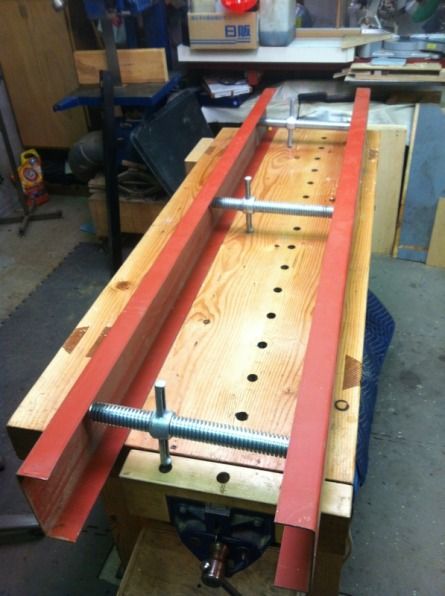
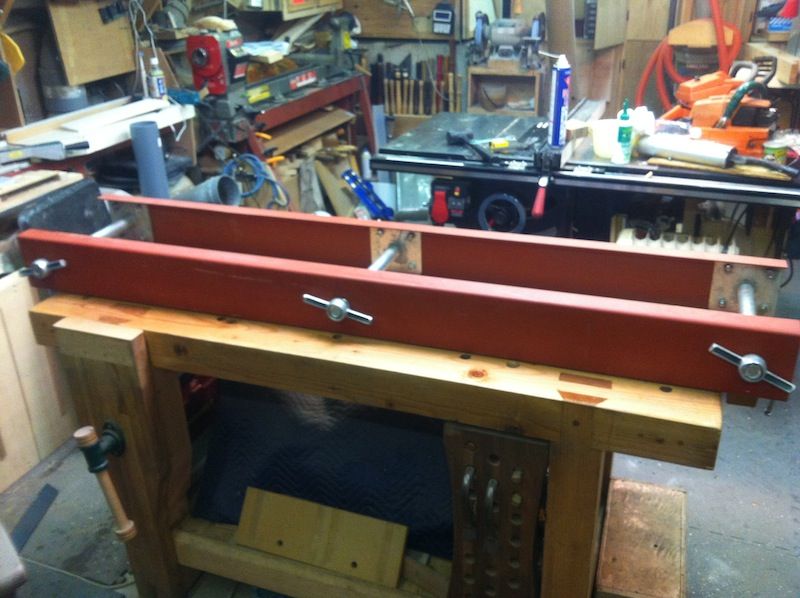
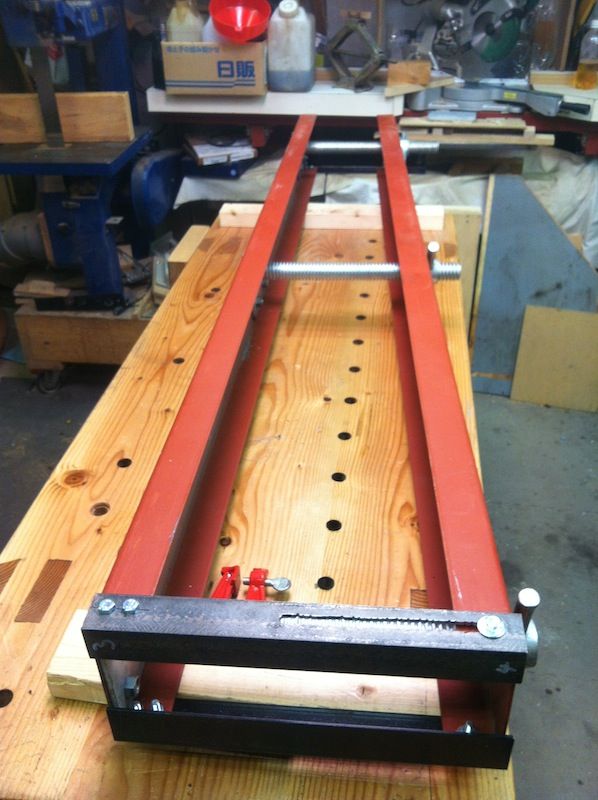
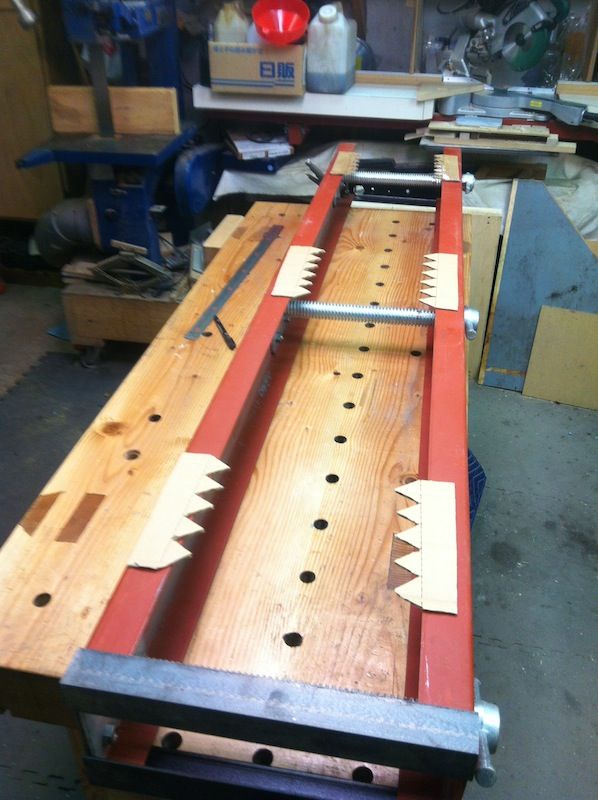
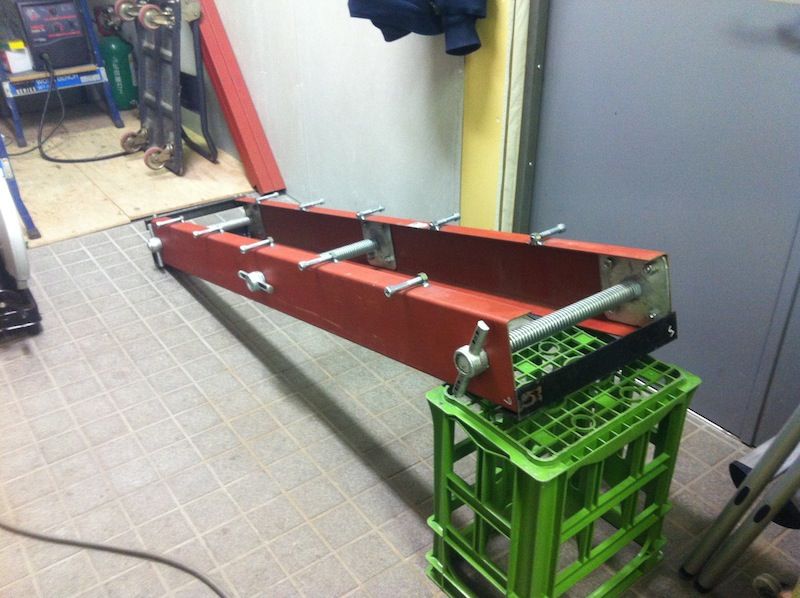
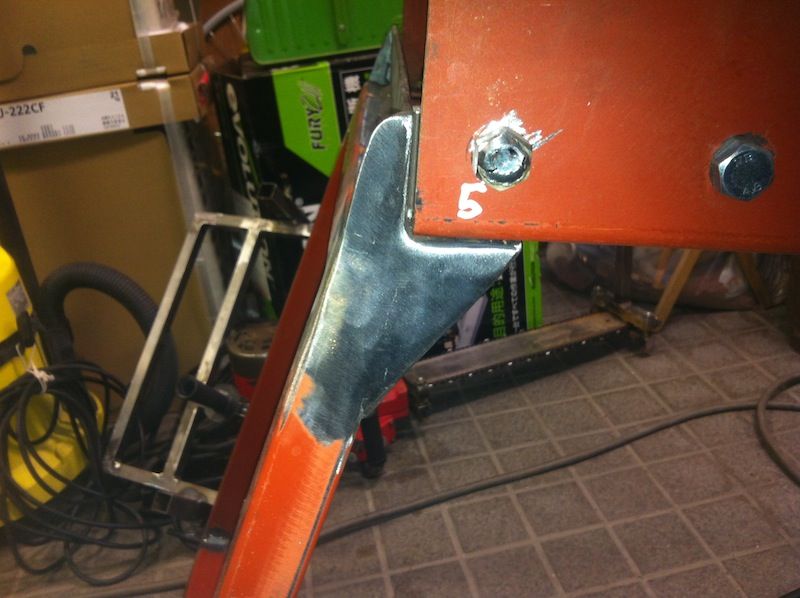
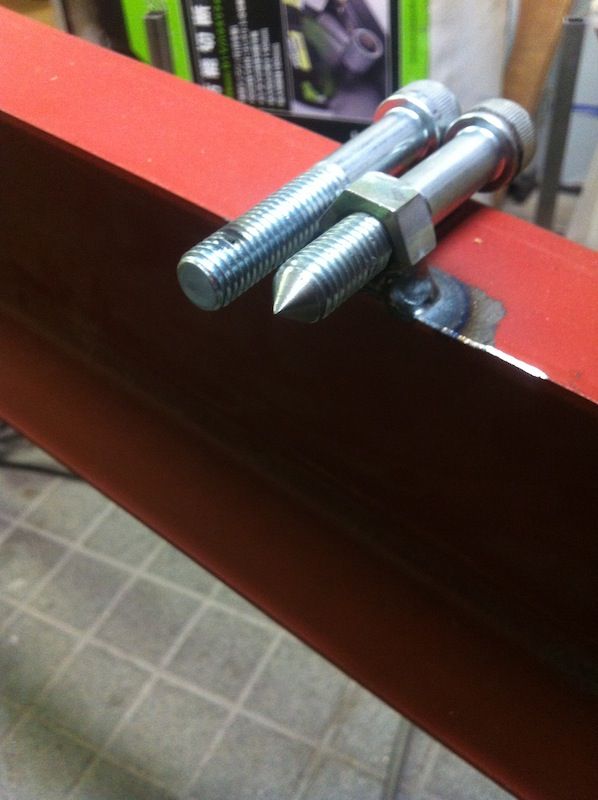
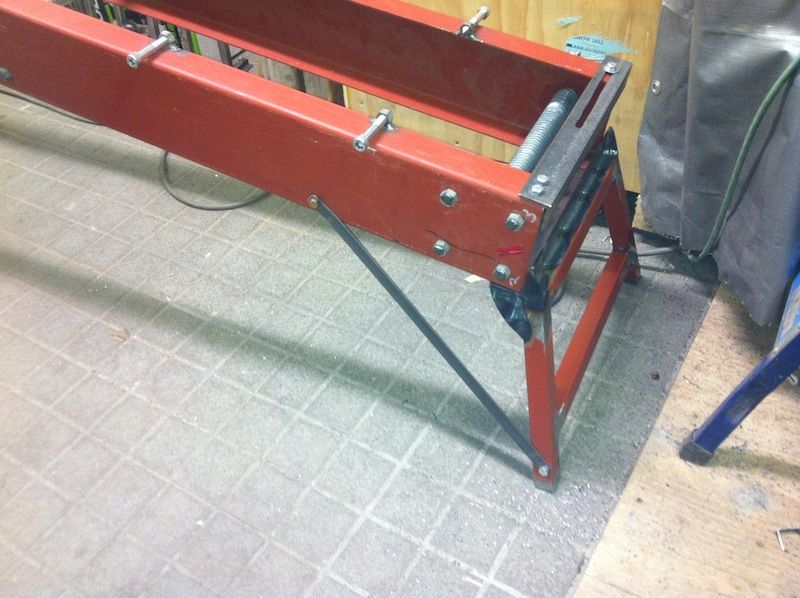
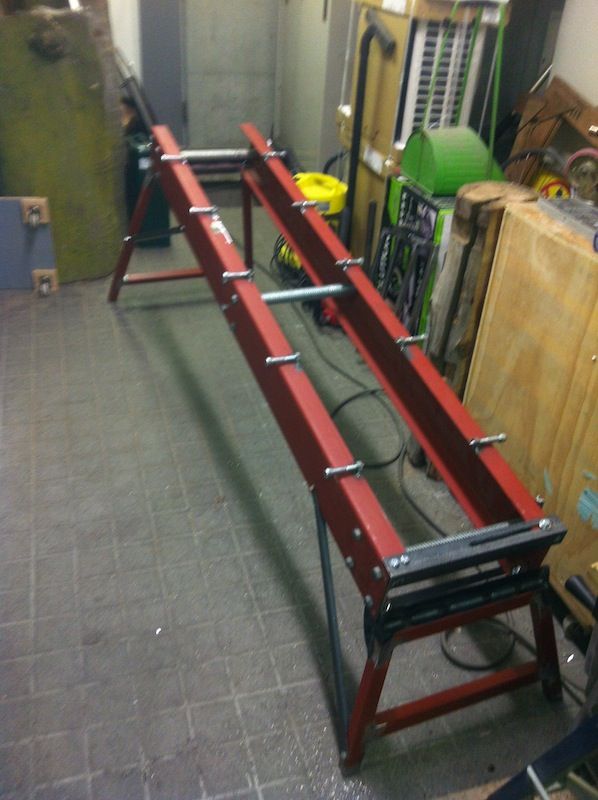
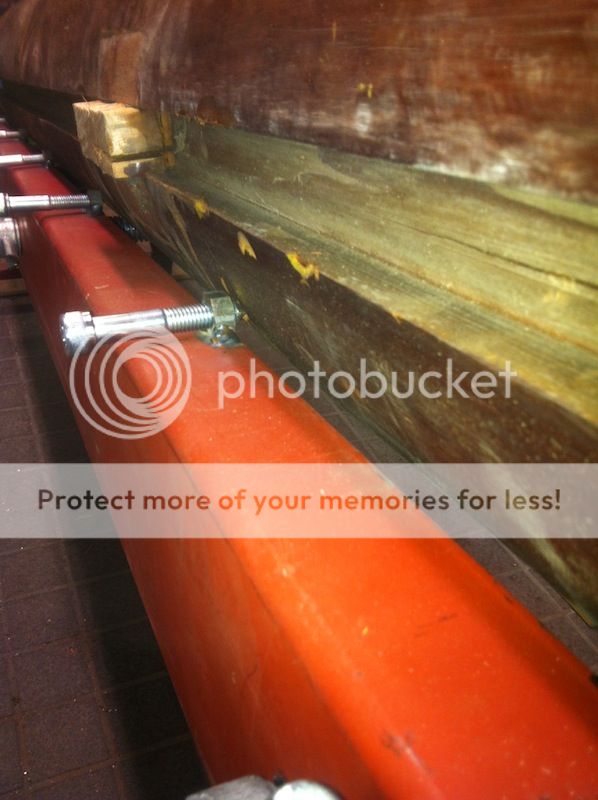
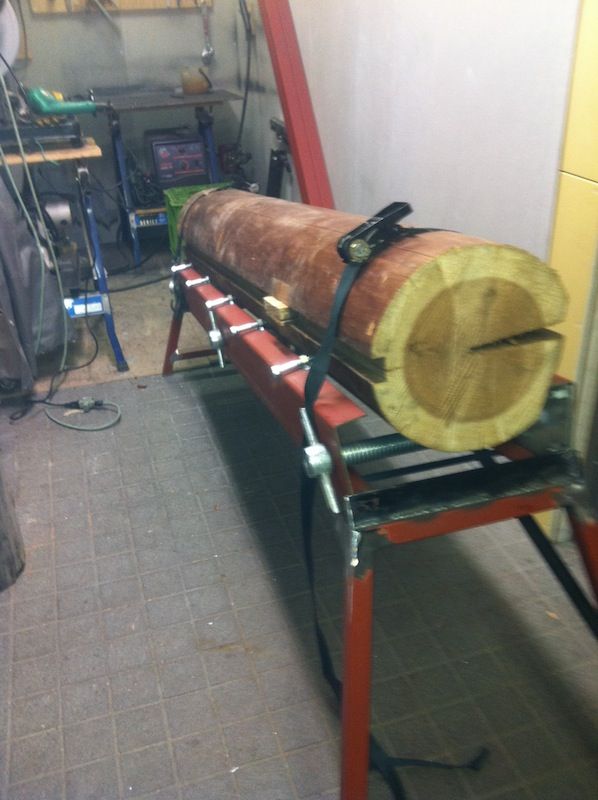
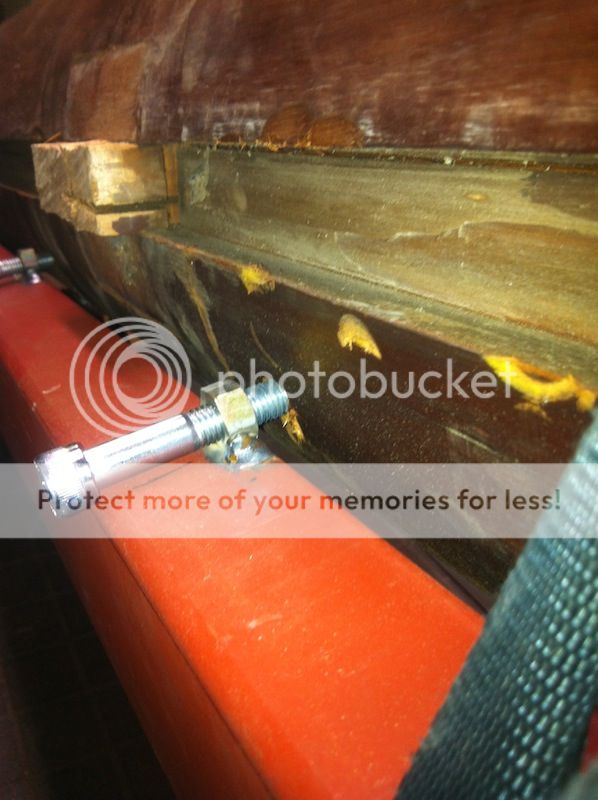
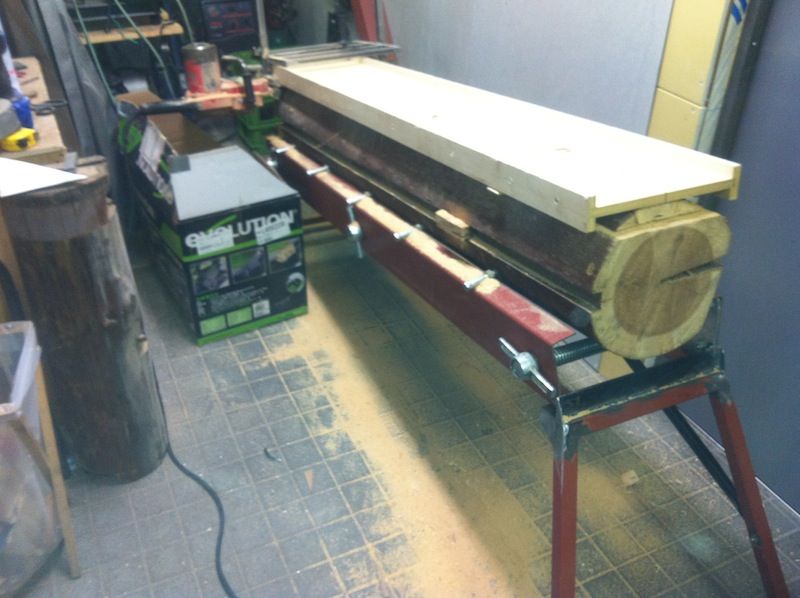
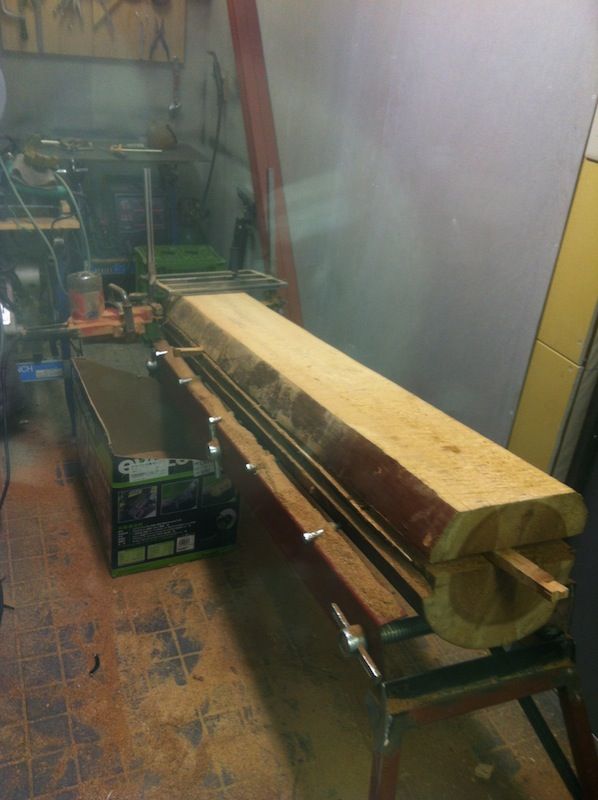
The wingnuts will go on the outside of the side rails, then I'll be able to make the rail the size I need it to grip the log. A piece of angle iron will go along each end on the bottom, one side welded to a side rail the other side will have a slot cut in it and a bolt, so when the rails are positioned it can be tightened and will keep things squared up. I'll put some sort of dogs along the top edge of the side rails to bite into the log. I'll put some bolt on legs on the bottom of the angle iron along each end to get it off the floor, and I'll even put foot levelers on it to make it rock solid.
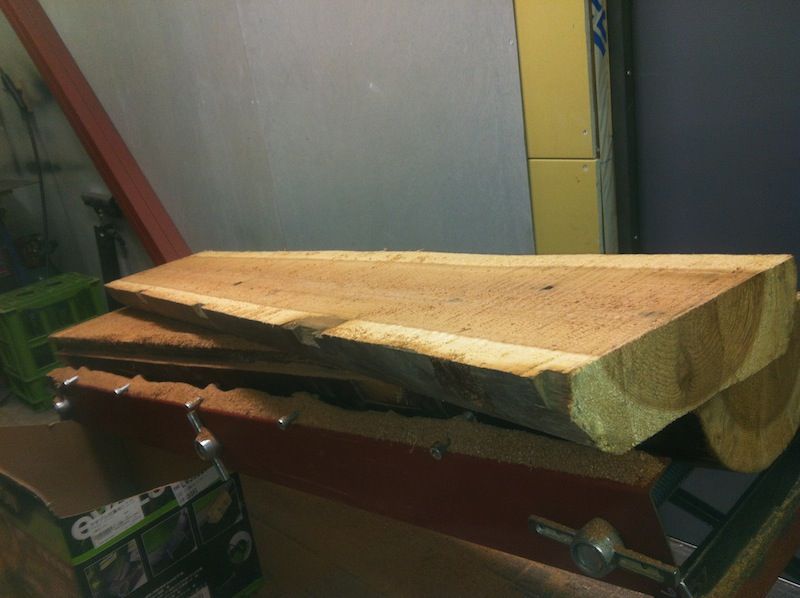
I don't do or get huge logs, so I don't need a huge set up, heck the mill won't even do 17" as it sits. This long vice like rail set up would also keep the majority of the log above the rail, and would make it easy to mill, just grip the log once and then slab it up, no dogs to get in the way.

Might work?
 
Thank you,Stu

"Tokyo Log Hog" is one of my favorite bookmarks, one where I send visitors who wonder what inspired me to hook my Huski 575XP to a home-made "alaska" mill. From that have grown oak, maple and walnut slabs and soon will be "red gum' (California Eucalyptus) that go towards rustic park-benches, guitar bodies and gunstock blanks. i've found an old lathe, re-motored it, so bowl-turning is on the agenda for chunks of a walnut root-wad. Yer pics explain what words can't do, plus yer words are great, too. Keep the postings coming.
 
Might work?

Once the log has been cut into a cant (ie two straight sides) it will work but I think it will have trouble gripping a circular object especially if it is not absolutely cylindrical. Try cutting a couple of cookies and se how well it will hold those. At a bare minimum it will need some dogs to bite into the log. The dogs could also be arrange so as to take up the variations in log diameter.
 
"Tokyo Log Hog" is one of my favorite bookmarks, one where I send visitors who wonder what inspired me to hook my Huski 575XP to a home-made "alaska" mill. From that have grown oak, maple and walnut slabs and soon will be "red gum' (California Eucalyptus) that go towards rustic park-benches, guitar bodies and gunstock blanks. i've found an old lathe, re-motored it, so bowl-turning is on the agenda for chunks of a walnut root-wad. Yer pics explain what words can't do, plus yer words are great, too. Keep the postings coming.

You are very kind, and I'm happy to hear that I might have helped you over the edge into the abyss :hmm3grin2orange:

I'll look forward to your pics and post too!
 
Once the log has been cut into a cant (ie two straight sides) it will work but I think it will have trouble gripping a circular object especially if it is not absolutely cylindrical. Try cutting a couple of cookies and se how well it will hold those. At a bare minimum it will need some dogs to bite into the log. The dogs could also be arrange so as to take up the variations in log diameter.

The plan is for four or six dogs that would slide along the top edge of the steel rails, and have sharpened points that would be on the ends of bolts that I could turn into the log to grip it. With a straight across stop at one end to push into I think it will work, but we shall see :biggrin:
 
I've gotten further along with my log holder for the new mill, I think this is going to work, out, but it is a work in process, so I'm sure I'll not get it right the first try, and it will need some tweaking.

I drilled the holes for the big threaded pieces to go through, and just tried it out...

IMG_5664_zpsa0985a35.jpg

IMG_5665_zps942ca9f0.jpg


This way I can make the log holder wider, or narrower depending on the size of the log.

IMG_5671_zpsc9101aba.jpg

Next I put some angle iron on three of the four side of the box, if you understand, both ends of the bottom got angle iron, and one end of the top side. The angle iron is bolted to the side of the log holder that does not move, and has one bolt in a slot on the side that does move, this should allow me to adjust the size but keep things squared up.

I'll also use the angle iron as a mounting point for the legs.
Not the best shot to show this, but the far end is much close together than the near end, this should allow me to adjust for the taper in the log.

IMG_5667_zpsd66db842.jpg

I was just going to cut some plate steel and add some teeth, like the cardboard mockup here, but I decided that it would be better to have teeth that I could screw into the log.....

IMG_5674_zpsa827d89d.jpg

So I welded on some nuts and then put some bolts into them, I'll sharpen the tips of the bolts so they dig into the log better.

IMG_5675_zps7a109a5f.jpg

I want the log holder to sit at an angle, let Mr. Gravity help push things along, so I need to build some legs, a short pair and a long pair.

IMG_5678_zpsd43fd58e.jpg

The short pair welded up and then ground smooth.
 
IMG_5679_zpsfe76b9fd.jpg

The long pair. I splayed the short pair at 15° and the long pair at 10° to make the whole thing more stable.

IMG_5680_zps8fd43918.jpg

IMG_5681_zpsc737048c.jpg

That is about how it will stand. It's not done yet, I have to add a couple of gussets to the angle iron and legs as well as a bar between the leg and the body of the log holder to make it stronger. I can only do this one one side as the log holder has one moving side, but I think it should be enough. I guess I'll find out.

IMG_5682_zps88e5d84c.jpg

Just for fun I tossed the short piece on the log holder, it is a bit too wide I need to adjust it in a bit, but it works.

Cheers!
 
I got the log holder done.....

IMG_5686_zps824f612d.jpg

The gussets around the top of the leg where the angle iron bolts to the frame, and you can see where the strut will go, just clamped in place in this picture.

IMG_5687_zpsda2c24e7.jpg

A close up of the gusset

IMG_5689_zpse94e66e0.jpg

I sharpened the tips of all the bolts that will grip the log.

IMG_5694_zpsaf371d1b.jpg

The short legs done, the gussets and the strut as well.

IMG_5695_zps0b0d0186.jpg

That is done, not the best picture, kind of confined space, but it is done, now I just have to wait for the ripping chain to be in stock and be shipped to me.

One thing that this build really pointed out to me is that in my new welding room space, the next project will be a good welding table/bench with a vice, it was just silly using that piece of 1/4 plate on a workmate knock off, I need a proper bench and vice attached to it, next project I guess :D

Cheers!
 
Looking good Stu!

. . . .One thing that this build really pointed out to me is that in my new welding room space, the next project will be a good welding table/bench with a vice, it was just silly using that piece of 1/4 plate on a workmate knock off, I need a proper bench and vice attached to it, next project I guess :D

Here's my welding fume hood/booth setup - cosy but very effective.
attachment.php


The extraction is a 500 cfm squirrel cage fan
The doors swing right back out of the way or can be completely removed or can completely be enclosed so the booth can be used as a spray paint booth.
The vice is on a short SHS post that can be completely removed and stored under the bench on that sliver bracket
[video=youtube;ysBByYj5Blc]http://www.youtube.com/watch?v=ysBByYj5Blc[/video]
 
Looking good Stu!


Here's my welding fume hood/booth setup - cosy but very effective.
attachment.php


The extraction is a 500 cfm squirrel cage fan
The doors swing right back out of the way or can be completely removed or can completely be enclosed so the booth can be used as a spray paint booth.
The vice is on a short SHS post that can be completely removed and stored under the bench on that sliver bracket
[video=youtube;ysBByYj5Blc]http://www.youtube.com/watch?v=ysBByYj5Blc[/video]

OK the bench and vice idea, I'm stealing that for sure :rock:

Freaking brilliant!

Do you have some more shots of the arm that holds the vice under the bench?

What do you do with the hole on the bench top, do you have a piece that drops in?

Love it, THANK YOU SO MUCH, the next time you are in Tokyo, beers are one me! :msp_w00t:

Cheers!
 
OK the bench and vice idea, I'm stealing that for sure :rock:

Freaking brilliant!

Do you have some more shots of the arm that holds the vice under the bench?
attachment.php

This is the bracket - it's basically a set of 3 strong hinges that allow the vice to sneak through the narrow space under the bench.

attachment.php

Here it is loaded with the vice.

attachment.php

Here is how it locks to the underneath of the bench -

What do you do with the hole on the bench top, do you have a piece that drops in?
Correct. Sorry I have no photos of that piece. It's just a 2" long stub on a piece of quarter inch plate. I think I have used it once? - see following

My original plan was to put a solid 3/4" steel top on the bench but I ended up just laying two piece of 1/4" plate loosely on top. I often move the plates so there is a gap between them and use the gap for clamping etc. I like this so much I don't think I'll bother with the thicker top at least for while.

Love it, THANK YOU SO MUCH, the next time you are in Tokyo, beers are one me! :msp_w00t:

That could be possible in the next couple of years!
 
Bob,

They're known to be quick with answers, while rarely capable of implementing practical solutions in the real world.

You, however, are giving Teachers a good name.... I so enjoy your ingenuity.


Question.... When hot from the mold, did your vise get laid on it's side before cooling? I can't say that I've seen one with the offset jaws....
 
Bob,
They're known to be quick with answers, while rarely capable of implementing practical solutions in the real world.
You, however, are giving Teachers a good name.... I so enjoy your ingenuity.
Cheers SF.

Question.... When hot from the mold, did your vise get laid on it's side before cooling? I can't say that I've seen one with the offset jaws....
That's how they are made. These Aussie made offset vices are excellent as welding and blacksmithing vices as the can hold long stuff vertically across the whole vice face. BTW all that vice cost me was the $10 for gas (well diesel ) to go and pick up. It was baldly rusted and had no jaws, so I used electrolysis to bring it back to life and made up some mild steel jaws and it has been great.
 
Thanks Bob, that is great, just what I was looking for! The little tab that the vice grips when stowed is a great idea too.

I have also never seen that kind of offset vice, looks very useful. I have a vice that rotates in two axis, and has a fixture on the bottom to hold pipe, I'm going to use this on my welding bench. The only thing I have thought to add is a nut an bolt on the tube below the bench that the stub on the bottom of the vice goes into to secure the stub in place, but before I do that I have to ask does the vice move around on your when in use, or does the weight of the vice keep it in place?

The two plate that can be opened is very intriguing, I'm going to think more about that for sure, any pics of that in action?

I totally agree with SF that your ingenuity is great, thanks so much!

Cheers!
 
My ripping chain will not come until the end of May, :'( and I need my space back, so I'll be stowing the log holder until then, but I wanted to give the whole set up a test run before I do put it away, so.....

IMG_5697_zps727ef72f.jpg

..... I threw one of the dry Doug Fir logs on the log holder.

IMG_5698_zps0904584e.jpg

I'm worried that the bolts would not dig into the log, so I strapped the log down first.....

IMG_5699_zpsa0e5d0d3.jpg


and then tightened the bolts down....

IMG_5700_zpse969c818.jpg

.... they dug in just fine ;D

IMG_5701_zps7b36c70a.jpg

I made a deflector out of cardboard and duct taped it to the saw, it worked well.

IMG_5702_zpsca041acf.jpg

I sliced the top off the log.
This cut took less than six minutes, not fast, but not as slow as I'd feared. The saw body was only warm to the touch, and the cord was not warm at all. The deflector worked well and a box kicked along got a lot of the sawdust, maybe 60%.

IMG_5704_zps3258674c.jpg


cont......
 
I went ahead and did a second cut, this went even better, took maybe 8 minutes and with a modified box I got more of the sawdust, maybe 80% not bad at all.

IMG_5709_zps598f491a.jpg

IMG_5711_zps92171a6d.jpg

I think that is a fairly nice slab of wood.

The bottom remaining part I'll cut into two square pieces something near 4x4s on my resaw bandsaw.

IMG_5705_zps843a770f.jpg

The saw seemed to work just fine, like I said, it's no speed demon, but it did not over heat, and I could keep oil on the chain as you can see.....
IMG_5707_zpsfb47a7bd.jpg


The tip did not overheat either....
IMG_5708_zpsb9178506.jpg


.... I'm about 90% satisfied, and I'm sure that will get towards 100% with the ripping chain. I hope to also make a better box/dust collector of some kind, but all it all it worked great. The log was very securely held in place and the mill worked just fine, I'm calling this a win!

Cheers!
 
Nice milling picks Stu - thanks for posting

.
.
.
The only thing I have thought to add is a nut an bolt on the tube below the bench that the stub on the bottom of the vice goes into to secure the stub in place, but before I do that I have to ask does the vice move around on your when in use, or does the weight of the vice keep it in place?
Yes it did move so I did what you were thinking of.
One of the blokes on the Aussie Wood workers metalwork form suggested locking at the the corner and that locks it really tight.
Rather than use a bolt and then always having to go look for a spanner I made a threaded swivel handle.
The base of the locking handle also acts as the welding earth clamp as this is in hard contact with the vice.

attachment.php


The two plate that can be opened is very intriguing, I'm going to think more about that for sure, any pics of that in action?

Sorry no pics of that. I had a close look at welding benches before making mine. One design that I like is one with an open diagonal cross on the top of the bench. The gaps are just big enough to insert and turn a standard F clamp.
 
attachment.php

This is the bracket - it's basically a set of 3 strong hinges that allow the vice to sneak through the narrow space under the bench.
That's what i was thinking, 3 HD strap hindges and you have it pretty much ready made...

Big HD strap hindges were common on farms around here, so you see them cheap all the time on farm sales...

SR
 
Nice milling picks Stu - thanks for posting


Yes it did move so I did what you were thinking of.
One of the blokes on the Aussie Wood workers metalwork form suggested locking at the the corner and that locks it really tight.
Rather than use a bolt and then always having to go look for a spanner I made a threaded swivel handle.
The base of the locking handle also acts as the welding earth clamp as this is in hard contact with the vice.

attachment.php


Sorry no pics of that. I had a close look at welding benches before making mine. One design that I like is one with an open diagonal cross on the top of the bench. The gaps are just big enough to insert and turn a standard F clamp.

Thanks Bob, that is great info, I can't wait to build my welding bench now :msp_biggrin:
 
I just wanted to post this as basically finished, I took the other half of the log down to the Dungeon and ran it through my resaw-bandsaw.

IMG_5715_zps70ef1e6d.jpg
IMG_5716_zps04aac71a.jpg


I moved the saw to the middle of the shop, using my bench and tablesaw as infeed and outfeed.

IMG_5720_zps072867a3.jpg

Ready to go!

The results.....

IMG_5721_zps4946f0b3.jpg
IMG_5722_zpsc4d131c9.jpg


The big slab on the left is the main piece I got, as well as two other not so bad chunks, this was the smallest end of the log, and it had some significant cracks in it, and I made a bad cut or two, as my resaw was not quite tuned up, yes operator error...

Once I get the ripping chain on my mill, I'll cut up the other four logs, until then I'll be stowing the mill and the log holder.
I'll make the slab and into a nice bench for a buddy's yard, it will fit in perfect.

Cheers!
 
Back
Top