1st day milling

Arborist Forum

Help Support Arborist Forum:

This site may earn a commission from merchant affiliate links, including eBay, Amazon, and others.

AndyR

ArboristSite Operative
Joined
Nov 20, 2007
Messages
188
Reaction score
15
Location
Central Illinois
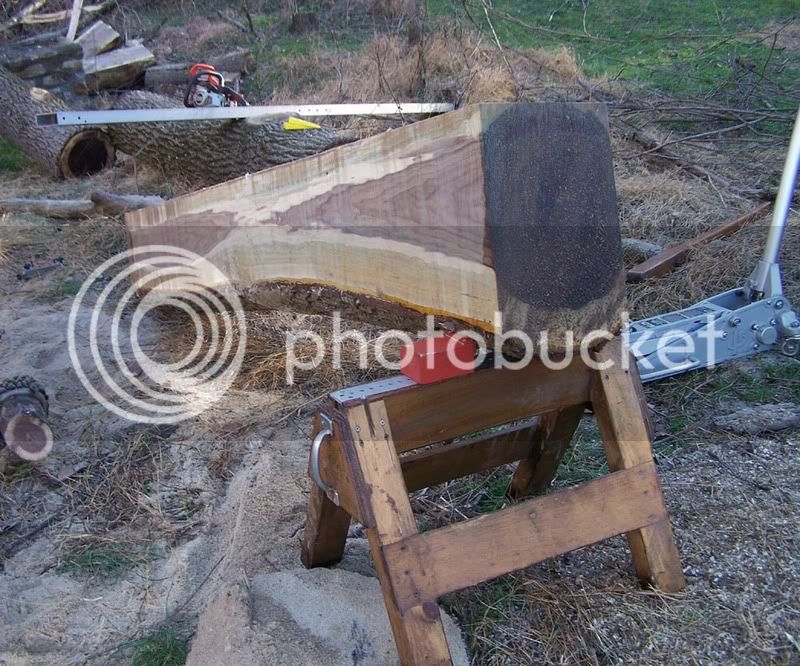
I couldn't stand it any longer. I took a day off and milled the upper log from the cherry tree I posted about removing a while back. It was knotty and had some bark and indications of beetles inside, but I think I'll get some good pieces out of it. Since it had so many knots, I cut two slices at about three inches thick. I figured I can cut out betwen the knots and use the thick parts for table legs-or resaw later if needed. I've heard that the best thing to do for the beetle larvae in the wood is to kiln dry it. Is there some other way that all of you air-dryers deal with this? Should I have just cut those sections out of the boards?

I kinda did this Woodshop style. Squaring the log with the CSM and then slicing boards with the Ripsaw. All members of the team (Ripsaw w/036, CSM w/395xp, and the Echo cs440) worked well together. It seems that the extra drag of the blade etc. causes the saw to not want to idle too well, though it got better as it warmed up. I also noticed that I needed to keep the rpms up in the cut or if it got to slow it would stall. Which was a pain because I had to wedge the cut and back the Ripsaw out to get it started again.

Overall, the boards aren't perfect, but aren't too bad either for the first three cuts.
 
Maybe I am weird but I like the knots in cherry. It adds some character to the furniture you use it on.

I have never done anything for the bugs in the wood. I noticed if I air dried the wood outside I had alot less bug holes compared to drying in a barn.

Nice slabs

Chris
 
Maybe I am weird but I like the knots in cherry. It adds some character to the furniture you use it on.

I have never done anything for the bugs in the wood. I noticed if I air dried the wood outside I had alot less bug holes compared to drying in a barn.

Nice slabs

Chris

Thanks,
Yeah, you're right. I don't mind seeing them in a table top or side of a cabinet or something, but I don't know if I want knots in the legs of my tables. For stability/structural reasons. I hope all those knots dry well...

I still have two pieces of butt log that should be clearer. I'll probably cut those into thinner boards (5/4 or 4/4).
 
Nice work for the first time around. It is important to keep the saw speed up with the RipSaw as they will bog down and can be difficult to continue. I think you may need to tune the saw a bit. I run my RipSaw off a 036 and do not have any trouble with it stalling. But if I do not keep the speed up, it bogs down. If I stall the blade I have found that just pushing whole rig off the finger guide and then giving it a lot of gas will start the cut again.

There is a major learning curve with these tools. I have been working at it for a year now and still learn something new every day. I milled part of a rock maple yesterday and had pretty good success except for breaking two resharpened bands.

Does anyone repair their RipSaw band breaks? They always seem to break at the weld and I know there are inexpensive kits out there to repair bands. But is it worth doing? I never get more than 2-3 sharpenings from a band before I break it.
 
Oh yeah, and excuse the mess in the garage-I'm having some space issues...

Nice cherry pics, I too like knots in cherry as long as they are solid. They do add character in SOME pieces, but you have to be careful or they will stick out like a sore thumb as they tend to take on stain etc differently. I find that on those slabs you sliced off to make that cant, I can usually set my Ripsaw at 1 inch and get at least one nice board from each slab. Even if there is only enough heartwood left so only one side has the pink cherry all the way across, you can still use the board by hiding the sapwood side on the inside of a desk for example. That outside of the log is the best clearest part, so usually gets you a premium board. As I don't like to run the Ripsaw blade through bark if I don't need to, I usually take my little echo and trim the sides down freehand (goes fast with thin slab) before I Ripsaw off that board.

... There is a major learning curve with these tools. I have been working at it for a year now and still learn something new every day...

...I never get more than 2-3 sharpenings from a band before I break it.

I agree Al, I've been milling with the Ripsaw for over 12 years now, and I'm still finding shortcuts and different ways to doing things to improve my milling session. I have never gotten more than 2 sharpenings from a blade, and often only one as the second sharpening usually doesn't last long enough to make it worth my time. I have to say though that I havn't broken too many blades over the years. The few times it's been because I either WAY over-tensioned or I was using a dull blade and pushing it past when I should have, thus it starts to cut wavy and get very hot and breaks. In my case they didn't always break at the weld though.

As for messy garage Andy... sheeeesh... not messy if you can still see the floor, your garage looks cleaner than my mine.
 
Nice work for the first time around. It is important to keep the saw speed up with the RipSaw as they will bog down and can be difficult to continue. I think you may need to tune the saw a bit. I run my RipSaw off a 036 and do not have any trouble with it stalling. But if I do not keep the speed up, it bogs down. If I stall the blade I have found that just pushing whole rig off the finger guide and then giving it a lot of gas will start the cut again.

There is a major learning curve with these tools. I have been working at it for a year now and still learn something new every day. I milled part of a rock maple yesterday and had pretty good success except for breaking two resharpened bands.

Does anyone repair their RipSaw band breaks? They always seem to break at the weld and I know there are inexpensive kits out there to repair bands. But is it worth doing? I never get more than 2-3 sharpenings from a band before I break it.

Al, after I broke my second band at the weld I found out that tensioning to the white line was over tensioning. If you'll back off about a half turn the breaks will stop. That advise was from Mr. Frank Graney the man that developed the Ripsaw.
 
Al, after I broke my second band at the weld I found out that tensioning to the white line was over tensioning. If you'll back off about a half turn the breaks will stop. That advise was from Mr. Frank Graney the man that developed the Ripsaw.

While I defer to the experts here, this has not been my experience with the RipSaw. I found that if I didn't tension the blade to the middle of the white line, I experienced wavy cuts. So I have been tensioning to the middle of the line and still not breaking anything except the blades I have sharpened at least twice (and occasionally three times). I suspect that each saw is a bit different and one has to find the ideal tension setting as indicated by the marker.

As an aside, I just received a new order of blades and when I opened the package to remove a couple, it appeared to me that they were somewhat more flexible than the ones I bought with the used RipSaw a year ago. I need to measure the thickness in comparison to the older ones before I mount one just to make sure they are the same. I suspect they are the same but for whatever reason they just seemed a lot less rigid.

Al, the bands that I had break at the welds were the silicone steel bands sold by Ripsaw.
 
As an aside, I just received a new order of blades and when I opened the package to remove a couple, it appeared to me that they were somewhat more flexible than the ones I bought with the used RipSaw a year ago. I need to measure the thickness in comparison to the older ones before I mount one just to make sure they are the same. I suspect they are the same but for whatever reason they just seemed a lot less rigid.

I don't know if this is the answer or not, but when I ordered my blades and a bunch of other spare parts a few months ago, the order was a bit late in shipping. I called one day to check and make sure my order went through ok and the man (don't remember his name-but very helpful) said that the person who made the blades for them in the past, had passed away and they had to find someone else to make them up for them, so maybe it's different stock?
 
I find that on those slabs you sliced off to make that cant, I can usually set my Ripsaw at 1 inch and get at least one nice board from each slab. Even if there is only enough heartwood left so only one side has the pink cherry all the way across, you can still use the board by hiding the sapwood side on the inside of a desk for example. That outside of the log is the best clearest part, so usually gets you a premium board. As I don't like to run the Ripsaw blade through bark if I don't need to, I usually take my little echo and trim the sides down freehand (goes fast with thin slab) before I Ripsaw off that board.

So, how do you keep the slab stable enough to run the ripsaw on it? Do you leave it attached to the guide beam?

Thanks,
Andy
 
So, how do you keep the slab stable enough to run the ripsaw on it? Do you leave it attached to the guide beam?

Thanks,
Andy

Can't really use the guide beam for something that small unless you just set it on the slab (which I have done) without attaching it. I usually just set that slab on my custom horses kinda cradled in the custom chocks I've built for them. As long as the slab is at least 5 ft long that's enough to hold it in place... then kinda baby the Ripsaw into the slab and carefully push it through.

Here are a few pics of those horses and the chocks that fit into the top of them in case you havn't seen them in prior posts. They do a pretty good job of keeping the round side of a cant in place while milling it. (...I know, technically a cant doesn't HAVE a round side... but you get the idea.)

2.jpg


3.jpg


4.jpg


walnut7.jpg
 
Ahhh...I see. Thanks for the pics. I need to build some heavy-duty horses like you have there. I hope to get into this cherry butt log this weekend. Or maybe the Ailanthus logs-I'm thinking that stuff might make a nice workbench top.
 
Ahhh...I see. Thanks for the pics. I need to build some heavy-duty horses like you have there. I hope to get into this cherry butt log this weekend. Or maybe the Ailanthus logs-I'm thinking that stuff might make a nice workbench top.

Those custom horses are an integral part of my milling system, without which much of what I do would be much more difficult. Also takes much of the load off my back and knees when milling... essential for me.

In my opinion Ailanthus is a jewel in the ruff from a woodworking perspective, I love the stuff... the wood is hard, nice creamy color and grain, and is easy to work with. I used it for the outfeed table for my planer. It's considered a junk/weed tree here in the eastern US and will quickly take over abandoned lots and sides of roads and bridges, pushing out native species. If you cut it down but leave the root base it just grows back thicker and faster. It happens to be one of the most disease and pollution resistant trees we know of, and it also has the distinction of being able to grow almost ANYWHERE, no matter how poor the soil. This is the tree you often see growing out of the cracks of a sidewalk.
 
Yes! This tree is insane! our yard is FULL of sprouts since the 2 trees were removed. I didn't know about that problem until after the fact. The stumps are still there. I've been trying to pull out the sprouts but I can't really keep up with them + they break really easily. Unfortunately, my neighbors yards are also being affected.

It's also my understanding that it takes a pretty strong herbicide to kill it..I'm going to try treating the yard with OTC stuff, and try to help my neighbors with it too. Gotta be careful what you plant...

Another funny thing I've noticed is that with the Ailanthus and the big walnut gone, we have tomato plants sprouting up all over the place (thanks to the neighborhood squirrels). I didn't think the Juglone would leave the soil that quickly? It may just be an effect of the increased sunlight, and I am drawing inferences, but there appears to be a difference. I'm happy about that, it was one of the deciding factors in the tree removals.
 
Back
Top