I agree with Brad. That is the worst hack port job I have seen, put the tools down and back away. Do a seach and starting reading. While you are reading, you can order a new $350.00 cylinder/piston kit from Stihl.You need to put down the grinder and go back to studying first, seriously. Porting a cylinder isn't something you just do on a haphazzard whim.
You are using an out of date browser. It may not display this or other websites correctly.
You should upgrade or use an alternative browser.
You should upgrade or use an alternative browser.
660 Porting, with pictures. Need Some Input. (Pictures are Huge)
- Thread starter 93Dakman!
- Start date


Help Support Arborist Forum:
This site may earn a commission from merchant affiliate
links, including eBay, Amazon, and others.
hey man, things lok worse before they look good. its not even a third of the way done, some things are roughed in and some havent een touched. lay off me, wait till i get it finished before you start raggin on me.
Just a visual of how much wider the skirt is than the port
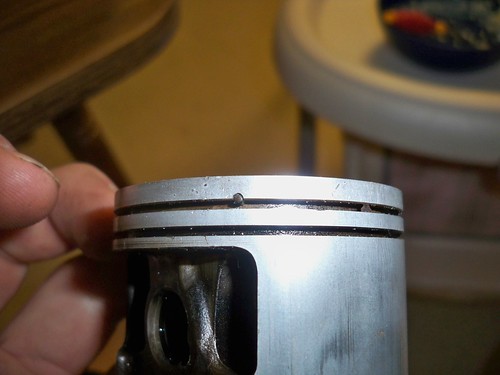
Ring pins are on the outside of the skirt so the limiting width is the skirt
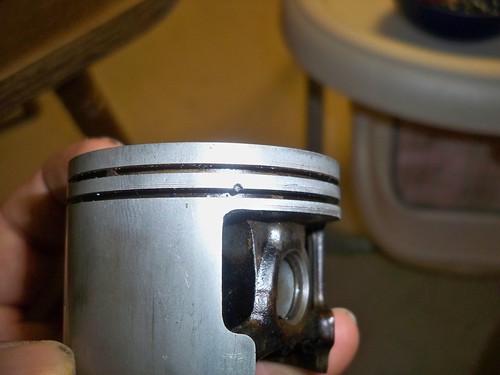
same as above but other pin
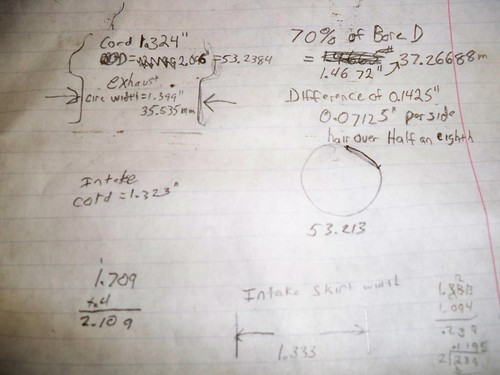
scratch paper. figures. skirt measurements
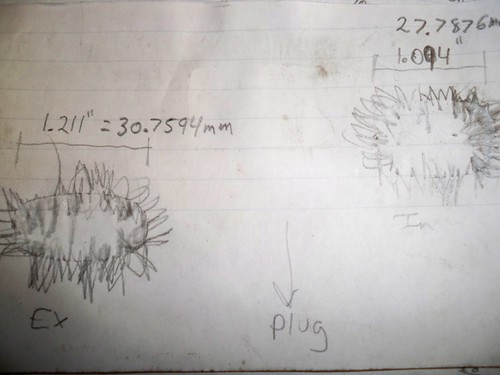
original port map
width that will be taken off each side of the port. will grind to the line. this is how I did the exhaust side.
Last edited:
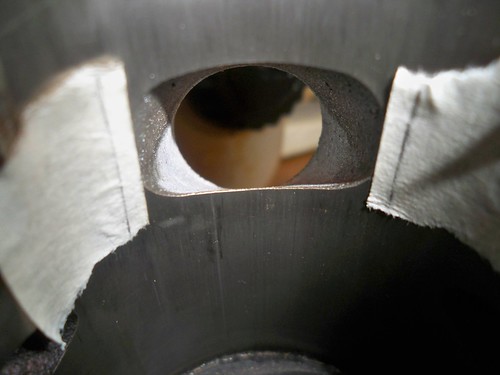
Widened intake to about .035 from the width of the skirt. I tried to keep a nice round in the sides so nothing decides to catch a ring.
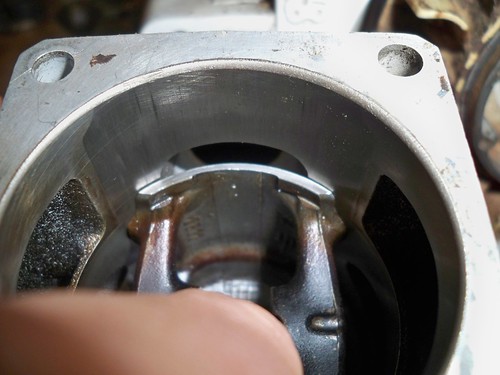
Same picture from a different angle. You can see where I blended the widened part of the port to the widened part of the intake mouth. The widest part of the port meets right up to the line i drew on the tape. Should it be like that or can I make some of the edges of the port wal straight up and down?
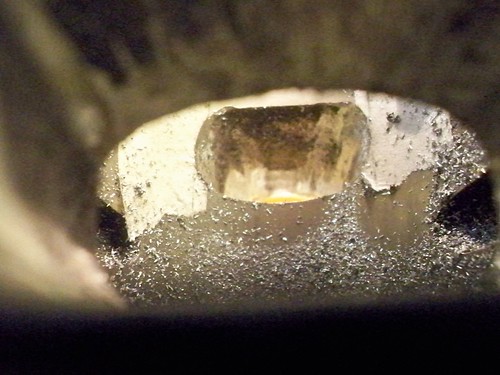
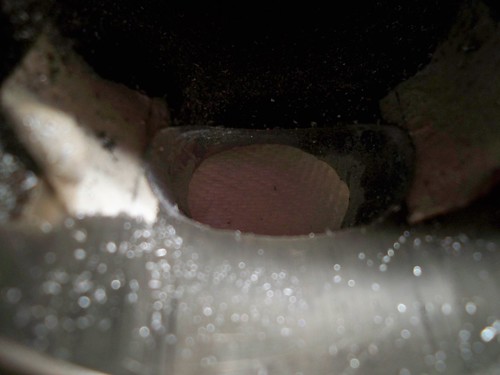
Again, another picture of the intake. Now you can really see my clumsy nick on the top of the port, it looks horrible, but i dont think the rings even get that low so maybe it wont hurt it.
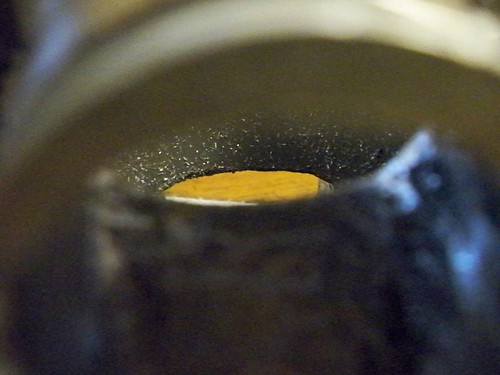
Bottom side of the exhaust port. I havent lowered it at all, I think the roughness is either aluminum dust or where i tried to smooth it out after nicking it.
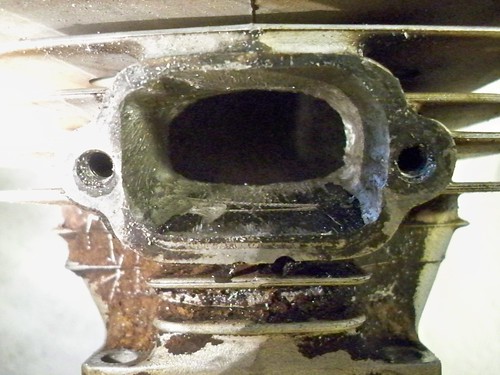
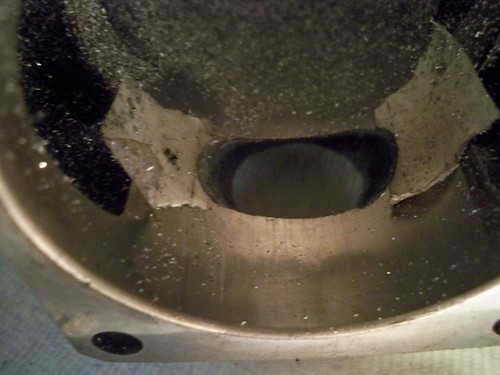
Exhaust after initial widening with the dremel. I didnt want to take to much off the sides where the gasket meets becasue i didnt want to loose strength there where the muffler bolts on. I have went over the left side with a haand file but havent got the right side yet. next i will smooth it all out with a finer file and or a round stone in my dremel.
those carbide burrs are grabby and very unforgiving!!
Last edited:
No rings travel over the intake. The bottom ring may dip down into the intake a little, not sure. Go ahead ahead and square up the sides, and flatten the bottom a little.
...those carbide burrs are grabby and very unforgiving!!
What kind of burr are you using? I don't find mine to be grabby at all. Use it like you're "sweeping" the aluminum away. Easy does it.
Boleclimber
ArboristSite Guru
Your work is looking good. Some believe only they know how to port a saw correctly- let it slide. There are many ways to do it and there are many different outcomes of the work.
Given that you did some math and measured your cuts, you are ahead of the curve. As you already know be sure to chamfer your ports.
When I port I use a very beat/deteriorated carbided bur designed for steel to ease of the grabbiness some describe. The aluminum carbide burs are too aggressive for me to use when doing cylinder work.
Dakman, don't let these people get you down. Porting looking pretty don't make the saw run any better. Some of the worst looking porting has been some of my best saws in the past on the job. Trial and error and good job, don't worry about the looks it don't make it run any better 

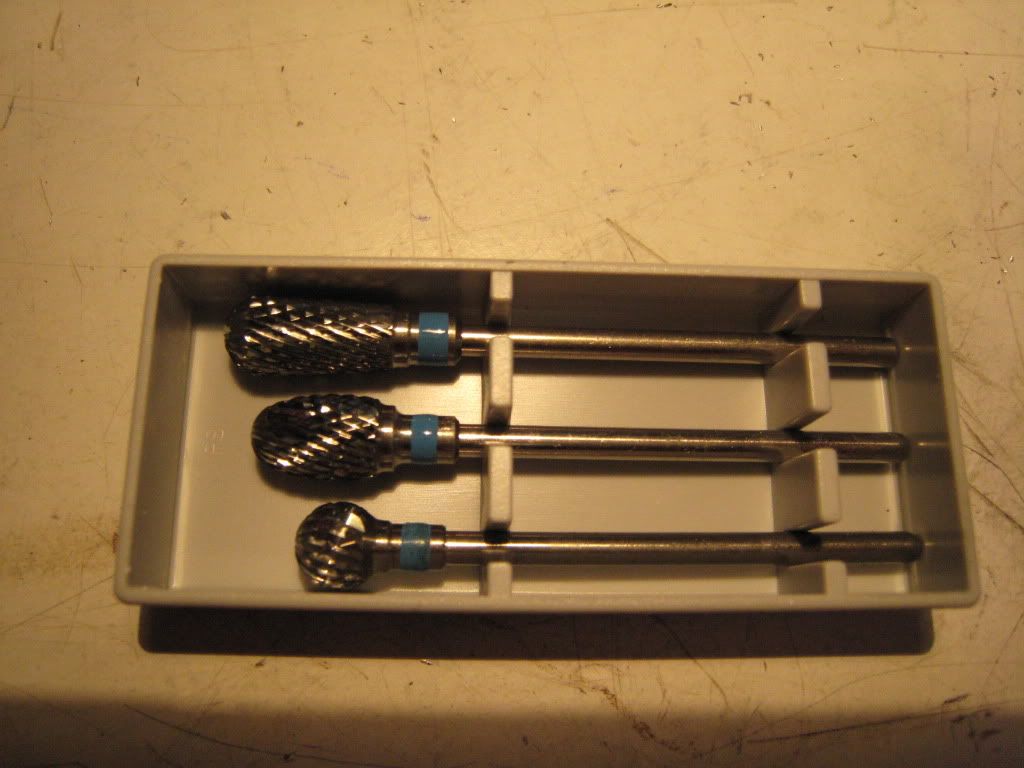
Dremel 117
1/4" Bullet Head High Speed Cutter
That is the style bit I use for porting. Like it has been said use light pressure & a sweeping motion.
Dremel 117
1/4" Bullet Head High Speed Cutter
That is the style bit I use for porting. Like it has been said use light pressure & a sweeping motion.
You should get some of the cross cut bits they are easy to control .I don't know if they are available for Dremel tool.
Guarddog1
ArboristSite Guru
yeah double cut rounded end work very well for me it may be the pics but those ports look huge and the double cut I think will leave a smoother surface initially. Also I noticed you ground to the line I now leave a bit of material for the finish work. Do not let all the nay Sayers discourage you.
husqvarmit
ArboristSite Operative
You should get some of the cross cut bits they are easy to control .I don't know if they are available for Dremel tool.
where do I get those!!!!!!!!!!!!!!!!!
Varmit
Sorry, it has been a chore getting everything done today, had to make a cheesey potatoe casserol for a work christmas party then go to work. Man I love that casserole. Best dish made by man, in fact i think it was god sent. Ok sorry i got off topic.
Thanks to all the input/replies/help I got on here, Its been a while since i got to replying to the particular people.
Brad, thanks for your in depth replies, they help so much. I did go extremely wide on the exhasut, maybe too wide. It seems to have about around a 1/32 of an inch from free porting the side. I that may very well have ruined this cylinder...I stopped opening the top and bottom of the the flange and focused on widening that area and blending that to the port. I ruined one burr with aluminum build up while taking that large amount off the sides, so I grabbed another and dipped the bur in new motor oil about every 5 seconds. It didnt make a mess at all and it kept the burr as clean as new. No alum caked on it. I took right at .090 inch off the sides of the intake and close to that on the mouth of the intake. I tapered it all the way in to the port. I didnt leave it quite as smooth as i did the exhaust side.
Pioneerguy600, Thanks for the info about the port offset. I had finished the intial roughing in before you posted that but I mocked it up and put some pencil lines on the piston and it is indeed not the same on both sides. This could be becasue I ground uneven or from exactly what your talking about. I will keep it in mind for the next saw i port. (I either a 026 if i find one or my 6401 bb cylinder....) I have been very careful to make sure my ring ends are well supported though out the entire stroke. Lukily the rings end beyond the edges of the the skirt sides, so i will not have to worry about them much,
Wigglesworth. haha, your completely ate up with it! I did throw those pictures up and not come back for half a day, oops. Us carmi boys will have to drop by and show you how we do it up here!! P.S., Mt. carmel is, as odd as this sound, our "rival" town. back in high school kids would drive either from carmi to Mt.C or other way around just to fight each other. Then the football games....cars would get busted up, pepole would get busted up...it was mayhem. I have no idea what started all that! kind of a waste of energy if you ask me!
Brad, once mocked up i could see that the bottom ring did pull down into the intake port, I made sure to keep a nice rounded top for that. I didnt get the sides flattened out before assymbly, they are still quite a bit curved. The burr im using is similar to the top one bonded posted. It has the same cutting edges and shape and style, but it is small and made for a dremel and is only as wide as the shaft and has a 1 inch long cutting length and a round over nose.
Boleclimber, Thanks for the positive. It was starting to all come together there. Once things started getting smoothed out and i started dipping the burr in oil and cutting, it started making things easier and quicker. I ended up chamfering my ports to 45 with a hand file.
wooddog, haha thanks for the input. PLUS, if it runs after i get it put togheter, no one will see my sketchy work any way!!! haha
bonded, I use a variation of the top one. My dealer picked up a variety bag of fifty carbide burrs for 25 dollars and gave me two to try out. I like em but DANG there grabby. I was tempted to start grinding on a broken ratchet I had just to take the bite off of em!
Guarddog1, I did grind to the line, and once i started the work with the hand files I was wishing i hadnt went as far as i did with the dremel. It made for an even more tedious job that it should have been. I have to learn somewhere!!! next saw will be better. I will probably alwayse say that haha!
I dodnt think i left anybody out that replied. Thank you all for helping me with this!
I got the mock up done, torqued the cylinder down and went to turn the flywheel and found out that the piston hits the squish band at the top of the jug and wont let it make a complete revolution with out the base gasket. So it looks like im running with a base gasket now.
superfire
Addicted to ArboristSite
sounds better
i seen your picts and had :censored: tryin to understand what was what now i see. sounds like dremels are not you friend") i think it is easier to just use a series of files and call it good. my buddy fubared a new mushy so i just put a new slug in and took some of the sharp edges offthe ports with a basterd file before i took a brake cylinder hone to the jug. runs ok considering that the saw is a mushy. the trick to porting is a little at a time the slow method saves you from a ruined job. it is amazing how well a little lite polising of the ports can do to saw performance:jawdrop:
i think it is easier to just use a series of files and call it good. my buddy fubared a new mushy so i just put a new slug in and took some of the sharp edges offthe ports with a basterd file before i took a brake cylinder hone to the jug. runs ok considering that the saw is a mushy. the trick to porting is a little at a time the slow method saves you from a ruined job. it is amazing how well a little lite polising of the ports can do to saw performance:jawdrop:

i seen your picts and had :censored: tryin to understand what was what now i see. sounds like dremels are not you friend
i think it is easier to just use a series of files and call it good. my buddy fubared a new mushy so i just put a new slug in and took some of the sharp edges offthe ports with a basterd file before i took a brake cylinder hone to the jug. runs ok considering that the saw is a mushy. the trick to porting is a little at a time the slow method saves you from a ruined job. it is amazing how well a little lite polising of the ports can do to saw performance:jawdrop:The double cut or cross cut bits are much easier to control and they cut plenty fast, the straight sided one with a little turn up on the end is my favorite. The straight side gives a nice smooth finish and helps keep the walls straight from entry to exit. I do all my chamfering by hand, start with 320 grit machine paper to accomplish the first cut and follow with a light buffing with 500 grit machine paper. You don`t need a big chamfer, something like .010 is plenty ,just so the rings don`t catch and of course we don`t want anything to scratch the piston. Your work is not really all that bad and will improve with practice, some guys here are from a machinist background and have taught themselves how to work to close tolerances. A steady hand and very good hand to eye coordination is a definite plus but just doing the task and repetively you can make small changes to the method and direction of approach that will give much improved results. Believe me I have seen much worse porting jobs than the one you have posted, some ran ok and others were ruined beyond repair. As others have said you are at least mapping and measuring, thats a plus and marking the piston through the intake and exhaust is a good habit to form, just gives an actual representation of what you are accomplishing and hopefully not going beyond known limits.
Pioneerguy600
Pioneerguy600
Looks like my burnt cylinder I practiced on. Heavy handed and porting don't work.
Someone said they dulled the burrs down a bit before porting on aluminum, i think that's what I should have done. That things is sharp and removes a lot really fast.
Someone said they dulled the burrs down a bit before porting on aluminum, i think that's what I should have done. That things is sharp and removes a lot really fast.
Last edited:
sachsmo
Addicted to ArboristSite
Your work is looking good. Some believe only they know how to port a saw correctly- let it slide. There are many ways to do it and there are many different outcomes of the work.
Given that you did some math and measured your cuts, you are ahead of the curve. As you already know be sure to chamfer your ports.
When I port I use a very beat/deteriorated carbided bur designed for steel to ease of the grabbiness some describe. The aluminum carbide burs are too aggressive for me to use when doing cylinder work.
Many experts on here, I hate it when told "it can't be done"
I like "outside the box thinking"
"The only way to avoid mistakes is to do nothing"
Another important item, at least to me is to make sure the worked over piston and cylinder is squeaky clean before final reassembly. I run all of mine through, you guessed it, the dishwasher to remove all remaining grindings. If you even soak out the P&C afterward you would be surprised at how much stuff will make its way out of the transfers but the swishing action of the dishwasher takes away even more junk. Actually I don`t even start to work a cylinder over until it has been thoroughly cleaned, but even then there is still some carbon or sticky unburned oil/gas residue left behind the transfers that metal chips/shavings will stick to and won`t come out even with compressed air blown through. The dishwasher or sonic cleaner is your friend!!
Pioneerguy600
Pioneerguy600
Brad, thanks for your in depth replies, they help so much. I did go extremely wide on the exhasut, maybe too wide. It seems to have about around a 1/32 of an inch from free porting the side. I that may very well have ruined this cylinder...
You need about 2mm (~0.075") or maybe a little less for a good seal. You are at about 40% of that.
From your calculations, you were going for a port width of 70% of the diameter, which is pretty aggressive. When Brad says "70% of bore diameter" in his posts, he is talking about a circumference measurement, which amounts to a port width of just less than 65% of the bore diameter.
Probably a good idea on the next one to start with 60%, see how it runs, and experiment with more width later.
