


Daninvan
ArboristSite Operative
I use a very simple home made mill based on the Maloff design. The bar is drilled and tapped, threaded rods are used for the vertical posts, cut thickness is set by spacers on the threaded rods, and the mill itself is made from 1' square steel tubing and wood. I like the design since it requires only a drill press and hacksaw to work the metal parts, no welding is required.
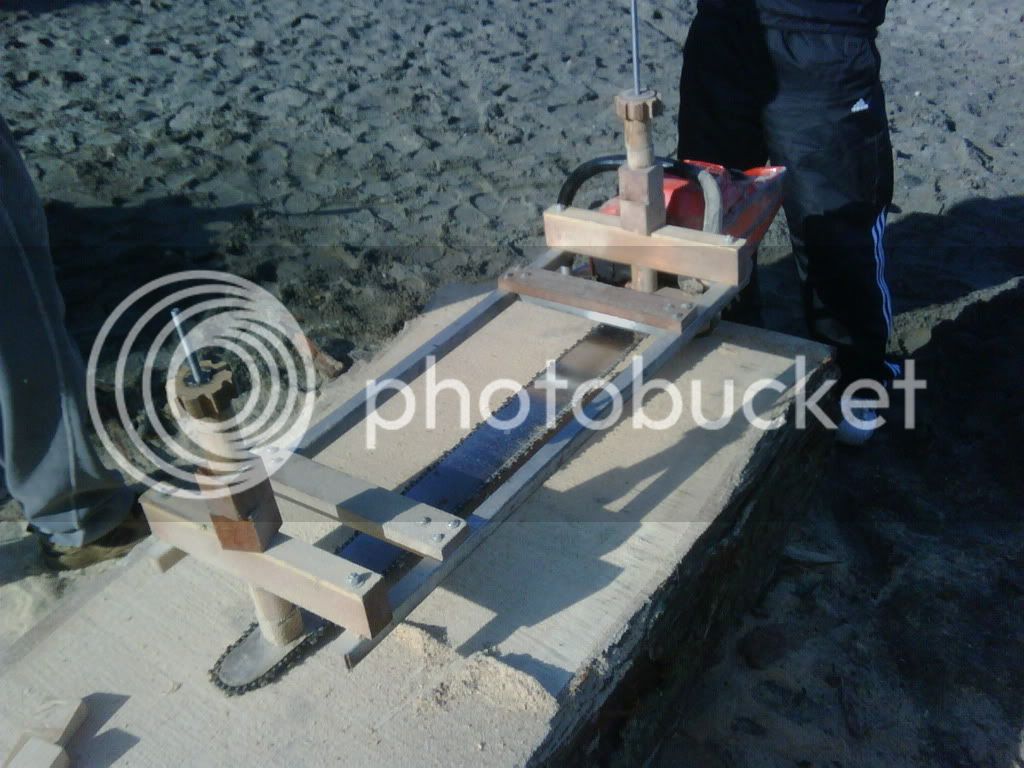
I have three more or less identical mills in this style, and they have served me well for several years. Recently I began to feel the need to enhance them slightly, they had seen a lot of use and their shortcomings were starting to wear on me.
First thing I did was get rid of the in-bar aux oiler that I bought from Bailey's. It worked well when it worked, but it clogged way too easily and generally required removing the chain and cleaning the groove to unclog it. I bought a brass bolt, cut off the head, drilled a hole through it (first useful thing I have done on my Unimat lathe!), and mounted it so it would drip directly on the chain.
In conjunction with this, I reversed the direction of the aux oil bottle, so that the valve was 'downhill' on the cut. This allows all the oil to flow out of the valve, rather than leaving some in the bottom.
Next, I added back on a clear acrylic dust/chip deflector at the powerhead end of the mill. One of the mills had one previously, but an ill advised muffler mod had directed the exhaust onto it, causing it to melt. This really cuts down on the amount of crap flying into my face, as well as cutting down on fumes a bit too.
Next, I cut about a million spacers out of surplus ipe flooring. The ipe is tough, and exactly 3/4" thick. I also cut the hole in the middle of each piece big enough to fit on my large and small mills both, as they use 1/2" and 3/8" threaded rod respectively. Now all the spacers are totally interchangeable on all mills. If I want/need to change mills in the middle of a cut, I can reproduce the thickness exactly. The spacers are about 1 1/8" in diameter, so they also give me that extra fraction of an inch more than my older ones that were different sizes, but at a minimum closer to 1 1 /2".
I also drilled the nose sprockets to give me some extra length.

After much complaining by my many friends who have milled with me, I added a handle to one of the mills. If it works out, I will replicate on the other mills. I think I cut it off a scrub brush.

I beefed up the bolts that secure the wooden crosspieces to the metal rails. I had noticed one of the mills would rack if I pushed it too hard. Also, the bolts I had used previously extended below the rails. This was not a problem normally, as the wooden crosspieces are outside of the cut. But if I angled the cut, or more commonly on the lower half of a log, the nuts that protruded below the crosspieces would interfere with the log. I tapped the rails and secured the crosspieces to them with 3/8" bolts.
My aux oiler tank was originally mounted to one of the spacer blocks. Every time I changed the spacers, I had to fool around with the oiler. So I added a separate piece of threaded rod to mount the oiler tank to.
I mounted a pair of rollerblade wheels to a piece of ipe about a foot long. I can replace the lower space block with these, if I want to have wheels in the picture.
One last mod I intend to make to the mills is to add a central cross piece. I do find occasionally on starting or finishing a cut that I can't align the mill so at least one of the guide crosspieces rests on the cut. This makes it very difficult to keep the cut flat.
I may also stop simply nailing a 2 x 12 to the top of the log to use as my guide board. I have a couple 10' aluminum rails that I think I can do something with.
I have three more or less identical mills in this style, and they have served me well for several years. Recently I began to feel the need to enhance them slightly, they had seen a lot of use and their shortcomings were starting to wear on me.
First thing I did was get rid of the in-bar aux oiler that I bought from Bailey's. It worked well when it worked, but it clogged way too easily and generally required removing the chain and cleaning the groove to unclog it. I bought a brass bolt, cut off the head, drilled a hole through it (first useful thing I have done on my Unimat lathe!), and mounted it so it would drip directly on the chain.
In conjunction with this, I reversed the direction of the aux oil bottle, so that the valve was 'downhill' on the cut. This allows all the oil to flow out of the valve, rather than leaving some in the bottom.
Next, I added back on a clear acrylic dust/chip deflector at the powerhead end of the mill. One of the mills had one previously, but an ill advised muffler mod had directed the exhaust onto it, causing it to melt. This really cuts down on the amount of crap flying into my face, as well as cutting down on fumes a bit too.
Next, I cut about a million spacers out of surplus ipe flooring. The ipe is tough, and exactly 3/4" thick. I also cut the hole in the middle of each piece big enough to fit on my large and small mills both, as they use 1/2" and 3/8" threaded rod respectively. Now all the spacers are totally interchangeable on all mills. If I want/need to change mills in the middle of a cut, I can reproduce the thickness exactly. The spacers are about 1 1/8" in diameter, so they also give me that extra fraction of an inch more than my older ones that were different sizes, but at a minimum closer to 1 1 /2".
I also drilled the nose sprockets to give me some extra length.
After much complaining by my many friends who have milled with me, I added a handle to one of the mills. If it works out, I will replicate on the other mills. I think I cut it off a scrub brush.
I beefed up the bolts that secure the wooden crosspieces to the metal rails. I had noticed one of the mills would rack if I pushed it too hard. Also, the bolts I had used previously extended below the rails. This was not a problem normally, as the wooden crosspieces are outside of the cut. But if I angled the cut, or more commonly on the lower half of a log, the nuts that protruded below the crosspieces would interfere with the log. I tapped the rails and secured the crosspieces to them with 3/8" bolts.
My aux oiler tank was originally mounted to one of the spacer blocks. Every time I changed the spacers, I had to fool around with the oiler. So I added a separate piece of threaded rod to mount the oiler tank to.
I mounted a pair of rollerblade wheels to a piece of ipe about a foot long. I can replace the lower space block with these, if I want to have wheels in the picture.
One last mod I intend to make to the mills is to add a central cross piece. I do find occasionally on starting or finishing a cut that I can't align the mill so at least one of the guide crosspieces rests on the cut. This makes it very difficult to keep the cut flat.
I may also stop simply nailing a 2 x 12 to the top of the log to use as my guide board. I have a couple 10' aluminum rails that I think I can do something with.
