Getting started with the ripsaw - blade build up?

Arborist Forum

Help Support Arborist Forum:

This site may earn a commission from merchant affiliate links, including eBay, Amazon, and others.

DaltonPaull

ArboristSite Operative
Joined
Aug 19, 2008
Messages
153
Reaction score
27
Location
Portland Oregon
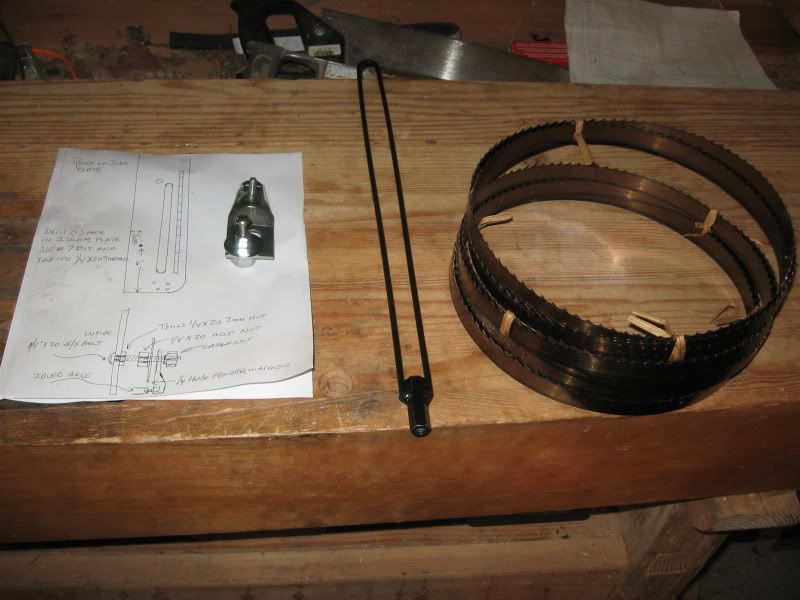
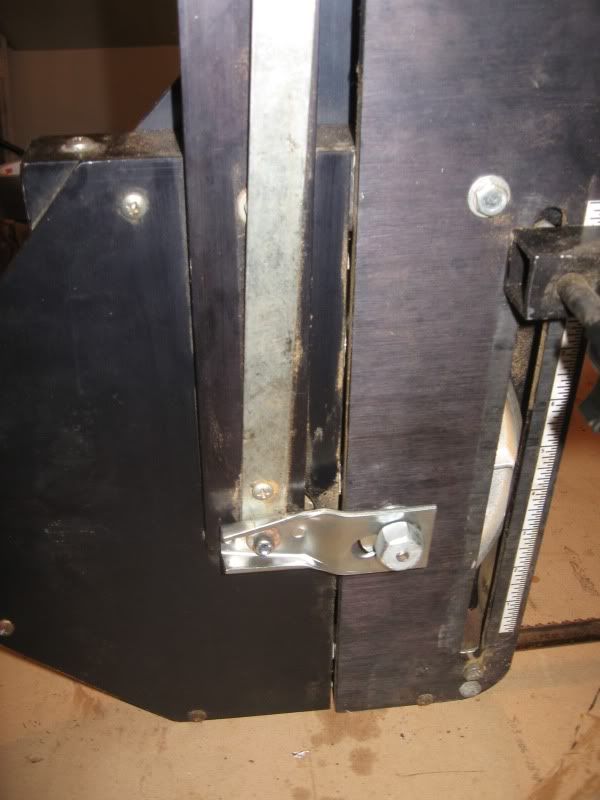
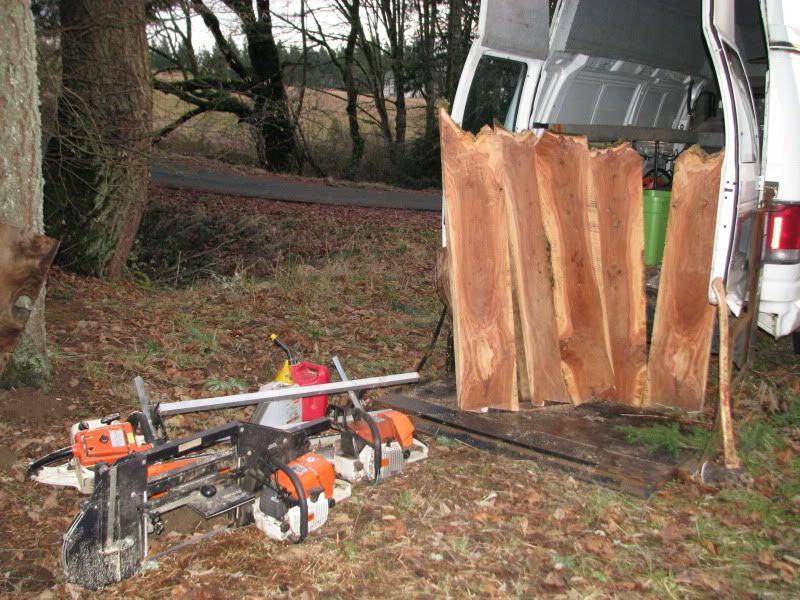
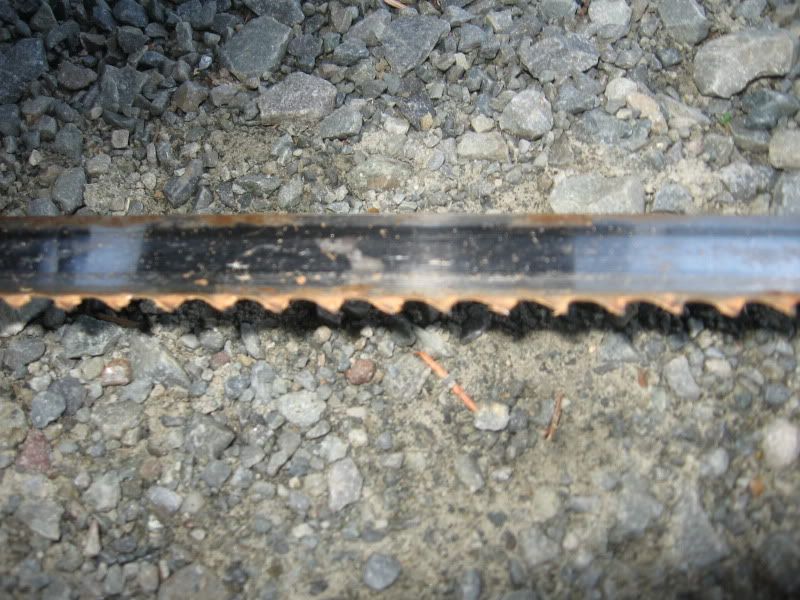
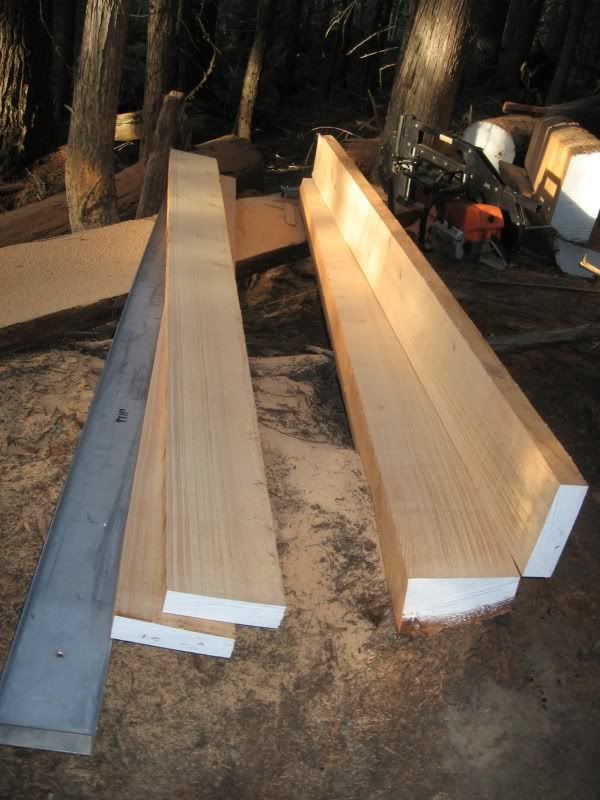
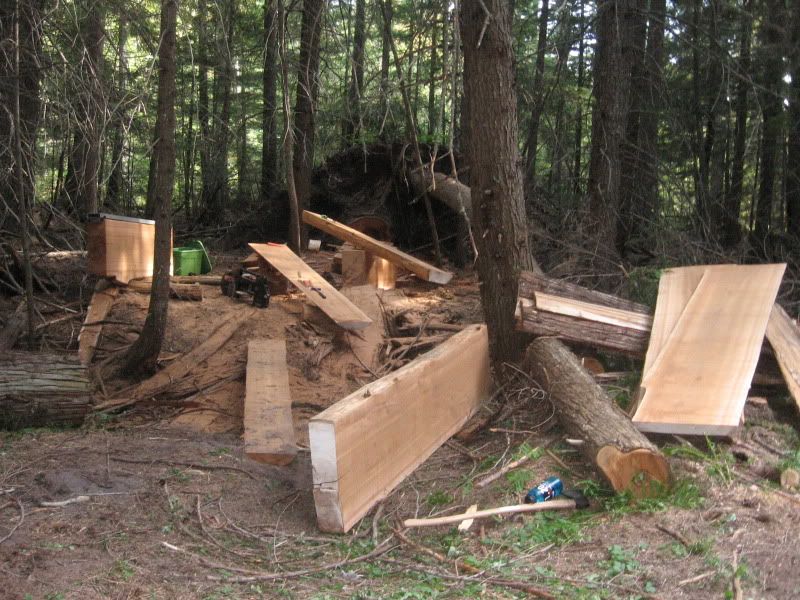
I just picked up a used ripsaw in good condition with an extra set of guide rails. I got it thinking that it would be great for cutting thin boards and quartersawing - basically the stuff that's too wasteful with the CSM. I've been cutting some western red cedar blow downs and a long dead larch - starting by cutting some cants with the CSM using the ripsaw rails - a huge upgrade! Then I started sawing boards with the ripsaw but my cuts keep coming out wavey - I've played with the blade tension and changed blades but it seams like maybe the cedar is building up on the blades and causing the poor cutting. The cut quality/speed really goes down quick after a blade change. Maybe the surface rust on the blades that came with the ripsaw causes the cedar to stick to the blade? Does anyone lubricate ripsaw blades? Do you think the build up would cause the blade to wander?

The only thing that seams to help is going really slow - like CSM speed and I think I should be able to do better than that in cedar. I'm pretty disappointed in the amount of wavy boards I've produced so far and looking forward to climbing the learning curve!

IMG_1363.jpg


IMG_1360.jpg


IMG_1359.jpg
 
I've been re-reading forum posts about ripsaws and noticing that people like to run there saws at lower speeds to find a sweet spot. I'm running my 066 on the ripsaw (it came with an 044 with a scored piston and my MS270 is too small) even though it's way too powerful for the application. Maybe it's just going too fast - it doesn't really seam to feel the load. I have it tuned rich for milling but I'll experiment with running it slower to see how that effects things.
 
The surface rust, will dissappear in the cutting.
When you buy new blades, I suggest Cook's super sharp....whatever lenght you need. They "roll" the blades, set and sharpen them before shipping. The rolling of the blades to flat....works and cuts out the "wandering" of the blade.

On our bandsaw mill we use dish soap in water....to stop the sap build up on the band blade. Your build up looks normal. But on the thick side.

It is a simple drip system and it works.

Just a tube above the infeed of the blade, slow drip rate. From a gallon jug with a small valve would work for what you are doing. It helps keep the blade cool, and keeps the temper on the teeth. It cuts down on the noise too.

The higher the band speed the better. KEEP THEM SHARP, KEEP THEM SHARP, KEEP THEM SHARP, KEEP THEM SHARP!!!!!!!!!!!!!!!!!

Keep the blades tension up near maximum. Pay attention to the feed rate, slow enough that it cuts flat through knots, and consistant.

Kevin
 
Last edited:
Though I've never used a bandsaw mill like yours...I've used a bandsaw for a long time. Assuming the mill is setup properly (proper clearance if adjustable for the band guides) I can get wavey cuts with tension that is too low for the feed pressure. However, higher tension isn't always the cure. Clearly if the feed pressure is too high..the band is not cutting properly. Though you have some buildup, I'd bet your blade is just not sharp, or if it was, it's not now. Cutting with too low a feed pressure, with a good sharp blade will kill the edge with heat in no time. It's a fine balance altering your feed rate to cut nice..but not exceed the blade tension which can make your blade wander. Too slow a feed rate will overheat the cutter and it's done. It happens quite fast. In 6" you can overheat your teeth and be done for..even feed pressure is required. If your band is in fact really sharp..not just sharp but REALLY good, then you either don't have enough tension, don't have a large enough band (width) for the length of cut you have and the feed pressure you need. The number of teeth per inch (TPI) can also be altered to help overcome the feed pressure, blade tension balance at the expense of the cut finish. By the look of the band in your photo, a bit out of focus but usually you can still see the shine of the tooth tip...yours seems to be covered in pitch at the tooth edge. Mine only look like that with dull cutters, slow feed. I'd suggest you sharpen that baby up (dremel and cutoff wheel). It will take you awhile until you get the hang of it but you have a couple of dead bands to play with and learn on. It's not that hard. I can get 4-5 sharpenings out of a band before I change the gullet too much and have to let it go. Bands are cheap though. Once sharp again, it should cut nice with low feed pressure. If you apply too little feed pressure you'll overheat the band and dull it again. If you cannot get good looking chips with the right feed pressure (because you run out of power for that width of cut) then you'll need to reduce the TPI to cut that material. However, it's only softwood...you should be OK. I think your band is dull..though you might have caused it. Just my 2 cents. Nice rig...nice setup, nice boards. What size power head is that? Max width of cut on the ripsaw?
 
Ripsaw manual

DP:
If you don't have one, you can download the Ripsaw manual from www.ripsaw.com.
The manual says to adjust bar oiler to a minimum. I have an 044 powerhead on mine, and I increased oil flow, which helped a lot. I adjusted mine until I could see oil coming out the discharge side with the sawdust.
Also, the manual states to apply liquid gasket around the oiler port before assembly.
My first few boards were wavy, especially if there were knots in the wood. You need to run WOT, and experiment with feed rate. For me, the feed rate was slower than I thought it should be. Try going slower than you think you need to, at a consistent rate. It varies with the type of wood, and the grain. It's similar to resawing on a bandsaw, there is an optimum feed rate which gives the smoothest cut.
I haven't used mine for a while, so I'll probably have to "relearn" the feedrate.
As mentioned, blade tension is also critical. If you're getting waves no matter how slowly you feed, the blade tension is too low.
 
Thanks for the inputs. Last night I was a little discouraged but now I'm excited to go give it another try.

Too slow a feed rate will overheat the cutter and it's done.

Maybe I'm going to slow and dulling the blades - I'll start with a sharp blade, lots of tension and try again a bit faster.

The manual says to adjust bar oiler to a minimum. I have an 044 powerhead on mine, and I increased oil flow, which helped a lot.

I realized that a lot of the oil is dripping out right at the saw before it makes it to the ripsaw. In the manual it doesn't mention removing the shield that goes between the bar and the chain tensioner but in the picture they show that it's removed. I'll remove it, turn up the oiler (was down all the way) and see if that helps - then consider using liquid gasket.
 
The surface rust, will dissappear in the cutting.
When you buy new blades, I suggest Cook's super sharp....whatever lenght you need. They "roll" the blades, set and sharpen them before shipping. The rolling of the blades to flat....works and cuts out the "wandering" of the blade.

On our bandsaw mill we use dish soap in water....to stop the sap build up on the band blade. Your build up looks normal. But on the thick side.

It is a simple drip system and it works.

Just a tube above the infeed of the blade, slow drip rate. From a gallon jug with a small valve would work for what you are doing. It helps keep the blade cool, and keeps the temper on the teeth. It cuts down on the noise too.

The higher the band speed the better. KEEP THEM SHARP, KEEP THEM SHARP, KEEP THEM SHARP, KEEP THEM SHARP!!!!!!!!!!!!!!!!!

Keep the blades tension up near maximum. Pay attention to the feed rate, slow enough that it cuts flat through knots, and consistant.

Kevin

Kevin, I called cooks to get bands for my Ripsaw maybe 3 months ago-they said they didn't sell bands in 3/4" width. 1" width was the smallest they had. Too bad, as they have really good prices.

Dalton-I've had good luck cutting dry cants with my Ripsaw. I cut some just cut green pine logs up a while back and my cuts didn't come out to good. I haven't really used it that much, and rather than taking the time to correct this issue with the green logs I switched to the CSM. I have some learning to do as well. I can tell you that when you get it right it will cut faster than a CSM with very little sawdust and much less kerf waste. I do have some cants drying and I'll use the Ripsaw for those. There is a learning curve with these, unlike a CSM, so I'll follow the posts too. Good luck
 
Last edited:
I realized that a lot of the oil is dripping out right at the saw before it makes it to the ripsaw. In the manual it doesn't mention removing the shield that goes between the bar and the chain tensioner but in the picture they show that it's removed. I'll remove it, turn up the oiler (was down all the way) and see if that helps - then consider using liquid gasket.

The oil is only lubricating the gear drive on the ripsaw and it really shouldn't take all that much. I'm guessing the build up on the blades is just par for the course with a softwood. I suppose you could rig up a water drip (has anyone else tried this w/ a ripsaw)? Set on low on my 036 it dribbles oil out of the bottom of the ripsaw. I think if you set it to a higher flow you'd just be wasting bar oil.

I don't have it all perfected yet but I can tell you that when it's set up correctly it gives good results. I think it just takes a while to know the machine.

Yeah, pull that shield between the bar and the mounting block on the ripsaw and use a little permatex when you mount it up. You definitely want to get some oil to the gears.

Wish I had more time to play with mine.
Your board pics look good to me...
Andy.
 
Your board pics look good to me...
Andy.

I didn't embarrass myself by putting up a picture the wavey ones!

I've had some more mixed results with the ripsaw. I turned up the band tension, fed a little faster and thought things where going better but soon the band seamed to be dull again, (like 50 linear feet of cutting in a 12" cedar cant) the cuts got wavey and the foot wanted to lift of the guide. Maybe this particular cedar (very wet?) is just hard on the band. This week I think I'll try cutting some hardwood and see how that works out. My cordless dremel and stones came in the mail so I'll give sharpening a try as well.

I've noticed that my ripsaw is probably one of the older models. One problem I had early on was that the tracking got out of whack on the drive wheel and the band came off and cut into the guard. I put some locktite on the screw and readjusted - so far so good. I noticed that the manual shows a set screw for the tracking adjustment that mine doesn't have - maybe I'll buy the newer tracking block instead of depending on the locktite. The idler wheel tracking mechanism also seams inferior to what is shown in the manual and might be inferior to the newer version and causing issues with tracking and blade tension. Notice in the picture how the bolt is bent and at an angle?

IMG_1366.jpg
 
DP. Looking at the photo...I can see the bent bolt...isn't the arm bent also? I can see some clearance between the mount. Might be the photo though. Feeding too fast can also knock the edges off a good new band. It's a fine balance. Watch the chips to make sure the band is clearing them fine. Could be a funny log...but 50' might be 1/2 of what I'd expect. Remember..I don't run one of these...just a 5hp stationary bandsaw that I also slave as a mill on green wet wood. Wet is nice...different to mill than resawing dry wood, but cooler for the band. Now.... 50' x 12" of dry hardwood I'd expect to give the band a quick going over.
My first thought when reading your post about using your 660...could you be running too high a cutter speed (sfm)? Bands are not very good with heat and too high a surface speed could be a problem for the band you are running. Are you using a hook band? 3TPI? Since bands in wood can perform OK from 1000sfm (slow) to 5K or 6k (fast = heat), I'm sure your gearbox is appropriate. Something else to think about though.
How about this trick my Dad taught me so I'd stop ruining his nice bands on the big BS when he wasnt' around....shut down your rig mid cut...take off your glove and touch the band...it will be hot but you should be able to hold it..sort of...and not get a burn. If it's hot...somethings not right...feed rate fast/slow....band not sharp...too fast a sfm for that board. Once overheated/dull the band will go downhill quickly until you give up.
 
Last edited:
Blade tracking and tensioning

DP:
The picture you posted shows the blade tensioning adjustment, not the blade tracking adjustment. I don’t think there has been a change to the design, I bought my Ripsaw new in April 1998, and my blade tension assembly is like the manual (see attached pictures). It looks like someone has modified/repaired the blade tension assembly (P/N RS000 29) on yours. The hex pin (P/N RS000 12) on yours has been repaired (that “bent bolt” should not be there). I can’t tell for sure, but it looks like it might work OK if the bolt were shorter and with a lock washer or double nutted. The ends of the bolt should not make contact with anything. Personally, I would order replacement parts, or send the saw for repair refurbishment.

BTW, in your picture, in the lower right, the “silver” metal piece is the tension indicator (P/N RS000 31) and you can see the mark on the end of the rear tension arm (the mark looks red in your picture). To start out, you should tighten the blade tension screw until the tension indicator is on the mark.

Re: Your comment about missing set screw, there are two screws on the the drive wheel blade tracking adjustment. The tracking adjustment screw is on the side (facing center of saw) of the wheel hub. The set screw is on the bottom of the wheel hub.
I also attached pictures of the idler wheel and drive wheel blade tracking adjustments.

I ran my Ripsaw with moderate to heavy use for about ten years, and finally I could not get the blade to track. Like you mentioned in your earlier post, I ended up cutting into the cover plates. In August 2008, I shipped the Ripsaw to SIR (Southeastern Industrial Resources) in Grant, Alabama, for repair/refurbishment. (They bought the design and manufacturing rights from Better Built Corporation in Wilmington, Mass.) I am very pleased with the work and the saw looks and performs like new. Total cost including labor was $354.95. Feel free to PM me for details.
 
Last edited:
DP:
The picture you posted shows the blade tensioning adjustment, not the blade tracking adjustment.

There is a label on the side of my ripsaw that points to this bolt as the tracking mechanism so I think it must be the old method. I don't have the idler tracking adjustment that is in your picture.

BTW, in your picture, in the lower right, the “silver” metal piece is the tension indicator (P/N RS000 31) and you can see the mark on the end of the rear tension arm (the mark looks red in your picture). To start out, you should tighten the blade tension screw until the tension indicator is on the mark.

I'll try to be more brave and crank it up a little but just to get it close to the red mark takes a ton of force on the nut and the blade feels very tight. I did break one band already and thought maybe I'd over tensioned.

there are two screws on the the drive wheel blade tracking adjustment. The tracking adjustment screw is on the side (facing center of saw) of the wheel hub. The set screw is on the bottom of the wheel hub.

Not on mine - there's no set screw, that's why I want to upgrade. Although maybe I can just drill/tap a hole.


My ripsaw looked to in perfect condition before I got a hold of it (and gouged the blade into the cover) and the old owner told me it only had 20 hours of use at the most so I don't really think it suffers from wear and tear or modification - it's just the old design.
 
take off your glove and touch the band...it will be hot but you should be able to hold it..sort of...and not get a burn. If it's hot...somethings not right...feed rate fast/slow....band not sharp...too fast a sfm for that board. Once overheated/dull the band will go downhill quickly until you give up.

Good idea, I'll check next time.
 
I discovered that the cooked bolt in the picture above was due to a broken tensioner (the loop thing) that was causing the tensioner to need to be tightened to the point that the bolt reached the end of the slot and started to go crooked.

I ordered a new tensioner today and also spent $20 to upgrade to the newer idler tracking adjustment system, allowing me to get rid of that bolt all together.

When I asked the guy at ripsaw/southern industries about the blade build up he suggested squirting some dish soap on the blade now and then. He also suggested tightening the blade to the point that it can be twisted only slightly in the middle as a starting point.

Looks like I'll be shut down with the ripsaw until the parts come in. I'll post an update when they arrive.
 
DP, There are all kinds of field methods for determining proper band tension. Nothing you can explain in words though. Sure..it shouldn't twist much by hand..but how much is much? Experience and checking when it's working right will help duplicate it in the future. Same as the blade temp in the middle of a cut...you just have to feel a good clean cut... to know how hot it gets. As I stated from one of your first posts..we'll assume the mill is setup properly. Maybe you just are not able to obtain tension and alignment until your new parts come in. Sounds like you are getting closer to a good setup.
 
I think most of your problem is due to the broken tensioning system. I have an older one (1997 vintage I think) and know that the newer ones have basically the same design as the older ones. They have changed some of the bolts and knob sizes and threads over the years but not the basic design of the tension or tracking system. If the picture you posted is an indication of where the tension is set for milling, it is much too low. I run mine with the edge of the indicator centered over the notch or even a little higher. You have to gain a feel for throttle speed and feed rate with experience. I use a 036 power head and rarely run wide open throttle. Also, angle the unit in the cut as this helps in some woods. I have found that cutting wet logs results in wavy cuts but you can compensate using throttle opening, feed rate and angling the unit in the cut. But I must admit that milling wet logs (maple in my case) doesn't result in very clean cuts even with proper tension and sharp blades.
 
I'm pretty sure that the tensioner broke mid-way through my cedar cutting frustrations. It might even be that I had it over tensioned at some point and that's why it broke. I do think that I'll get more consistent results when I'm able to nail down the tension adjustment.

I must admit that milling wet logs (maple in my case) doesn't result in very clean cuts even with proper tension and sharp blades

That cedar was pretty darn wet - almost dripping.
 
Better results

Well a few months ago I finally got the replacement parts for the Ripsaw. First the blades where back-ordered then the tensioner was. Since then I've milled maple and apple had no problems with wavy cuts.

Here's a summary of whats been changed:

1) Installed the updated idler wheel tracking mechanism

2) Installed the replacement tensioner (new style to go with new tracking)

3) Bought new blades (look the same except that the new ones are coated)

4) Started spraying the band with soapy water every cut or so.

With this many changes it's hard to know what made the most difference but I'm happy with the results now although it was cedar that was giving me fits before. Now that I'm a little more confidant I'll try cutting up some ceder cants that I cut last summer to see if I've really solved the problem.

The new parts:
IMG_1384.jpg

Holes drilled, tapped and tensioner installed:
IMG_1386.jpg

Apple milled with new setup:
IMG_1935.jpg
 

Latest posts

Back
Top