How to mill this log?

Arborist Forum

Help Support Arborist Forum:

This site may earn a commission from merchant affiliate links, including eBay, Amazon, and others.

AndyR

ArboristSite Operative
Joined
Nov 20, 2007
Messages
188
Reaction score
15
Location
Central Illinois
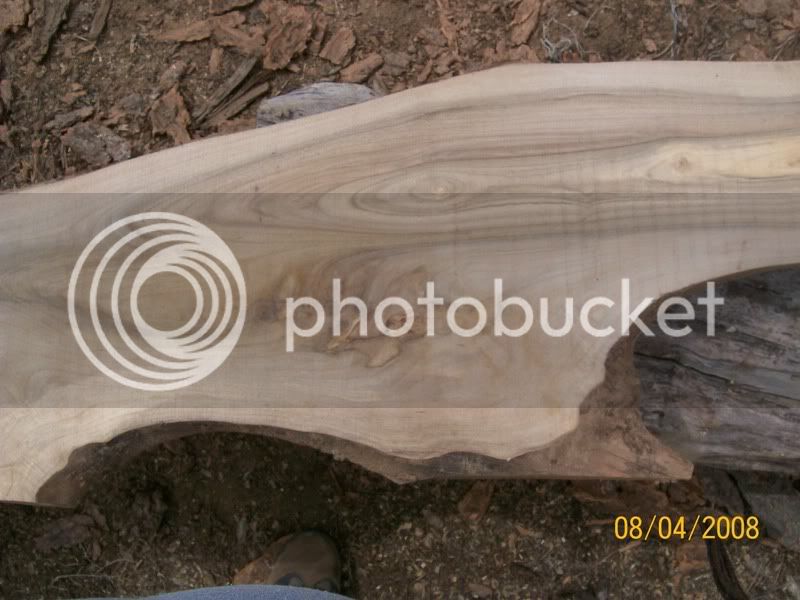
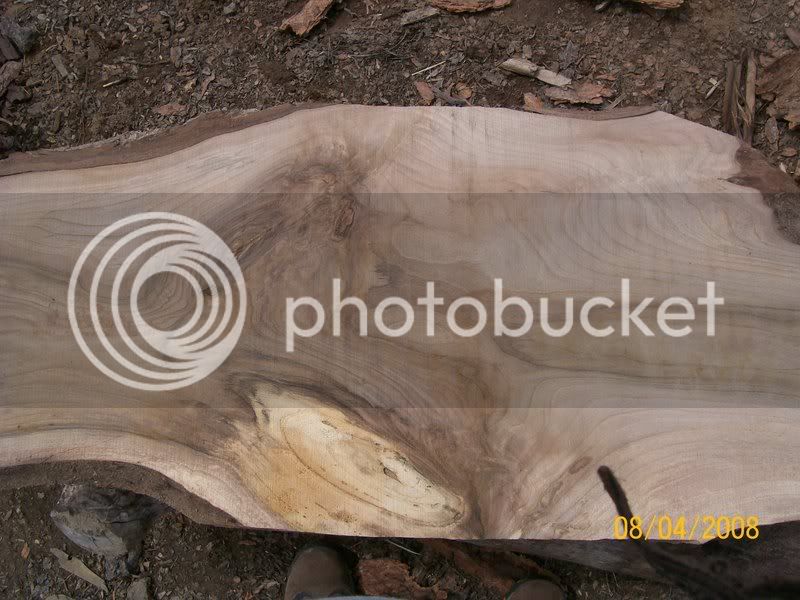
I'm going to attach a few pics of the upper log of the Walnut that I have been working on. This piece has quite a bit of damage. There's a dead section that the tree grew around over the years and that is mostly in the side pointing upright-the side pointing towards the ground is pretty solid still.

I'm thinking I might cut this log in half to make it more manageable. I have alot of walnut milled that is 11.5' long. I'm sure I won't mind the shorter pieces-about 5-6'.

I'm thinking I need to cut the protruding lumps off to get it to a size that the Alaskan mill (36") will handle. I'm a little afraid of screwing up any curly/figured crotch wood though.

Any thoughts/opinions on this gnarly thing would be much appreciated.
Thanks much,
Andy
 
Glad to see you end coated them. It is a hard one to decide on, first...and I stress this one...check for nails!!!!

The branch stumps can be made into bowls, and keep a lot of the crotch crazy grain too boot.

On walnut I "saw for grade" when I can. I cut a slab off, turn the log, cut another and turn it over then cut......on and on...

Here are a couple of pics...these were just straight slab cuts as per the customers wants.

028.jpg

These were on the bandsaw mill, I only use the alaskan on the big stuff.
027.jpg

Good luck and keep posting.
 
Not an easy call Andy unless you have x-ray eyes and can see how far that rot or bark inclusion goes. Crotch pieces are almost always a crap shoot even if they are easy as with one main stem branching into only two equal sized branches opposite one another because often they split and crack as they dry, and many have at least some bark inclusion mixed into the grain pattern. Enter into the mix un-even branches coming from different angles like yours, and then throw in some rot and bark inclusion and you're kinda just guessing at that point because you really can't tell till you open it up. My best crotch figure usually comes from milling the crotch the same plane as the "Y". I usually slice off the sides of the Y, crosscut close to the crotch but not into it, and then slice from there. I then decide where to go as soon as I see one or two slices. I might continue same plane, or might turn it 90 and try and get some figure from the other plane. All depends what it looks like once I open it up. Not to put a damper on your spirits, but that hole there in one of the main crotches in your pic does not look promising if your looking for wide clean crotch figure. You might... but it sorta looks like with that piece you'll end up with more short thick bowl blank type pieces as Deeker says. Only one way to find out.
 
Not an easy call Andy unless you have x-ray eyes and can see how far that rot or bark inclusion goes. Crotch pieces are almost always a crap shoot even if they are easy as with one main stem branching into only two equal sized branches opposite one another because often they split and crack as they dry, and many have at least some bark inclusion mixed into the grain pattern. Enter into the mix un-even branches coming from different angles like yours, and then throw in some rot and bark inclusion and you're kinda just guessing at that point because you really can't tell till you open it up. My best crotch figure usually comes from milling the crotch the same plane as the "Y". I usually slice off the sides of the Y, crosscut close to the crotch but not into it, and then slice from there. I then decide where to go as soon as I see one or two slices. I might continue same plane, or might turn it 90 and try and get some figure from the other plane. All depends what it looks like once I open it up. Not to put a damper on your spirits, but that hole there in one of the main crotches in your pic does not look promising if your looking for wide clean crotch figure. You might... but it sorta looks like with that piece you'll end up with more short thick bowl blank type pieces as Deeker says. Only one way to find out.

I think I am fallowing this....

Your saying the best grain can be found by cutting the 'Y' s the widest way?
 
Yes, I did a couple of crotches from this tree. I think I posted pics of it at some point. Just gets kind of confusing with all the branches and holes and rot. I'll just take it a little at a time, see what I'm getting and go from there...

Thanks guys.
Andy
 
Yes, I did a couple of crotches from this tree. I think I posted pics of it at some point. Just gets kind of confusing with all the branches and holes and rot. I'll just take it a little at a time, see what I'm getting and go from there...

Thanks guys.
Andy

Beautiful!

I really like the middle grain in the second from the left!
 
I think I am fallowing this....

Your saying the best grain can be found by cutting the 'Y' s the widest way?

Yup... the widest way, the plane going from side to side if looking at the tree as if looking at a big Y. You will get crotch figure almost any way you slice through a crotch, because that grain seems like it is growing every which way at once in that area, but I get the best symmetry and usually the widest figure doing it side to side looking at the Y as I explained, and as BobL concurred.

Those are some very nice crotch figures you have already there Andy. Hope they dry OK for you... don't let them dry too fast as that is one way cracks form in crotch figure.
 
I see you found some nice figure.It's usually is more intence in the heartwood areas.Almost always spreads out to a nice wide flame in the sapwood.Nice Job:clap: Mark
 
Last edited:
Yes, I did a couple of crotches from this tree. I think I posted pics of it at some point. Just gets kind of confusing with all the branches and holes and rot. I'll just take it a little at a time, see what I'm getting and go from there...

Thanks guys.
Andy


+1
NICE FEATHER FIGURE!!!
Now thats a crotch I'd like to get my hands on!
 
Update

I milled this one today. It had a few bad spots but all in all I got some pretty nice lumber. There wasn't a lot of curly figure or anything, just around some of the branches. Todays work made a big dent in my pile. All I have left in walnut is the branch that the cant was resting on in the one pic—it's probably a good thing I am really running out of room to stack it.
 
Very nice stack of walnut Andy... lots of folks on here don't have access to walnut like that. Is that big block sitting on top of the stack for bowls? Can't tell in the pic, but if it is not end coated, I'd do that soon as you can. Even a thick coat of latex exterior gloss paint will do if you don't have the pro stuff.

How did the Ripsaw do? Any problems? Do I see aluminum indexed strip on the top of those sawhorses in one of those pics for holding chocks?

Yes, those are bowl blanks "aka too good for firewood". I ran out of time and energy last night. I will at least paint the ends today-I cut a couple of cherry blanks months ago and they are drying ok with just a couple coats of paint. I need to seal the ends on some of the boards too. I cut out some of the rotted areas as there was evidence of insects. It's only on one side of those boards so tonight I plan to rip those short pieces down and paint it all up.:)

Yep those sawhorses are my version of your design. I have the Aluminum plates dadoed in there but I haven't drilled the holes or made the chocks yet...

The ripsaw worked really well overall. I have a little trouble where the grain changes at knots (I get a little wave). I tried slowing the rate of the cut down (not rpms) but I still get it. And the oil tube on the 036 (which I replaced) leaks a little bit (drips on the ground as I go). Other than that the thing runs like a champ.

Backwoods- I have plans to expand the back of the garage w/ a shed that should allow me to make a lot more space in the garage itself. I need to find some logs to mill for that. That might be a fun timber frame starter project...

Andy
 
...The ripsaw worked really well overall. I have a little trouble where the grain changes at knots (I get a little wave). I tried slowing the rate of the cut down (not rpms) but I still get it. And the oil tube on the 036 (which I replaced) leaks a little bit (drips on the ground as I go)...

I don't think it's your oil tube leaking, it's normal for a Ripsaw to drip oil like that going down the log. What happens is even if you set the saw for minimum oil flow, it's still constantly pouring oil from the saw oil exit port through a tube in that aluminum casting that mates the saw to the Ripsaw and right out onto that pinion gear that turns that large gear that is mounted to the blade wheel. It is constantly being lubed with that oil, and after only a few passes down the log there is enough inside that Ripsaw bathing the gears that the excess runs out and drips onto the ground as you go down the log. Actually seems like overkill to me on Ripsaws part keeping those gears in there lubed, but I guess in lieu of turning off the oil flow and only turning it on every other log or so (how would you do that?), that is the solution they came up with, that is keep that pinion bathed in chain oil and the excess just drips out.

I havn't tried it, but I would be willing to bet that if you let the oil in your saw run out, and instead just greased that pinion and other large gear in there well every once in a while, it would be fine. I can't see those gears running dry for many a log. You have to open that thing up to change blades anyway every 3-500 bd ft.

As far as not keeping flat at knots... that's a matter of a sharp blade, and keeping the tension high enough. I find that as the blade starts to dull, I do give it a little more tension which helps keep that problem at bay for a while. Some logs though, depending on the kind of wood, are tough to mill flat even under the best conditions when it comes to large knots and rouge grain.
 
Last edited:
I don't think it's your oil tube leaking, it's normal for a Ripsaw to drip oil like that going down the log.

As far as not keeping flat at knots... that's a matter of a sharp blade, and keeping the tension high enough. I find that as the blade starts to dull, I do give it a little more tension which helps keep that problem at bay for a while. Some logs though, depending on the kind of wood, are tough to mill flat even under the best conditions when it comes to large knots and rouge grain.

Ok, but I have been noticing oil inside the sprocket cover...a little. It also ends up pooling on top of the ripsaw's mounting block in some of the depressions up there. It hasn't really been a problem. I don't mind the dripping it usually drips into some sawdust thats going to get cleaned up anyway. Might be a reason to switch to Bailey's biodegradable oil.

On this walnut, I can tell a difference in the way it cuts after only one or two boards. I've only milled cherry and walnut with it, I wish I had it when I lived out west on the Olympic peninsula. It'd be cool to see how it does in softwood. There's a lot of white pine around here and that can make nice furniture wood-I'll have to keep on the lookout. I'll try giving the tension a little crank after a couple cuts and see if that helps the wave.

Thanks for your help again.
Andy
 

Latest posts

Back
Top