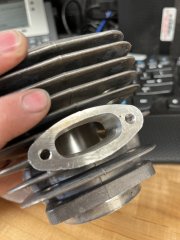
Hey guys I am new to porting. I have my 288 that I’m looking to play with. I had a farmertec cylinder that I purchased to work with. As I didn’t want to screw up a meteor or an oem cylinder. The farmertec leaves a lot to be desired… castings are rough. First off I cut .020 off the base. Cleaned and widened the intake. Widened the exhaust did not raise the roof any though. I have been watching Tin mans saws on YouTube. I like his channel. I know that I need to get some timing numbers. Here are some pics of my work so far. Any and all criticism is welcome. This is for learning. If I like the finished product I will get a better cylinder to match numbers with. Once I fully understand timing numbers I will raise or lower ports.
You are using an out of date browser. It may not display this or other websites correctly.
You should upgrade or use an alternative browser.
You should upgrade or use an alternative browser.
Husky 288xp first time porting and home made pipe
- Thread starter shug360
- Start date


Help Support Arborist Forum:
This site may earn a commission from merchant affiliate
links, including eBay, Amazon, and others.


Looks pretty good.
Without timing numbers I wouldnt raise or lower anything, 50/50 chance you make it worse.
Tinman banned me from commenting on his channel because I ask him why he wouldnt copy a known stronger build than his or try not raising the exhaust so much so he'd have more torque. He admits his saws are a bunch slower than other builders but doesnt try new things to improve his builds lol.
You can easily add finger ports to the 2 series huskies and they make more power especially in after market cylinders as the upper transfers arent quite right. Just make sure the finger is far enough away from the intake the piston skirts corners dont hit it.
Like this, you need to be about that far from the intake, stay close to the transfer. I make my finger ports about the size of a pen or pencil in a stihl 660 clone, these ones are extreme.
Why did you hogout the lowers?
He's been watching the tin man on youtube who copies what iron horse does, neither of those youtubers can build a strong work saw but a lot of people watch their videos.Why did you hogout the lowers?
Big lower transfers sure are pretty, it's a shame they take away power.
You would think if you were using math you could figure that out. I'm just going to leave it at that.He's been watching the tin man on youtube who copies what iron horse does, neither of those youtubers can build a strong work saw but a lot of people watch their videos.
Big lower transfers sure are pretty, it's a shame they take away power.
I don't say much of anything about what them guys do. With that said... that idiot Tin Pony is a menace! Tin man just wings it. My 2cts
Hey lightning. First off I am wanting to learn. I’d like this saw to run the best I can make it. I’m not a saw builder nor do I want to become one professionally. I do want to make this saw run the best I can. And as of now it runs really good without loss of power. But if you have any suggestions and how to grind the ports machine the cylinder or piston I’d be glad to take any and all advice. I’m a pipefitter welder by trade who was also a machinist. I have a good mill and lathe that I know how to turn on lol as far as Tin man goes he may not know much and I don’t know where to call bull **** on him. So till I know what I’m doing 100% I won’t call ******** on anyone. I can tell you I don’t have a small 90 deg grinder so I drilled holes in the transfers to grind and shape the transfers then welded them shut and blend them back through. And as far as grinding the transfers to me it seemed more of a velocity kind of thing. Maybe not though. Like I say give me some advice I will gladly take it.You would think if you were using math you could figure that out. I'm just going to leave it at that.
I don't say much of anything about what them guys do. With that said... that idiot Tin Pony is a menace! Tin man just wings it. My 2cts
No reason to grind out the lowers. You in fact make the case volume larger reducing ratios. Do the uppers and blend them in to the numbers you want. Take sharp edges off the lower entries. The rest would be removing bumps in the casting or slag lines from molds. On a work tool a rough bur finish is the preference. 60 grit rolls to knock of high spots only. The stock shape is fine. You want a fast taper. Lengthening the lower is sometimes done to draw more from the case depending on how high the crank sits. Most times filling in side feed transfer ports add case pressure by reducing volume. That won't help a heavy breather like a milling saw. It wants the big case saws with more volume. You can polish the exhaust but it will still get carbon on it in the slower flow areas. Spend more time widening ports and expanding the correct taper quickly. Hand finish the plating around every port with emery paper in several grits till a ring passses it smoothly in the piston dry. Use tiny bevels on the transfer ports. Smooth those also or use a buff ball. Use a large radius on the roof of the exhaust including the plating. Dont grind on the roof in the middle at all. The center 55% of the roof can be flat on the exhaust port. Don't make the floor flat or it hangs rings. Tighten up the quench to 0.0055 or add more per inch of bore. Do cry make your own gasket or sand it down accurately and even. Sand the exhaust side of the piston down 0.0030 on the exhaust side only. Many will disagree. I have no **** to give.Hey lightning. First off I am wanting to learn. I’d like this saw to run the best I can make it. I’m not a saw builder nor do I want to become one professionally. I do want to make this saw run the best I can. And as of now it runs really good without loss of power. But if you have any suggestions and how to grind the ports machine the cylinder or piston I’d be glad to take any and all advice. I’m a pipefitter welder by trade who was also a machinist. I have a good mill and lathe that I know how to turn on lol as far as Tin man goes he may not know much and I don’t know where to call bull **** on him. So till I know what I’m doing 100% I won’t call ******** on anyone. I can tell you I don’t have a small 90 deg grinder so I drilled holes in the transfers to grind and shape the transfers then welded them shut and blend them back through. And as far as grinding the transfers to me it seemed more of a velocity kind of thing. Maybe not though. Like I say give me some advice I will gladly take it.
Enjoy your work. Go in your own direction and try new things. Remember the intake port starts outside the air filter. In reality it starts at the choke butterfly so remember that.
Thanks for the information. I don’t know that I trust the farmertec wrist pin clearance to .0055. It has .004 play in it already. I do plan on buying a better cylinder. But I want to get better before I grind on a good cylinder. The farmertecs are less than 30 to f…. Up. I do appreciate a good explanation and will work on another cylinder. I bought 4 to mess with.No reason to grind out the lowers. You in fact make the case volume larger reducing ratios. Do the uppers and blend them in to the numbers you want. Take sharp edges off the lower entries. The rest would be removing bumps in the casting or slag lines from molds. On a work tool a rough bur finish is the preference. 60 grit rolls to knock of high spots only. The stock shape is fine. You want a fast taper. Lengthening the lower is sometimes done to draw more from the case depending on how high the crank sits. Most times filling in side feed transfer ports add case pressure by reducing volume. That won't help a heavy breather like a milling saw. It wants the big case saws with more volume. You can polish the exhaust but it will still get carbon on it in the slower flow areas. Spend more time widening ports and expanding the correct taper quickly. Hand finish the plating around every port with emery paper in several grits till a ring passses it smoothly in the piston dry. Use tiny bevels on the transfer ports. Smooth those also or use a buff ball. Use a large radius on the roof of the exhaust including the plating. Dont grind on the roof in the middle at all. The center 55% of the roof can be flat on the exhaust port. Don't make the floor flat or it hangs rings. Tighten up the quench to 0.0055 or add more per inch of bore. Do cry make your own gasket or sand it down accurately and even. Sand the exhaust side of the piston down 0.0030 on the exhaust side only. Many will disagree. I have no **** to give.
Enjoy your work. Go in your own direction and try new things. Remember the intake port starts outside the air filter. In reality it starts at the choke butterfly so remember that.
Thanks for the information. I don’t know that I trust the farmertec wrist pin clearance to .0055. It has .004 play in it already. I do plan on buying a better cylinder. But I want to get better before I grind on a good cylinder. The farmertecs are less than 30 to f…. Up. I do appreciate a good explanation and will work on another cylinder. I bought 4 to mess with.

That is quench area per inch of bore available.
Wrist pin should be 0.0010 - 0.0008 and no more dry. 0.0015 is wasted
Do you own a micrometer?
Yeah I have one or two not the fancy harbor freights though. They test indiacator (interapid .0001) reads a bit much play in the wrist pin. Chinesium tolerances aren’t so good…. Maybe I buy an oem cylinder and piston next. But then again f up with junk first.
That is quench area per inch of bore available.
Wrist pin should be 0.0010 - 0.0008 and no more dry. 0.0015 is wasted
Do you own a micrometer?
Homer6679
ArboristSite Operative
I am still very new to porting and I am learning lots along the way. I would recommend porting in "steps" if you will. For instance, put your custom pipe on the stock cylinder and see how the performance changes and take notes/observations. Then widen the exhaust with stock muffler and see the performance and take notes, then have widened exhaust and custom pipe and measure the results. That way you can learn what does what and expedite your learning instead of shooting a shotgun at the cylinder all at once. Below are some resources that helped me learn.
Check out this thread, specifically the links in post #6
https://www.arboristsite.com/threads/best-porting-instructions.358732/
Also a link to the thread in regards to the poulan 2150 I have been experimenting with. Some very good information there.
https://www.arboristsite.com/threads/poulan-2150-build-thread.368598/
Buy a Meteor piston kit to use in those cheap jugs.Yeah I have one or two not the fancy harbor freights though. They test indiacator (interapid .0001) reads a bit much play in the wrist pin. Chinesium tolerances aren’t so good…. Maybe I buy an oem cylinder and piston next. But then again f up with junk first.
Similar threads
- Replies
- 57
- Views
- 5K
- Replies
- 8
- Views
- 1K
- Replies
- 5
- Views
- 1K