Husqvarna 385 oiler problems

Arborist Forum

Help Support Arborist Forum:

This site may earn a commission from merchant affiliate links, including eBay, Amazon, and others.

ATH

Addicted to ArboristSite
. AS Supporting Member.
Joined
Nov 19, 2006
Messages
5,041
Reaction score
5,169
Location
Ohio
My 385XP has been leaking significant amounts of bar and chain oil. It also doesn't oil correctly - to the point where I am not running it because it is too hot.

Any suggestions to get this corrected will be appreciated.

I thought the problem may have been with adjustment screw on the bottom needed. It wouldn't tighten anymore (just turned) so I assumed it was in it's closed possition . I tried running the saw again, with no better results. Now the adjustment screw is missing - I will be replacing that.

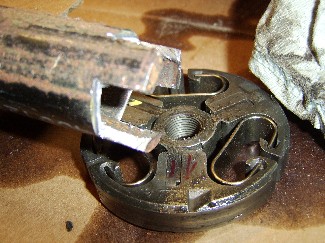
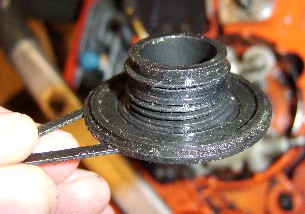
Looking at the parts diagram, it shows a plug that looks to be at the end of the system -- I assume to slow the flow to the correct level??? Mine does not have that. Does yours? Not sure how it could have gone missing as I have not had the cover plate over that area off before. Is there supposed to be a plug there, or am I looking at the wrong place?

Pic shows parts diagram and photo of inside my saw. See green arrows for visualization of what I am talking about.

Thanks!

385oilpump.jpg
 
The green arrow you have pointing on the pic of your saw is not the same spot on the illustrated parts manual. It should be pointing at part # 503 77 43-01. The illustrated picture is backwards. My new 390 has 3 stops while turning the adjustment screw that it will click at. In the pic below it is hard to see but the + & - is for the amount of oil output. Counterclockwise turn for more oil. You may have stripped the adjustment screw.

saw2bn7.jpg
 
Alright...thanks for setting me straight on the picture. So I am not missing anything (besides the adjustment screw).

Mine also had 3 stops on the adjustment screw. Hopefully the new screw will fix the leaking. I'll order it and check back if that does not solve the problem.
 
Make sure the plastic worm didn't have it's gear stripped. This happens when the cam-screw backs all the way out. Cheers.
 
There are two different styles on the oiler

If you have the three click adjuster, there is a very good chance that the pump housing is broken.

The new style has a hex head fitting that the adjuster screw passes through.

The new style should have the single drive "wing" on the plastic worm gear with the older style having two drive wings directly opposite each other.

If you try to turn the new style adjuster past the stops at either end it almost invariably will break the casting of the pump housing where the adjuster assembly screws in.

I have seen quite a few broken because of the different style adjuster stop set up.

See this link for what I believe is more correct for your style.

http://weborder.husqvarna.com/order_static/doc/HIPL/HIPL2006/HIPL2006_5010077-01.pdf

The plug is always in the end of the pump to keep out dirt and has no effect on oiling or output.

You need to remove the pump to make sure what you will need for parts.
 
Last edited:
I do have the single wing pinion (saw is 15 months old).

My original order was for the older screw. The order shows it is still being processed, so hopefully they can change it to the new one. Thanks for the newer parts diagram!

I wanted to take the whole pump out before ordering parts, but could not get the clutch off. Any suggestions on how to get that off? -- does it take a special tool or just special creativity? I could not get a good grip on it to get enough torque. (Holding it was not the problem, I held the piston in place to turn against that...)

A 3/8 air ratchet works great for me and I have read the new battery powered guns work also. Just be careful which way it comes off, could be right or left hand threads. The husky boys could tell ya....
 
A 3/8 air ratchet works great for me and I have read the new battery powered guns work also. Just be careful which way it comes off, could be right or left hand threads. The husky boys could tell ya....
It is threaded backwards...but there is nothing for a socket to grab on the clutch. Page 4 on the link provided by PES+ shows the diagram (the actual clutch on the far right side of that diagram is the part I cannot remove).
 
I made a tool from a socket cut away evenly to give a 120 degree drive. If you have patience, you can spend 5 minutes with a punch and hammer driving on a solid part of the clutch spider. Don't forget this is a left-hand thread so drive it clock-wise. It will come off. Alternate on contact points so you don't damage one part badly. Cheers.
 
Getting back to this a month and a half later... (waited 4+ weeks for the part, then I kept forgetting to get a deep 10mm socket - good thing I don't need to use this saw every day!)

This post is mostly for anybody who might want to learn along with me, and to make sure there is nothing else I need to take care of (for the correct parts diagram, see page 4 of the link provided above by PES+):

First of all, you cannot take the adjustment screw out from the bottom of the saw. It looks like a deep 10mm socket will get it, the housing is just a tiny bit too small for the socket to fit in. So, I needed to take the pump out to get the old adjustment screw out. (I am glad I did...)

As I said above, I was having trouble getting the clutch off. I was working on it at about 11:30 (and later) last night, so going to the store to find something for it was not an option.... I got creative. Simonizer suggested cutting a socket properly. I almost did that, but wasn't looking forward to trying to cut the hardened steal of an impact socket. So, I made what I needed out of a 1" black pipe (gas pipe). It is really pretty soft, so not too bad to cut with a regular hack saw. I used a pipe wrench to turn it.

clutchwrench.jpg


It is a good thing that I took off the clutch because the plastic worm had stripped gears (like I was warned about)

wormdrive.jpg


So no I need to order one of those.

Is there anything else I should be doing while it is opened up?
 
Back
Top