Anybody made a beam machine?

Arborist Forum

Help Support Arborist Forum:

This site may earn a commission from merchant affiliate links, including eBay, Amazon, and others.

ptjeep

Addicted to ArboristSite
Joined
Jun 13, 2010
Messages
1,027
Reaction score
232
Location
knoxville, TN
I was milling some pine cants yesterday and decided to make one log into some 2" slabs for future use. I know i can use my MK III mill to make 2x4's but figured a beam machine would make it a little easier, plus its another toy! Checked baileys and $37 dollars aint bad, much better than $150ish for the mini mill. Did some researching and found that the beam machine has some flaws which i guess is expected for the price. You get what you pay for. So i decided to just build my own beam machine. I've got a few ideas in mind like making it fit my two uni strut rails clamped together instead of a 2x4 since the c-channel on the BM is actually 1/8" wider than a 2x4 and cuases some alignment issues and crooked cuts. I also want to use a 1/2" bolt threw a sleeve as a pivot point for the bar clamp to mount to the c-channel. I dont like how the BM doesnt have a way to hold the saw in one position like on a mini mill so i figured two holes threw the sleeve and bolt at different angles would allow the saw to be in a fixed position at 90 and 45 degrees instead of just swiveling up and down. It will also have a handle to push from. I tried to search and only found one thread were someone built their own BM and it was way more advanced that what i plan to make with what i have laying around the garage. Anybody else made their own or know of something that they would change on theirs if they had the chance? It will probably be a few weeks before i have time to start making one so i figured i would ask while i am still in the development stage, thanks.
 
Re-think your plans and revert back to the mini-mill, but a homemade version, hell its even easier than making your own "beam machine".

12" of 1/2 to 3/4" tubing, cut into 2 x 5" and 1 x2"
3/8-24 x 1/2" bolts x2
3/8 studs x8" x2
3/8 nuts x 2

Any square and true surface to run it upon.
 
Thanks for the advice but I'm not really sure how the parts you mentioned add up to a mini mill. Care to give a little info or maybe a picture? Thanks

Sent from my SCH-I500 using Tapatalk
 
Anybody else made their own or know of something that they would change on theirs if they had the chance? It will probably be a few weeks before i have time to start making one so i figured i would ask while i am still in the development stage, thanks.


PTJEEP,

Here is the mini-mill I built. I also made a remote throttle which you don't need to make it operate. It only requires a little welding and the rest bolts together.
jerry-

http://www.arboristsite.com/milling-saw-mills/158004.htm
 
I dont know where $150 came from but $80 is still more than i paid for my MK III. I really just want to build one.
PTJEEP,

Here is the mini-mill I built. I also made a remote throttle which you don't need to make it operate. It only requires a little welding and the rest bolts together.
jerry-

http://www.arboristsite.com/milling-saw-mills/158004.htm

820, thanks for the info, that should be to hard to make. Hopefully i can get started in a week or two.
 
jerry that has to be the baddest (in the good way) mini mill in the universe. :yoyo: i never really saw that thread the first time around.
 
Anybody else made their own or know of something that they would change on theirs if they had the chance? It will probably be a few weeks before i have time to start making one so i figured i would ask while i am still in the development stage, thanks.

If Jerry's is not complicated enough for you :msp_smile:, have a look at the "Minimill" thread link in my sig. If nothing else it might give you some ideas.
 
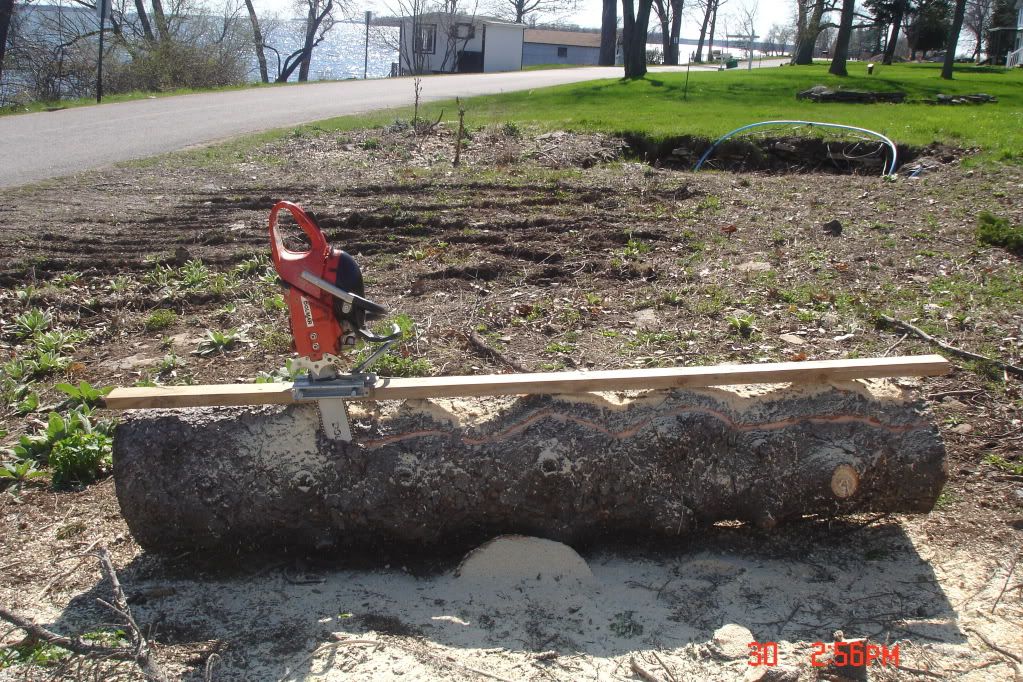
TreecuttingApril30025-Copy.jpg


This took just a couple of hours to make and has been working pretty well for me. I think you would like the mini-mill setup better because you can get better cuts with them than the beam machine and they are pretty easy to make yourself. I like Jerry's quite a bit, very well made for ease of use.
 
If Jerry's is not complicated enough for you :msp_smile:, have a look at the "Minimill" thread link in my sig. If nothing else it might give you some ideas.

Dang bob, way too complicated for me! But very nice indeed.
 
I dont know where $150 came from but $80 is still more than i paid for my MK III. I really just want to build one.


820, thanks for the info, that should be to hard to make. Hopefully i can get started in a week or two.

PTJEEP,

Here is the link that shows how I setup and used the mini-mill. Just remember, you don't need a remote throttle like I built, but it sure is nice to have. Make your auxiliary handle from some old bike handle bars. The horn/radio and GPS are all optional items.

http://www.arboristsite.com/milling-saw-mills/160682.htm

One note on the guide rail board. I used a 2-6 redwood board because they just don't warp much. If you can get one great, if not use what is local to your area that is pretty stable wood. To get a nice edge to screw the 3/4" angle iron down straight, joint one edge if you can and then rip the opposite side to make the rail board straight on both sides. Now use the jointed edge to set your 1" space for the 3/4" angle guide rails to screw down to. Once the first rail is down adjust your mill rails, outside to outside and screw down the opposite side rails. My rails are 8', you can make yours up to 10' because that is the longest length stock you can buy. If you have them cut 8' pieces, don't let them use their shear cutter, it actually bends the metal at the end and it won't be straight. Have them cut the rails with a band saw. Just a suggestion from experience.

Here is a blue oak log I milled for a bench using the mini-mill and rail board. The beauty of the setup is that it is very portable.

Blue Oak log on hillside. We drug it to an area on the hillside that was fairly level for milling.
attachment.php


We set it up on a couple of rounds we cut and used the mini-mill to make our first cut.
attachment.php


In this picture you can see we have cut both side of the log and used wedges to keep the guide board from moving when we milled. By the way, when I mill each direction on the guide rails, I get a 6" thick slab which was great for making the bench.
attachment.php


Here is the finished bench. I used one of the cap pieces as the back rest for the bench, then put a good coat of linseed oil thinned with a little mineral spirits.
attachment.php


Have fun building/milling.
jerry-
 
"I also want to use a 1/2" bolt threw a sleeve as a pivot point for the bar clamp to mount to the c-channel. I dont like how the BM doesnt have a way to hold the saw in one position like on a mini mill so i figured two holes threw the sleeve and bolt at different angles would allow the saw to be in a fixed position at 90 and 45 degrees instead of just swiveling up and down. "


Allow me to toss this out here, on some of these mills I've used & built
5/8" & 3/4" All Thread Rod with a couple of nuts welded as far apart as the shoe would allow
with FS welded to it, to bolt/mount the bar to, allowing the saw to rotate or swievel...then with a jam nut
one can lock it into a solid mount. On bigger logs allowing the saw to swievel keeping the bar out of
the ground & not having to raise the log at least until its trimmed down lighter.
 
Jerry, i like your setup alot and will probably will probably use some of your ideas.

M.R., i agree about wanting the saw to be able to pivot, sooner or later i think it will come in handy.

I will probably dig through my scrap metal pile next week and see what i have to work with, would be nice if i dont have to buy anything. Thanks for the help guys! I am starting to really enjoy milling and are looking forward to a new toy.

When I built my mill I thought of making the blade pivot to allot for ground clearance. I haven't found that I've needed that option yet.

Have fun building and please post pictures.

jerry-
 
Well i finally got around to building my version of a 820wards' mini mill. I got tired of rebuilding carbs and doing vac tests so i decided to work with some metal. I ended up using two pieces of 1.25" square tubing stack on top of one another instead of 2x4 box tubing. I got 10' of it for $10 so that was way cheaper than a stick of 2x4, $60. The 1.25" was a left over piece at the metal place so that is why is was so cheap. It was used for the main guide rails, 1/2" all thread to hold it together, and some 1/4" flat bar for the bar clamp and width guide rail. I also picked up a stick of 3/4" angle iron which will be screwed to a 2"x6"x10' board that i will pick up this weekend. I hope that i can try it out this weekend or maybe first of the week. I should end up with about $25 in this thing so thats not to bad. After i took the pics i also added a push handle and after a trial run my add a chip deflector. I don't know whats up with the pics, when i embedded them they are huge as in take up the whole screen so i just gave up on that for now, sorry. Edit: figured out pics.
208256d1322010620-dsc01173-jpg

208257d1322010633-dsc01174-jpg

208258d1322010647-dsc01175-jpg

208259d1322010663-dsc01176-jpg

View attachment 208256View attachment 208257View attachment 208258View attachment 208259
 
Last edited:
A couple more with the 260 mounted up.
208265d1322011771-dsc01178-jpg

208266d1322011783-dsc01179-jpg

View attachment 208265View attachment 208266

PTJEEP,

Very good! I like that you built your mill for minimal $$. I think you are really going to like using your mini-mill. With the handles you have made will make it that much easier to use. Please post some pictures when you mill. You will find that the dust deflector was worth the time to make. I found that I needed to get my deflector as close the saw as possible without touching. A piece of AC line-set insulation foam fit over my deflector sealed the gap between the saw and deflector.

Nice job!
jerry-
 
PT,

I meant to ask you how long your rails are on your mill. I found that 18" was a good length because it gave me the length for stating as cut and finishing a cut. The first mini-mill I built the rails were to short and was difficult to use when I was cutting a log at the maximum length of my rail guide board.

jerry-
 
Jerry, the rails are 12" and seem to work pretty good but would probably be better at 18". I took it out for a test drive today and was very impressed at the ease of set up and use over my mill. I took a 2" pine slab that I made a few months ago to rip into 2x4's. A chip deflector is gonna be a must and the width guide might need some rethinking, didn't work all the great. I forgot the camera so here is some cell pics. I took more pics but when I try to add more than two it crashes. Sorry.
208554d1322265997-uploadfromtaptalk1322265989263-jpg

208555d1322266204-uploadfromtaptalk1322266195401-jpg

208556d1322266489-uploadfromtaptalk1322266483581-jpg

Sent from my SCH-I500 using Tapatalk
 
Last edited:

Latest posts

Back
Top