Federal Airtight 264CCL Questions

Arborist Forum

Help Support Arborist Forum:

This site may earn a commission from merchant affiliate links, including eBay, Amazon, and others.
Yeah I defiinitly know because of the small size of my stove I'm limited, plus the layout of my house doesn't help distribute the heat.

I'm really thinking hard about putting an intake behind the stove though.

As in an OAK? Meaning outside air kit? That would be beneficial if you have a really tight home.. How you can tell it will help is cracking open a nearby window and see if it runs better.. BTW I will take that extra high temp insulation and try it here.. Lemme know what I owe you.. This stove seems much better now that I sealed off the cat bypass.. Thinking a new stove is in my future as the stove is basically my primary heat source and the FHW by oil my backup.. I still use the furnace for my DHW source via a tankless coil.. Propane too expensive and electric maybe worse so I keep the furnace as a backup and hot water source..

Thanx,
Ray
 
No not an OAK, but a return for my HVAC system. Basically, bust a hole into the floor of the fireplace (behind the woodstove), put a return vent there and connect with flexible HVAC line to the main return in my crawlspace. That way with the circulating fan on it would be pulling in 140 degree air into the system. Of course mixing with the other air being pulled in, but hopefully it would raise the temperature up enough to really disperse the heat through the house.

I have no idea if any of this is possible. In the crawlspace under the fireplace I'd have to remove the cinder blocks along that wall to access the area directly under the fireplace. That area may be full of concrete instead of being open.

I won't be pulling out the jack hammer any time soon. There is just so much heat behind the stove (plus what gets absorbed by the masonry) that it seems like a good way to do it. I know if I were building a house I would have a return vent located really close to where the wood stove would be located. If of course code would allow it.
 

2010-12-17_00-10-59_334 by Glamisduner, on Flickr

Picture of the air intake for catalyst as promised.

Update: I bought a floor standing drill press off CL :)
Now I'm looking for a nice XY table or Cross vise to hold the doors in place while I work (overkill? Well Im going to need it anyways).
http://www.amazon.com/gp/customer-m...8U7Q8/ref=cm_ciu_pdp_images_0?ie=UTF8&index=0

I was thinking about this cross vise, but not sure if I would be better off with an XY table and a regular drill press vise mounted to the xy table?)

Any Suggestions?
 
Thanks JI. That's exactly what I needed and expected. I think it could be fairly easy to convert my stove to have an air supply directly at the cat like the later stoves.

Can't really help you out on the vise/table question. That vise does look incredibly useful though. Definitly wouldn't hurt to have it, except for the initial shock to the wallet.

For the time being, couldn't you just clamp the doors to the table? Not as good as a vise, but should stablize the pieces enough to do the job.

Brandon the only real purpose for the cat air is for running high burns it gives extra air to help the cat burn off more smoke.. If you need a long overnight burn you pretty much close the air to the cat off.. I usually only have mine open one turn or just a crack.. What benefit do you'll get think adding cat air? The way the air feed to the cat is situated it is preheated by the stove as the air passes over the top of the firebox in a cast iron tunnel then travels through a set of S/S tubes located directly under the cat.. Wondering how you can add this feature without replacing the top of your firebox and/or your stove side which has the side loading door (this side has the cat air damper in it)..

Ray
 

2010-12-17_00-10-59_334 by Glamisduner, on Flickr

Picture of the air intake for catalyst as promised.

Update: I bought a floor standing drill press off CL :)
Now I'm looking for a nice XY table or Cross vise to hold the doors in place while I work (overkill? Well Im going to need it anyways).
http://www.amazon.com/gp/customer-m...8U7Q8/ref=cm_ciu_pdp_images_0?ie=UTF8&index=0

I was thinking about this cross vise, but not sure if I would be better off with an XY table and a regular drill press vise mounted to the xy table?)

Any Suggestions?

Personally I'd just clamp the foor down with C-clamps etc. unless you have lots of work to do with that drill press.. I bought a floor stand drill press 20 yrs ago and never needed a vice like that but it would have been handy a few times.. BTW I would definitely replace that cat if that were my stove.. They cost about $125.00 and last 4-6 yrs.

Ray
 

2010-12-17_00-10-59_334 by Glamisduner, on Flickr

Picture of the air intake for catalyst as promised.

Update: I bought a floor standing drill press off CL :)
Now I'm looking for a nice XY table or Cross vise to hold the doors in place while I work (overkill? Well Im going to need it anyways).
http://www.amazon.com/gp/customer-m...8U7Q8/ref=cm_ciu_pdp_images_0?ie=UTF8&index=0

I was thinking about this cross vise, but not sure if I would be better off with an XY table and a regular drill press vise mounted to the xy table?)

Any Suggestions?
E-mail me direct for the drilling diagram that you can use for the steel plate that will replace the cat combustor. You can drill this without any drill press vise. I made two of them and both work.
 
Brandon the only real purpose for the cat air is for running high burns it gives extra air to help the cat burn off more smoke.. If you need a long overnight burn you pretty much close the air to the cat off.. I usually only have mine open one turn or just a crack.. What benefit do you'll get think adding cat air? The way the air feed to the cat is situated it is preheated by the stove as the air passes over the top of the firebox in a cast iron tunnel then travels through a set of S/S tubes located directly under the cat.. Wondering how you can add this feature without replacing the top of your firebox and/or your stove side which has the side loading door (this side has the cat air damper in it)..

Ray

Hey Ray. Well I guess I want to do it for the exact purpose you described. Right now my only option is to open the side door air, but that kicks the flames up higher, which is not what I want. I thought that by being able to put air directly at the cat it was just increase the burn at the cat and not on the wood. I've actually experienced some burns this year that have created so much smoke that even though the cat was at temp and ignited over time the cat couldn't keep up with the smoke coming to it and got clogged. Maybe if I had been able to get air to the cat this would not have happened.

I probably will not end up doing it. As I've sat around pondering it, I think that actually drilling a hole through the side might be harder than I think with out doing some damage. Anyway, its like the old saying goes "if it ain't broke, don't fix it".
 
So I ended up getting the 8" version of that drill press vise. Initial shock to the wallet hurts, as does my back from moving around the 82lb vise lol. But it sure is nice to have. I probably should have just found some wood blocks to space the object away from the table (hinges will not allow it to lay flat for drilling. But I think this will motivate me to use the machine a bit more.

I drilled out the holes used to mount the windows in one of the doors. Seemed to take a 7/32 bit drill bit. Does anyone know what size Helicoil setup to buy? I'm guessing I may need to drill the hole out bigger yet. I can't seem to find the correct size helicoil. .218 (7/32). Perhaps a metric size would work, but I don't have any metric drill bits.

You'll need to look that info up as I do not want to give you bad information.. I would go american standard for simplicity's sake..

Ray
 
So I ended up with the 8" cross vise, which actually cost more than the drill press itself!

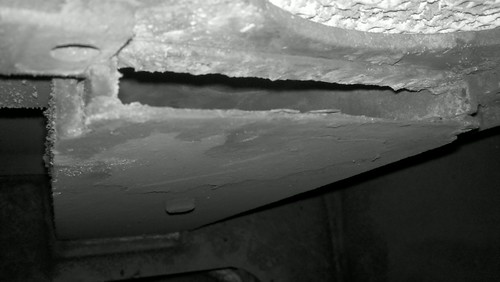
Well I finished tapping out the old broken bolts. I could not use helicoils due to not having enough material so I did the best I could. Some of them are off center (drill bit walked even with the press and cross-vise due to flex in the bit when putting enough pressure to drill out the hardened bolts) and some of them came out over sized due to pieces of the old galled up bolt sidewalls flaking off. I had one chunk of cast break off when re-tapping a hole (I think it may have already been tapped out larger once before or maybe it was off center from the factory)

So some of the threads are crappy, some are ok, some of the holes are not on center, one one of them only threads in by 1.5 turns due to the hole being drilled over sized or not being able to maintain center even with the drillpress.

I had a lot of problems drilling into some of the old bolts; breaking cheap small bits etc (took a ton of down-pressure to even drill into the bolt with the smallest bits). I Picked up some nice Rigid brand cobalt bits and even they could not drill into one of the hardened bolts (eventually the chunk of old bolt grabbed after several hours of trying different size bits).

I think I will have cut to size whatever 1/4-20 bolts I use due to varying depths in the holes I drilled (some deepened just to get some threads etc). In a couple instances due to the bit walking over to softer material I actually ended up with a hole where part of the old bolt makes up the sidewall, and had to tap into that remaining piece of bolt (its super galled up to the cast, almost melted into place it seems).

Some of the bolts Drilled out very easily with the cobalt bits, it was strange how easy some of them where while other were crazy hard. In the end though, all the bolts with thread in at least a little bit, even if the threads are not perfect or I'm threading into part of the old bolt. I think it will be enough to keep the metal windows sealed against the doors.

The Helicoil for the latch mechanism turned out to be the easiest part. My hole was not perfect due to using the hand drill before the drill press, so my threads ended up a little off center but I don't think it will matter in the end. Plent of room to drill out a larger hole for the helicoil in this portion of the door, and the cast for the most part cut smoothly when using the carbon tap that came with the kit (small piece chunked off at the very end on the inside of the door (which you will never see).

I spent about $500 in tools but some of them I had been wanting anyways.

So now I just need to figure out whether to make a back castor or buy a replacement. I'm not sure what tools would be optimal for cutting into 1/4th inch steel or stainless steel? I doubt I will be able to find a piece that is exactly the size I need. I have a Reciprocating Saw, Jig Saw, and a hacksaw, a dremel and thats about it. I have an air compressor so I could get a die-grinder or something I guess. I'm not sure if it is worth the hassle over just buying the replacement for $200.'

Looks like all the parts with the Combuster and Back Grate are about another $500. I think It may have been cheaper to buy a used one i n better condition than it was for me to repair this one. But it's been fun. For example I was looking at this one.
http://www.amazon.com/Vermont-Castings-Dutch-West-Catalyic/dp/B002NWH8DA/ref=cm_cr_pr_sims_t
$1500 and completely new and better looking. But for $500 I guess It's worth it to simply fix the one I have. Not sure that the new one would be any better, but the front door design looks kinda nice (not as many gaskets to screw with, and one door instead of 2 to open.

I purchased the center grate because its a missing part (a $40 part too). But I was reading that the grate covers should be in place when burning wood. Do I need to buy a grate cover for the center grate? Also which direction are the grates supposed to be flipped when burning wood the side with the cover up? thanks!
 
Last edited:
Flat Side Up

The flat side of the rotating grates should be up. The wood rests on that while burning. Note that in that position, there is only about 1/4" crack on each side to allow air to pass from the front air control that leads into the ash pan. Believe me, that's all the air you need. I have that air control choked to about 3/16" open when burning full bore.

Cutting and drilling stainless steel is almost impossible. Most metal smiths that I know torch cut it.

Thanks, I'm missing the center grate, but I did order one with my purchase, However I did not add the plate that would attach to it, so it sounds like I need to order this as well?

Speaking of my order from Blackswan; it's on hold due to a backorder. I hope it's not an indefinite backorder. Going to call them tomorrow. I pulled off the screens that lead to the air ducts. I noticed what looks like pieces of cement that have broken off. I'm assuming I should attempt removing the top (worried about breaking more bolts) and re-cement the top of the stove? Where do I buy the cement to do this? Also is the $200 fan that blows air out the ducts worth while?

oh, one more thing, the metal windows for the doors (mine are not glass), have some surface rust, is there some kind of paint or something I can use to get them black again without causing issues or a nasty small when heating?
 
Rutland Stove Polish

Oh, one more thing, the metal windows for the doors (mine are not glass), have some surface rust, is there some kind of paint or something I can use to get them black again without causing issues or a nasty small when heating?
Forget paint. Scour off the rust and polish the doors (and most of the stove) with Rutland stove polish that you can buy at a home improvement center. Done.
 
Forget paint. Scour off the rust and polish the doors (and most of the stove) with Rutland stove polish that you can buy at a home improvement center. Done.

Thanks for the tip. And idea where I can get the correct kind of cement to re-attach the top? I see some real air leaks so I think I'm going to need to re-seal the top of the stove.

Also for the grates in the stove, I ordered the center grate but not sure if there is supposed to be a cover on it or not? From what you described it seems that there should be.


Looking at this diagram, I'm not sure if #14 will also fit on the fixed grate? If so I will order it, but I would hate to order it for no reason. Here is the grate I have on order (has not shipped yet).
Large Fixed Grate at Black Swan Home, Hearth & Gift

It looks like it will only go in with the spikes facing up?

If it needs a grate cover would I be better off just using a piece of sheet metal in the center and drilling some holes in it?

To seal the top use furnace cement, it worked fine on mine.. I did find a couple larger gaps and packed these with scrap pieces of fiberglass rope.. Make sure you clean the old stuff off 1st.. As for the fixed center grate it is a one piece unit with no cover.. You have to remove the inner bottom and it just sits in there with no bolts etc., the Vee side goes up ( I replaced this piece last year)..The inner bottom will hold the fixed center grate in place.. I also painted the stove with stove paint.. The stove paint will smell until it is cured by running the stove.. Run the stove in mild weather with a window or 2 open and a box fan blowing out.. I prefer paint as the stoveblack has graphite which will get on you if you touch it and paint will not.. You can make the call on that one..

Good Luck,
Ray
 
Thanks for the tip. And idea where I can get the correct kind of cement to re-attach the top? I see some real air leaks so I think I'm going to need to re-seal the top of the stove.

Also for the grates in the stove, I ordered the center grate but not sure if there is supposed to be a cover on it or not? From what you described it seems that there should be.


Looking at this diagram, I'm not sure if #14 will also fit on the fixed grate? If so I will order it, but I would hate to order it for no reason. Here is the grate I have on order (has not shipped yet).
Large Fixed Grate at Black Swan Home, Hearth & Gift

It looks like it will only go in with the spikes facing up?

If it needs a grate cover would I be better off just using a piece of sheet metal in the center and drilling some holes in it?

Look here for fixed center grate installed in my stove:

********** | Wood Stoves, Fireplace, Pellet Stoves, Gas Stoves and More - Forums!

Ray
 
Thanks for the tip. And idea where I can get the correct kind of cement to re-attach the top? I see some real air leaks so I think I'm going to need to re-seal the top of the stove.

Also for the grates in the stove, I ordered the center grate but not sure if there is supposed to be a cover on it or not? From what you described it seems that there should be.


Looking at this diagram, I'm not sure if #14 will also fit on the fixed grate? If so I will order it, but I would hate to order it for no reason. Here is the grate I have on order (has not shipped yet).
Large Fixed Grate at Black Swan Home, Hearth & Gift

It looks like it will only go in with the spikes facing up?

If it needs a grate cover would I be better off just using a piece of sheet metal in the center and drilling some holes in it?

Pics of the stove with the top removed to replace the catalytic bypass damper gasket:

********** | Wood Stoves, Fireplace, Pellet Stoves, Gas Stoves and More - Forums!

Ray
 
Maybe 2015?

Look here for fixed center grate installed in my stove:

********** | Wood Stoves, Fireplace, Pellet Stoves, Gas Stoves and More - Forums!

Ray
Looks good, Ray. I noticed today that my 1987 Fed Airtight 288 might need a new center grate in 2015. Hard to predict these things. The original is bent slightly toward the rear of the stove. However, the grates still rotate easily to empty the ashes. It could be another 10 years.

Wish my car or truck worked as well.

Thanx Ed! I never empty my ashbin because this stove runs best with it full.. I shovel out from the side door and it takes a couple minutes.. The original center grate lasted 22 yrs. here and it heved upward and finally broke in two.. I could have run it that way but figured I'd make it right..

Hope all is well with you!

Ray
 
Back
Top