McCulloch Chain Saws

Arborist Forum

Help Support Arborist Forum:

This site may earn a commission from merchant affiliate links, including eBay, Amazon, and others.
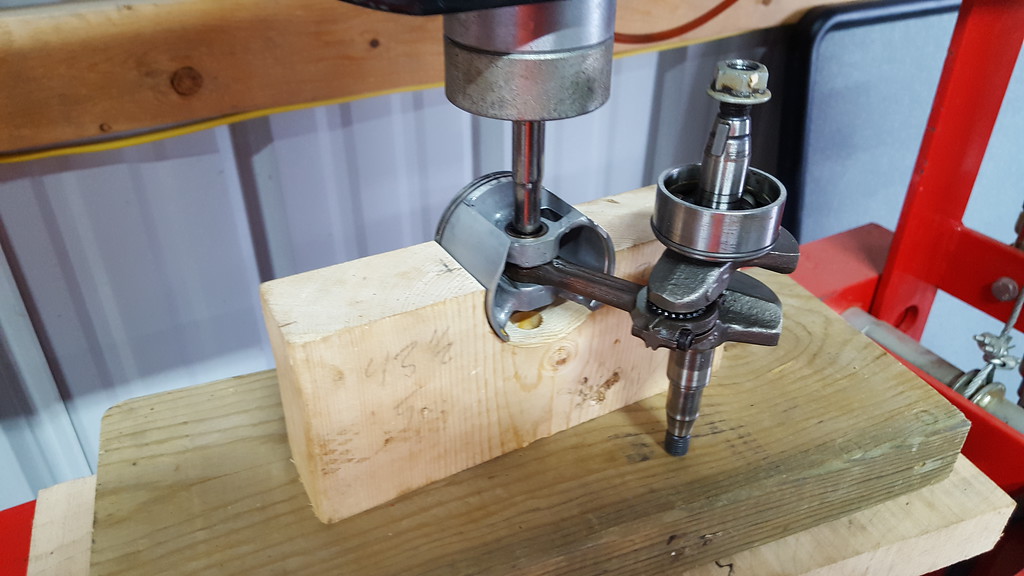
OK, never mind my question on the wrist pin. I found another thread where they talked about making a wood block as a cradle and pressing it out. I was able to do that fairly easily. Got the wrist pin and both needle bearings pressed out and then pressed back into the new piston. Let me tell you, it is no fun when the needle bearings fall out on the multi-colored epoxy chip floor. Good thing for magnets.

Rob
 
So now I'm on to getting the piston back into the cylinder. I have the rings lined up correctly and everything is lubed up generously with 2-cycle oil. But man this thing is going into the cylinder hard! I measured again to make sure the piston is the exact dimension as the old one and it is. Should the piston need to be tapped all the way home or should it basically be pretty easy to push/pull once the rings get into the bore??

Rob


In my experience, it should slide very easily. Any chance there is some aluminum transfer on the cylinder? My last rebuild cold seized on some leftover transfer. Ron
 
When i struggled with the piston in my SP80, Mark came to the rescue with solid advice wrt the rings were too wide. Judicious and loving carresses with a Dremel and calipers solved it. Removed 0.005" on the inside of rings solved my troubles. Maybe check yours especially if using a Chainswr piston an rings for your saw
 
In my experience, it should slide very easily. Any chance there is some aluminum transfer on the cylinder? My last rebuild cold seized on some leftover transfer. Ron

I guess it is possible. But I had a cylinder head shop take a look at it and clean it up for me earlier. They didn't hone it but they did run some type of mild abrasive tool through it and got rid of the visible problems.

This piston seems tight all the way up. I guess maybe I'll pull it back out and take the rings off and see how tight it is just with the piston.

Rob
 
When i struggled with the piston in my SP80, Mark came to the rescue with solid advice wrt the rings were too wide. Judicious and loving carresses with a Dremel and calipers solved it. Removed 0.005" on the inside of rings solved my troubles. Maybe check yours especially if using a Chainswr piston an rings for your saw

Oh. So the rings are too 'long' and they are touching ends? I will check that...

Rob
 
Depth of groove or width of ring prevented the rings from going below flush as they should. Ring endgap was fine. The easiest fix for me was reduce the ring width by 0.005" all the way around the inside of each ring. Worked great
 
Ah. Maybe that's what it was. Well, it's over now. I pulled it out and put in in a few times to see if I could loosen things up. I looked at the ring end gap in the exhaust port and it looked fine. But it was still pretty sticky when going above the exhaust port. Finally, when I was pulling it back out it came fast at the end and the top ring must have caught on something as it exited the cylinder. Cracked a 3/8" chunk out of it. Ring is no more.

The good news is that with only one right it slips in and rotates just fine. Regardless of whether that one ring is in the top or bottom groove. So something was definitely up with the one ring. Anyway, I'll need to find a new ring now and get back to it later.

Walter - How did you reduce the ring width? I assume this means slightly increasing the inside diameter of the ring, right? Did you just use a grinding wheel or sanding disc on a dremel and free-hand it around the inside of the ring?

Really appreciate the guidance folks!

Thanks,
Rob
 
Here's what I did for a block to use to press out the wrist pin and needle bearings. It is just a chunk of 2x8 that I used a 2" hole saw and cut out a semi-circle. The piston on the 800 is right about 2" so that works great. The piston just fits in the cutout and actually sticks on there slightly. Fortuitously, the block and semi-circle ended up perfect so the end of the crank rested nicely on the support board also. That's luck, not planning. I drilled a 1/2" hole in the bottom for the wrist pin to fall into. then I set it up in the press with a deep socket of the right outer diameter to just fit the pin (and another for the bearings). Slick as can be. Worked just the same to press the bearings and then wrist pin back in. I'd say the 45 ton press was straining to get it done but that might be an exaggeration! ;-)

20180608_131614-XL.jpg


Rob
 
Rob, I free handed the grinding with a dremel and 1/4" grinding stone. Long sweeping overlapping motions and checked progress with dial calipers.
Is the ring end gap actually in the exhaust port on that saw? Iirc both rings should be on intake side as the piston never drops the rings below that port.

What do you mean by "both rings should be on intake side"? Did I put the piston on the rod backwards? When inserted into the bore so the big and small bearings on the crank are correct with the case this ends up with the piston rings lined up with the exhaust port. Now I'm not saying the rings are showing in the port on every stroke, since I never got the piston installed all the way (well, before the ring broke, and I never looked into the port after that), I'm just saying that as I install the piston I can see them at some point on the way in.

If I have to press out the wrist pin and turn the piston around so the ring ends end up 180* from where they are I can do that. Let me know if that's an issue.

Thanks,
Rob
 
By the way, I measured the width of the rings to compare. By 'width' I mean the inner vs. outer diameter. The bad ring comes out to about 0.001 - 0.0015 wider in a couple spots than the good ring. Not much, but something. Since the good ring doesn't bind the piston in either position I'm thinking it is the one ring that is the problem, not the piston's grooves. I did order another set of rings for the piston so I'll get to try this again next week.

Rob
 
What do you mean by "both rings should be on intake side"? Did I put the piston on the rod backwards? When inserted into the bore so the big and small bearings on the crank are correct with the case this ends up with the piston rings lined up with the exhaust port. Now I'm not saying the rings are showing in the port on every stroke, since I never got the piston installed all the way (well, before the ring broke, and I never looked into the port after that), I'm just saying that as I install the piston I can see them at some point on the way in.

If I have to press out the wrist pin and turn the piston around so the ring ends end up 180* from where they are I can do that. Let me know if that's an issue.

Thanks,
Rob

Piston should be marked with Exh for exhaust side - at least oe pistons are. The ring pins should be away from the exhaust side IIRC.

Ron
 
Yup, i did that on mine as well. Had to remount piston to get it right. Rings pass the exh port up n down so cannot have the ring ends there fir sure!
 
Check your old piston. If it is labeled then orient the new one the same way. Ron

Yeah, looks like based on the old one the ring ends go on the side opposite the exhaust. I'll have to press out the wrist pin again and rotate the piston 180*. I guess I can put in the new wrist pin that came with the new piston then too, since I forgot that the first time. This is definitely a learning experience.

Rob
 
Back
Top