Need some help with a log splitter.....

Arborist Forum

Help Support Arborist Forum:

This site may earn a commission from merchant affiliate links, including eBay, Amazon, and others.

Wife'nHubby

Addicted to ArboristSite
Joined
Oct 9, 2008
Messages
1,387
Reaction score
306
Location
Milwaukee, WI area
Okay, guys, when I need help I admit it: I need help! (please)

Here's my problem: Last fall hubby's two brothers came out to check out the problem with our splitter (leaking, squirting fluid). They took it apart for me and determined the seals, etc. had to be replaced. I took it to the repair shop and it's all fixed - but not yet reinstalled on the splitter.

The brother's-in-law haven't been back to put it together. One of them has a very valid reason (quadruple heart by-pass surgery) and the other brother-in-law doesn't respond.

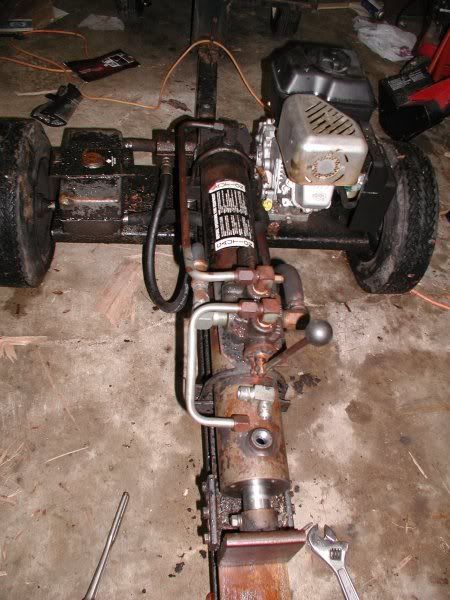
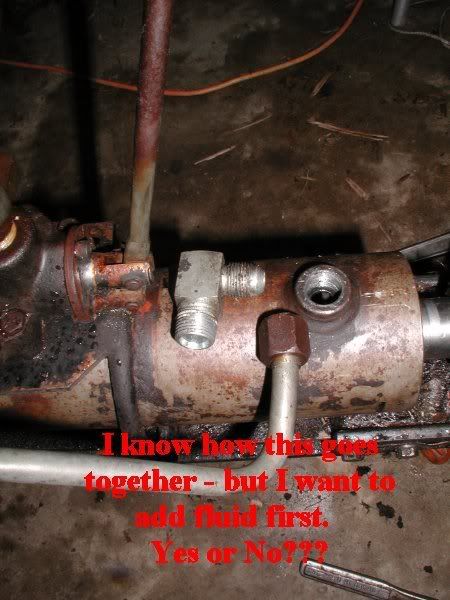
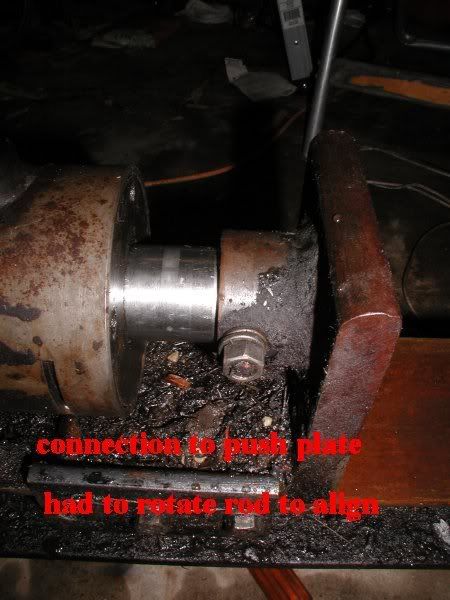
So.... here I sit with a repaired cylinder that needs to be re-installed. I know nadda how it came apart but I do remember (somewhat) what it should look like when back together. This is not a name brand splitter, rather (I believe) a homemade job.

If I post pictures of the parts, can someone here give me direction on how to get this put together again? We bought 2 gals of 32 hydraulic oil today because I do know we will need to fill the cylinder, etc. If there is any bull work involved our youngest son can help me but he also knows nothing about hydraulics. Hubby also is here with me but can't help much anymore.


Geez, I really hate to ask for help.....

Shari
 
Ask away Shari Ill help all I can. What do you need to know. How to hook up lines or put cylinder in splitter. Was it attached with pins or bolts. You should be able to just hook it up and work cylinder back and forth to bleed air out of it.:D
 
Last edited:
Ask away Shari Ill help all I can. What do you need to know. How to hook up lines or put cylinder in splitter. Was it attached with pins or bolts. You should be able to just hook it up and work cylinder back and forth to bleed air out of it.:D


Thanks for the reply! Much appreciated! I don't think this is going to be too much of a big deal really. There are large u-bolts that attach the cylinder to the i-beam. There's a couple of hydraulic connections to figure out but the hyd. lines should still line up because we didn't change anything. I am most concerned about getting the fluid in it and pumping up the ram for the first time. I do "know" it has to be bled but don't "know" where/how to do that on this splitter. We can work on that when I get photos to the list.

Let me charge up my camera batteries, pull up the splitter and get it in the garage and take photos. Will do this all tomorrow and then will post pics of the parts I have. I think there is a slip ring that I have to put back on the cylinder too.

I don't mind getting my hands dirty so this should work out okay. I will have our son crank the u-bolts nice and tight though before I run it.

Shari
 
It should "self bleed" easily enough. As long as you get the lines hooked up properly, it goes foreword when it should and back when it should. (if not, swap the lines, easy fix)
Then cycle it a few times. It will be slow and make some noises, but all the air will blow into the hydraulic reservoir. It might get foamy and you may have to shut it down for a while then add fluid.
Easy enough? It ain't rocket science, just pump the air out of the cylinder into the reservoir, let it sit, add fluid as needed!
 
:agree2:
It sounds pretty straight foward and you seem quite capable. Plenty of good advice on the board to point you in the right direction.

Keep us posted and hopefully we can guide you through getting it back together and working correctly.
 
Last edited:
It should "self bleed" easily enough. As long as you get the lines hooked up properly, it goes foreword when it should and back when it should. (if not, swap the lines, easy fix)
Then cycle it a few times. It will be slow and make some noises, but all the air will blow into the hydraulic reservoir. It might get foamy and you may have to shut it down for a while then add fluid.
Easy enough? It ain't rocket science, just pump the air out of the cylinder into the reservoir, let it sit, add fluid as needed!

:agree2: Bleeding the air out will be the easiest thing on the whole job. Like Redneck says the force of the cylinder moving one way will push the air out and visa versa. Then just let the airbubbles settle out of oil and recheck fluid level.Ill be watchin:D
 
You just have to love a gal that knows when to ask questions. I personally know one that thinks she knows what she doesn't know, ever met one? lol

Not a put down, glad to help in anyway I can, built many of them. Get some pics up.

Shari, don't worry about filling the cylinder with oil, it will fill itself when hooked up. Just be sure to have oil in the tank, but leave at least 10 percent for expansion when it gets warm.
As far as hooking up the lines to the cylinder, when you move the lever, if it goes the wrong way to suit you, just undo them at the lever and change places with the ones that go to the cylinder.
There should be one hose from the tank to the pump, from the pump to the valve body, it might have an in stamped on it or next to a pressure relief valve built into the valve body. One coming out back to the tank. The ones for the cyl will be inline with the lever.
Hope this helps you.
 
Last edited:
I think there is a slip ring that I have to put back on the cylinder too.

Shari, please get the snap ring in place before trying to bleed the system. You don't want the seal blowing out of the end of the cylinder. Not pretty.:(
 
Batteries for the camera are charging. Your replies so far have given me confidence that I can do this. At least I have a foot up on some women: I know the difference between a wrench and a socket! :)

Shari
 
I would have to say you have a head and a leg up on most.

As to the other fellow, yes, be sure to get that snapring seated. If you have to take it to the local shop, do it. safety first.

Shari, when you light it up, be sure you have all fittings tight and do not place your hands on any part of it except the lever. Where safety glasses. Oil under pressure can cut skin like a knife. Not trying to scare you off, just take precautions.

Pics Please!

My only comment right now, from my experiences.....once you get to the fittings and tightening...go slow...make sure they start real easy and straight, and only then start to tighten......vs cross threaded......:censored:
:popcorn:
 
Shari, please get the snap ring in place before trying to bleed the system. You don't want the seal blowing out of the end of the cylinder. Not pretty.:(

I am assuming the shop put the snap ring on the cylinder already, as it was rebuilt?
As for the hyd conections, just keep in mind, you cannot get them too tight!!
 
Okay! It is going back together very easily! I am just following the old grease marks(!) to know where everything goes. Hubby did confirm the split ring was installed inside the cylinder at the time of repair, so I don't have to worry about that.

Give me a little time to post the photos as I have 7 to post. I will try to post comments with each photo.

If you reply, could you please copy the photo you are referring in your reply?

Thanks for giving me the ump to do this on my own.

Don't forget, I will have some male I can corner to crank down all the connections I made before I fire it up.

Shari
 
Here's my baby, rear view. It's a little wet as it was raining when I took the tarp off of it (it is normally stored outside, undercover).

Shari

P1010070.jpg
 
Here's my first hyd. connection. I have it tight enough now that now shiny threads are showing - again, I will have someone give this another crank or two before firing.

The fluid tank has an air hole, will this air hole be enough to release air in the hydraulic lines when I add fluid or should I remove the cap when running it during the initial fuild fill?

P1010075.jpg
 
I haven't made this connection yet because I have a question here: Should I add hyd. fluid into the cylinder before completing this connection?

P1010074.jpg
 
log splitter

Okay! It is going back together very easily! I am just following the old grease marks(!) to know where everything goes. Hubby did confirm the split ring was installed inside the cylinder at the time of repair, so I don't have to worry about that.

Give me a little time to post the photos as I have 7 to post. I will try to post comments with each photo.

If you reply, could you please copy the photo you are referring in your reply?

Thanks for giving me the ump to do this on my own.

Don't forget, I will have some male I can corner to crank down all the connections I made before I fire it up.

Shari


The hoses are most likely JIC female swivel hose ends.

They can be ruined if they are tightened too much; the way they are designed allows for tight leak free connections.

The swivel fittings will cross thread easily if you are not familiar with them-so be very careful when threading the hose ends on to the fittings in the cylinder ports.


In regard to the cylinder it self it will jump considerably when the spool valve it moved to push the piston forward or back this normal due to the lack of oil.


An easy way to avoid this and the air problem with cavitation is to fill the cylinder up with oil by holdiing the cylinder with the fittings straight up at the twelve oclock position and filling both ports untill the cylinder is full.

Then quickly attach the hose ends to the fittings on the cylinder barrel and tighten them, install the cylinder and then loosen up the hoses slightly to allow the hoses to come back to position- they should not be under any tension or allowed to twist.

You will loose a little oil this way but a drip pan can catch it all and reuse it if it is clean.


leon:chainsaw::givebeer::popcorn:
 
Back
Top