Mastermind
Work Saw Specialist
This thread is the most interesting thing I've seen on this site in awhile.
Thanks Chris.")
Thanks Chris.


I suppose you could grind out the bearing pockets in the cylinder, and cut the edge of the pan down, but then the split between the cylinder & pan would not be in the center any more, and the bearing hole would not be completely round. The distortion would be small though, so it could probably be filled with sealant. I'll have to think about how to fixture the pan so it could be cut down.Instead of cutting the jug, why not the engine pan?


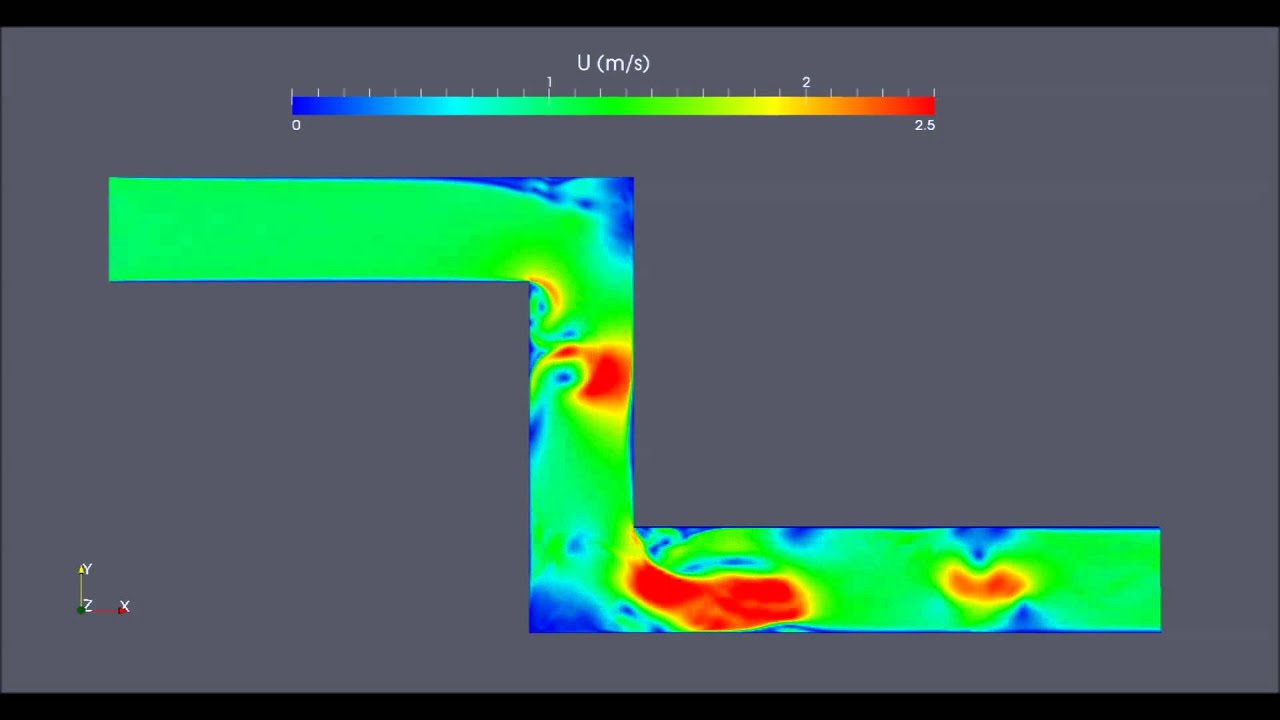
From what I have read an outlet angle of 90deg is desirable (although I have not thoroughly investigated why). Surely the air in the back corner of the upper transfer will be dead air, which effectively makes it curved anyway. A more sophisticated casting would have a transfer runner that loops further back from the bore and comes in from a larger radius, but this is an inexpensive design.Chris looking at the end of the transfers the 90* shelf at the top of the transfer. Could you gain any air speed/flow by inserting a peice to smooth out that bend? Its essentially a dead corner


The 3D printer is about the only "high tech" equipment I do have access to. Other than that it an old worn out lathe driven by a leather belt, some drill presses and belt sanders. The CNC stuff is all set up for production work and I don't know how to use it anyway (although I have been considering learning to program one). And a Dremel.After all the 3d printing and high tech equipment you have access to you wound up using a dremel tool?
After all the 3d printing and high tech equipment you have access to you wound up using a dremel tool?
Lol, thanks. In fact the 3D printed stuff was just playing around. This could be done with a flat file and a dremel, and the old bearing as a reference. Or at least if you just take off the difference to get the right squish, rather than doing the pop up for which you'd need a lathe.macgyver would be proud of chris
I think I need to send Chris a non-running Poulan 42/18 in a carton. It has a new piston and rings, has hardly been run, and still will not start. Maybe he can save it or tell me how I can save it.
OK, I'm all ears. After installing a new piston and rings (saw looked like it was straight-gassed), it still seems to have insufficient compression to start, even with a good spark and carb settings as recommended. Saw has very few hours on it and looks brand new. My Stihl dealer told me to stop wasting my time on junk. What's next for me to try?They are easy to work on i brought back to life my Poulan Pro 260
These saws are so straightforward you should be able to get it running. Check the flywheel for a sheared key/tab, and fuel line which often fail.I think I need to send Chris a non-running Poulan 42/18 in a carton. It has a new piston and rings, has hardly been run, and still will not start. Maybe he can save it or tell me how I can save it.
OK, Chris, I'll double check all of that. But, I think that's what I already did in November. Compression still seems nil compared to any Stihl that I own, and that's usually the bottom line. I was very careful when rebuilding the top end and saw no difference in rope pull resistance after completing it. Not much is more depressing than that. I'll report back what I find and show you a Pic of the piston before I started.These saws are so straightforward you should be able to get it running. Check the flywheel for a sheared key/tab, and fuel line which often fail.
Also use the purge bulb to diagnose the lines/carb - it should pull fuel with very few bubbles. If you get air then it is either the lines or a leaking check valve in the carb.
Fuel line routing can get mixed up too - the small fuel line should go to the carb nipple near the end with the cover with the single center screw. The line from the nipple nearest the mixture screws goes to the urge bulb inlet, and the purge bulb outlet goes back to the tank, ususlly through a larger line.
Enter your email address to join: