Remington PL-55A teardown & rebuild

Arborist Forum

Help Support Arborist Forum:

This site may earn a commission from merchant affiliate links, including eBay, Amazon, and others.

CamMann

ArboristSite Operative
Joined
Sep 1, 2018
Messages
112
Reaction score
76
Location
Ontario, Canada
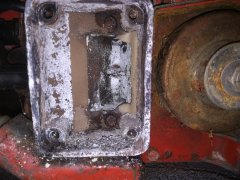
Picked up this saw for a few bucks. It's seized, everything inside the muffler, exhaust port, and exposed portion of piston is all covered in crusty white powder from corrosion. It's probably junk, but figured I'd at least pull off the top end & see how how bad things are. The handle/airbox/rear-cylinder cover are all one piece that has to come off first. Before I can take that off, I have to remove the decompression valve lever, shown under the choke. It's seized too.

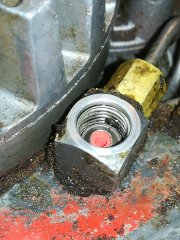
Normally, how would that decompression valve/lever come out? Looks to me like if I moved the springed throttle latch out it's the way, maybe the decompression lever would just pull out? That's what I've been attempting, but so far it won't budge. So far, just been trying to get some penetrant to both ends of the valve rod, put a vice grip on the lever, and worked it back & forth, bit by bit. Got it free enough I can rotate it by hand now, but still won't come out.

Edit 1: Yep, that's how the decompression valve comes out. This one was just stuck as heck. Then to get the handle/airbox assembly off, i took off the carb, 4 bolts behind the carb, and two bolts at the bottom of the handle. Also had to disconnect some oiler lines, and temporarily remove the oiler plunger & oiler adjustment screw to free them from the handle assembly.

Getting the cylinder off does look like it'll require a significantly more in-depth teardown than most saws I've come across. Looks like about a 75% teardown of the saw will be needed to get access to all 4 cylinder fastners. Will update later with more pics of the process & whatever comes next.

Edit 2: So, after removing the handle assembly, I removed the flywheel & ignition assembly. Then the clutch, drum, & clutch-side of the saw had to come off to give access to one of the cylinder's fastners. That was part of the crankcase... pretty annoying having to open that up to access a cylinder bolt, but was 100% necessary.
 

Attachments

  • IMG_20230303_083539.jpg
    IMG_20230303_083539.jpg
    3.2 MB · Views: 0
  • 334463722_5785120488249803_6583606824790196652_n.jpg
    334463722_5785120488249803_6583606824790196652_n.jpg
    171.8 KB · Views: 0
  • pl55dc.jpg
    pl55dc.jpg
    64.9 KB · Views: 0
  • IMG_20230303_151705.jpg
    IMG_20230303_151705.jpg
    4.1 MB · Views: 0
  • IMG_20230304_213708.jpg
    IMG_20230304_213708.jpg
    2.6 MB · Views: 0
I'll be darned, the cylinder looks great! Crank & bearings are all good. Piston is covered in this powdery white stuff on the exhaust side & the rings are stuck. TBH, if I cleaned up all this white crud, cleaned the ring grooves, cleaned/replaced rings, cleaned everything else up, and reassembled with some fresh cut gaskets, and maybe some new crank seals, this engine would probably run fine. Will definitely need some new prongs for the recoil though. Someone broke them trying to crank it while it was seized.

So, I'm wondering what caused this white powder. Obviously this thing sat on a concrete floor or something for way too long. Bottom of the handle assembly turned white & crusty with magnesium rot. I don't often see muffler boxes turn white from corrosion though... So, maybe it's a cast magnesium alloy too. But why would it's corrosion spread & coat half the the piston... just through moisture & proximity to the magnesium muffler box?

I'll add pics & details of the disassembly process later, but here's the white crud:
 

Attachments

  • IMG_20230303_073942.jpg
    IMG_20230303_073942.jpg
    3.8 MB · Views: 0
  • IMG_20230303_182519.jpg
    IMG_20230303_182519.jpg
    4.2 MB · Views: 0
I’ve been collecting Remingtons ever since I discovered chainsaws. They’re cheap ‘cause nobody wants ‘em. 😄

FWIW: A piston kit for the Homelite SXL 925 is a perfect fit if you shorten the skirt in the lathe. Search evilbay.

Thanks for the tip on the piston kit! Yah, not many Remington fans... unless they're rebranded as John Deere lol. JD fanatics will pay 10x what a Remington is worth when it's rebranded as a JD.
 
Piston cleaned up great (closeup of exhaust side where all the white crud was). Cylinder looks great & rings look good too. Cut fresh gaskets, almost ready to reassemble.
 

Attachments

  • IMG_20230304_205740.jpg
    IMG_20230304_205740.jpg
    1.9 MB · Views: 0
  • IMG_20230304_205613.jpg
    IMG_20230304_205613.jpg
    1.9 MB · Views: 0
  • IMG_20230304_205538.jpg
    IMG_20230304_205538.jpg
    2 MB · Views: 0
  • IMG_20230304_205913.jpg
    IMG_20230304_205913.jpg
    2 MB · Views: 0
I’ve been collecting Remingtons ever since I discovered chainsaws.
Have a question about the piston rings. When i was cleaning them, I noticed a bevel on the inner circumference of one side on each ring. Should those bevels be facing up or down, or does it matter?

Edit: I found a vid on youtube that says that bevel should face up in the upper ring groove & face down in the lower ring groove. Cool!


Attachments

  • IMG_20230304_204934.jpg
    IMG_20230304_204934.jpg
    1.9 MB · Views: 0
For the broken recoil prong, I just stole one from a skil1645 parts-saw. With that, the saw started right up & sounded beautiful. Manual oiler worked fine, but auto-oiler wasn't doing anything. I'll mess with that later. Just need to free up the bar's roller & service the chain now.
 

Attachments

  • IMG_20230304_210332.jpg
    IMG_20230304_210332.jpg
    2.4 MB · Views: 0
  • IMG_20230306_143940.jpg
    IMG_20230306_143940.jpg
    2.7 MB · Views: 0
For the broken recoil prong, I just stole one from a skil1645 parts-saw. With that, the saw started right up & sounded beautiful. Manual oiler worked fine, but auto-oiler wasn't doing anything. I'll mess with that later. Just need to free up the bar's roller & service the chain now.
Did you put a new duckbill valve in for the auto oiler?
 
I haven't touched the auto oiler yet, is that what's in there? That'd be nice, as I do have a few extra duckbills
We did the JD23 version of your saw. @67L36Driver talked me through it. It's been a while. I know you have to tear the case apart. We had to make a new gasket. I'll see if I can find that info for ya.
 
The valve seems to be missing altogether from the auto oiler valve fitting assembly. Not sure what style it was... didn't see anything on google for that part number either.
 

Attachments

  • pl55 oiler valve fitting assembly.jpg
    pl55 oiler valve fitting assembly.jpg
    63.8 KB · Views: 0
Much appreciated, but I may have improvised a solution. There's a smooth 1/4" bore in the fitting that the OEM valve is supposed to sit in. I just took about 3/8" length of fuel hose (1/4"OD x 1/8"ID), pushed it into that bore, then pushed a duckbill into that fuel hose (touch of high tack sealant around neck of duckbill, though it was probably fine without it). All fit quite nice & snug. Then I put a washer over that and a spring into the cap to push down on the washer. Hoping the slightly compressed spring will also double as a bit of a screen, since I took the screen out of the equation.

Oh, and the opening into the tank at the bottom of the fitting's 1/4" bore is only like 1.5mm, so no risk of any of my improvised components going through that side. I do wish I had the more stubby style duckbill though, as this length comes close to the impulse hole. The stubby style would sit well below that hole. Oh well, should be good. Will let the high tack sealant set over night & test it out tomorrow!
 

Attachments

  • IMG_20230308_172255.jpg
    IMG_20230308_172255.jpg
    6.4 MB · Views: 0
  • IMG_20230308_172534.jpg
    IMG_20230308_172534.jpg
    2.7 MB · Views: 0
Awesome; thanks! Manual has tons of useful info. The one I have looks different than yours & the one in the service manual though. Did yours come with that plug beside the oil uptake line? Service manual says it's description of the PL-55a oiler is of the "later" Pl-55a. Maybe mine is an earlier version. I think my valve is supposed to be in this fitting on the outside of the tank.
 

Attachments

  • Untitledrr.jpg
    Untitledrr.jpg
    1.2 MB · Views: 0
Actually, I missed a paragraph in the service manual that discusses the earlier pl-55a oiler valve. Sounds like it was supposed to be in that elbow where i put one. So, should be good! thanks again :}
 
Auto oiler is now working beautifully! Improvised valve did the trick. Next issue, noticed RPM racing in certain orientations. No surprise there. When I had to open the one side of the crankcase to access a cylinder bolt, that portion of the crankcase has an o-ring instead of a gasket. Didn't have a new o-ring that size on hand, so I reused it long enough to see if the saw was worth ordering any parts for. Which at this point, I think it's worth putting a few bucks into the saw for that o-ring, new crank seals, and a new sprocket.
 

Attachments

  • oring.jpg
    oring.jpg
    39.3 KB · Views: 0
I see the original crank-seal part #65194 is the same on both sides, and there are still some NOS options out there at reasonable prices. However, idk how I feel about installing 50yr old seals. Would rather find a modern equivalent if possible. Anyone know which modern ones are compatible? No worries if not, I could always just take some measurements to the local bearing & seal shop.

Edit: Pretty sure SKF 6119 matches the necessary dimensions (5/8" crank, 7/8" bore, .18" width). Also searched SKF 6119 on here, and saw one person say they fit PL-4, which uses the same seals as the PL-55A. So, should be good; ordering a couple of those tomorrow.

SKF 6120 would fit as well, but is single-lip. SKF6119 is double-lip
 

Latest posts

Back
Top