Step by step porting

Arborist Forum

Help Support Arborist Forum:

This site may earn a commission from merchant affiliate links, including eBay, Amazon, and others.

little possum

Crash and Burn
Joined
Apr 19, 2009
Messages
7,465
Reaction score
2,125
Location
Norf Carolina
Ok fellas, time for me to try my hand at understanding a woods port
So any of you with experience please chime in. I have searched, and read for days but Im a visual/hands on learner.

attachment.php

Exhaust side. (edit, whoops I cant add- supposed to be 33.19)
2mm from the edge, is'nt that a safe amount?
attachment.php

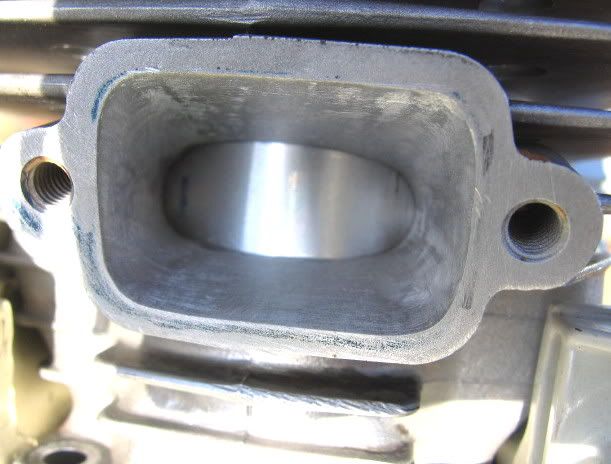
Intake side, not real sure how to go about shaping this one- do I try to even up the port? Total number is wrong on the picture, and should have read 36.01

Am I even close to understanding? Besides my math skills being terrible :)
Thanks
 
Last edited:
2mm from the piston skirt edges should be fine. What saw are you porting on now? It's bound to be a husky with that intake shape.
 
I'll be looking for answers here too as I know nothing about porting with chainsaw engines.

:popcorn:
 
281 in the pictures. Or I may do a 288.

Dont think I have the equipment to do the transfers so this may just be basic widen and set squish job. But I will have plenty of pictures and questions.
 
Interesting.....I will be watching and learning here

:popcorn:
 
281 in the pictures. Or I may do a 288.

Dont think I have the equipment to do the transfers so this may just be basic widen and set squish job. But I will have plenty of pictures and questions.

Zach, if you are going to widen your ports, you might as well do your transfers. Open up the lowers as per heaps of photo's of saws with this type of port system. The uppers can be opened toward the back and is one of the easiest mods to do with a stone/cutter in a dremel.

Hands on is the best way. Good onya for having a go. :cheers:

014.jpg
 
From Aussies pict I can now see the intake port shape. If the muffler mount bolts don`t go all the way back to the cylinder wall I would take as much as I dared out from behind the blind hole to make the port shape as rectangular as I could at the cylinder wall, only the corners would have a little round to them.If the piston rings don`t come into contact with the intake port so the more rectangular the shape of the port the more area that is available for flow.
Pioneerguy600
 
ROFL.....Is that a Crayon drawing zach? :laugh:

I think he needs a new piece of paper and a new crayon.. :)
and Al's pic and jerry's reply have me confused :dizzy:
2MM from port edge to piston skirt is good and safe,yes..
 
Oh no here we go again. Boy I done told you ten times to let them saws be. Before ya'll crawl me for fussing at him, the next thing you know he'll be after MY saws.
 
Someone can stomp on me if I'm doing it all wrong, but I've been assembling the cylinder on the saw with the piston, tracing my port shape on the piston, and then calculating how much I can widen each side of the port.....Then I stick a strip of masking tape on the inside of the cylinder bore beside the port, the distance that I can widen the port and use that as my guide......That seems simple and less calculating for me.....But I'm errr "simple".:laugh:

This is the first one I did, and I learned a lot (I've only ported three saws so far)........I'm a hands on learner too, so just jump in and give it a shot. You can see a bit of my original tracing on the piston in the pic......This saw rips, so I didn't do too bad!

IMG_4311.jpg
 
ROFL.....Is that a Crayon drawing zach? :laugh:
Bite me wiggitywack. Only pencil in the shop :dizzy: And yes, its a regular pencil, even has a eraser.
Someone can stomp on me if I'm doing it all wrong, but I've been assembling the cylinder on the saw with the piston, tracing my port shape on the piston, and then calculating how much I can widen each side of the port.....Then I stick a strip of masking tape on the inside of the cylinder bore beside the port, the distance that I can widen the port and use that as my guide......That seems simple and less calculating for me.....But I'm errr "simple".:laugh:
Sounds good to me, just had this one pulled apart in the shop, and figured I could start a new thread

Thanks Al, I was fixing to look for that thread. Would I need a right angle grinder for the transfers? We have a dremel and a flex shaft but no right angle
Thanks Jerry!

I may start with a wildthing first :biggrinbounce2:
 
Bite me wiggitywack. Only pencil in the shop :dizzy: And yes, its a regular pencil, even has a eraser.
Sounds good to me, just had this one pulled apart in the shop, and figured I could start a new thread

Thanks Al, I was fixing to look for that thread. Would I need a right angle grinder for the transfers? We have a dremel and a flex shaft but no right angle
Thanks Jerry!

I may start with a wildthing first :biggrinbounce2:

Zach, most people just use a cutter or stone in the dremel. You aren't going to raise the upper transfers so you won't need a right angle drive. I didn't take any pics of the 181/288 when I did it, just that shot above when I had the carby off. Take your time and ask heaps of questions here. It's not as hard as you may think.

Widen your exhaust at the cyl to match the width needed for your piston skirt. Keep your port roof with a slight curvature at the top. Open the port up at the muffler then make your walls, roof and floor straight, not curved.

Take it all in steps and post pics of what you are up to.
 
Yes sir, will have plenty of pictures. Guess the good news of my scored 288Lite is that I can use the junk cylinder to practice on first
 

Latest posts

Back
Top