First log with Granberg Mill

Arborist Forum

Help Support Arborist Forum:

This site may earn a commission from merchant affiliate links, including eBay, Amazon, and others.

flashhole

Addicted to ArboristSite
Joined
Sep 18, 2011
Messages
1,594
Reaction score
413
Location
Southern Tier Up-State NY
I had to go away on an extended business trip that delayed me getting to my Granberg Mill. Had the day off and spent a few hours with it. Here are some pics.

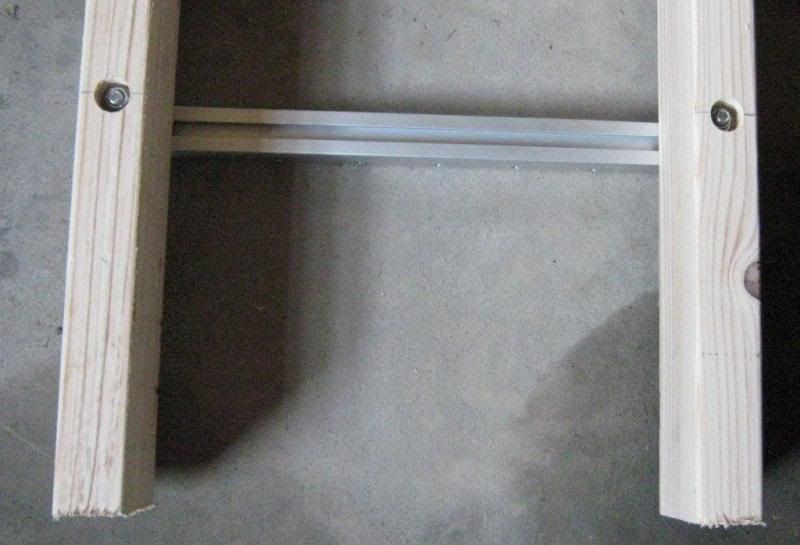
First thing after assembling the mill (other thread) was to build the runner assembly.

Granberg brackets - a bit disappointed with these for the amount of money they get, they could be 4" longer. Drilled 3/4" counter sink holes first then a 3/8" through hole. The counter sink only needs to be deep enough to get the self locking nut below the surface of the runner. The directions say at least 1/2". That's too much. My nut driver used to tighten the self locking nuts runs out of throw before it bottoms out and locks the bracket to the runner. Had to use washers to lift it. Not a big deal but they should be more descript in the instructions.


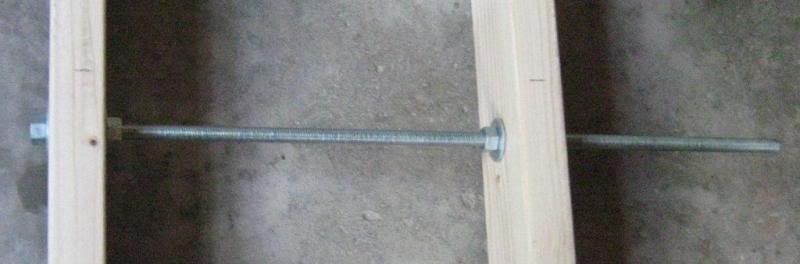
I opted to use 1/2" threaded rod as stabilizer bars on the rail assembly. This turned out to be a good decision. There is a lot of surface area on the washer/nut assembly and they only need to be finger tight. I will replace the hex nuts with wing nuts.


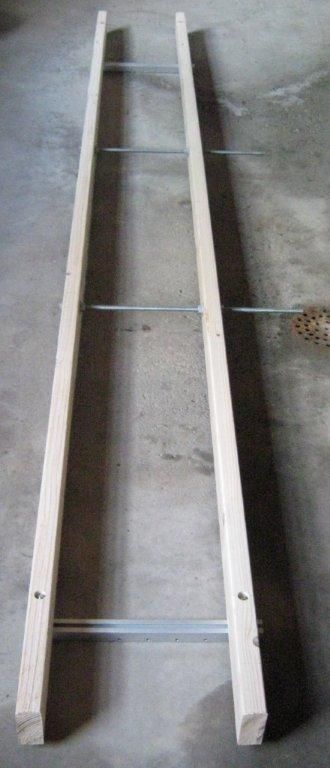
Here's the finished rail assembly. My bar is plenty long to clear the end of the threaded rod but I will likely cut them shorter because the Granberg brackets are so short. I have decided to dedicate this rail assembly to smaller logs and build my own end brackets from angle iron. There is lateral adjustment but no forward/back adjustment. This forces you to cut the logs to be milled to a specific length. I used 9'.


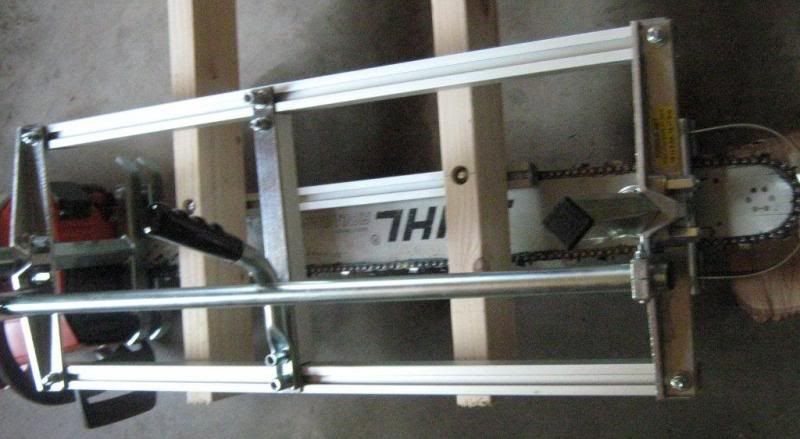
I extended the rails beyond the length of the log to accommodate the mill so I can get a flat entry into the log. Here's how the saw/mill fit on the rail assembly. You can see the chain is out board of the bracket that screws to the log and both mill bars rest on the runners.

 
Next was setting it up on the log. Here are a few different shots of the rail assembly and mill on the log. My screws affixing the brackets to the log were #10 2.5". They were very difficult to screw into the maple log. I ended up switching to 2" sheet rock screws and they worked fine. Screws are not included with the Granberg brackets but they give you 4 double headed nails to secure the 2"x4" rails to the log. My threaded rods worked great to stabilize the runner assembly. You can see a "wood wedge at the saw end". I had to narrow the rails to an inside dimension of 8". A tape measure and a level come in handy to get everything set up properly. I braced the log with scraps of wood.


Here's my very first mill cut. The Husky 394 XP with the 36" bar was not even challenged by this log. It cut through cleanly with the new milling chain. I have the mechanics down, now I need to work on technique to get a smoother finish on the cuts. They are not bad, but I think I can do better with practice. The length of bar cleared the threaded rod stabilizers w/o any problem but if I go to a shorter bar I have to cut the length of the rod back to match the Granberg brackets. I'm going to mill several more logs and use them to build a shelter for the horses.


First 2" thick slab.


Second slab. Notice I had to shift the log to be centered over one cinder block. My handle on the chainsaw would not clear the cinder block. Lesson learned.


Third slab.


Stacked in the garage.

 
Very nice... I have a 395xp coming next week from a member here.

I still need the mill. But look forward to learning as much as I can before I get the Mill.

Looks good. Keep the pice coming!
 
Here's my very first mill cut. The Husky 394 XP with the 36" bar was not even challenged by this log. It cut through cleanly with the new milling chain. I have the mechanics down, now I need to work on technique to get a smoother finish on the cuts. They are not bad, but I think I can do better with practice.
Tip1: You can get a smoother finish by providing a more constant force along the log. Part of this is technique but some constant force can be obtained by sloping the log. This then uses the weight of the CSM to provide a constant force, you also need less push.


The length of bar cleared the threaded rod stabilizers w/o any problem but if I go to a shorter bar I have to cut the length of the rod back to match the Granberg brackets.
Tip 2: keep the long ones and buy a shorter set, otherwise you may have to turn around and buy a longer set in the future.
 
Thanks Bob - I'll be milling more tomorrow and I have a mild slope I can take advantage of. Plus the slope is in the shade of some nice big trees. Today was 90 degrees with 90+% humidity. I almost melted into a pool of nothing milling that log but I got it done and enjoyed doing it.
 
Thanks Bob - I'll be milling more tomorrow and I have a mild slope I can take advantage of. Plus the slope is in the shade of some nice big trees. Today was 90 degrees with 90+% humidity. I almost melted into a pool of nothing milling that log but I got it done and enjoyed doing it.


Don't be worried about using too much slope. If you look at my avatar and look at Danivan's pics of how much he slopes his logs you can get an idea of how much you can use.
Of course when logs get too long it becomes harder to do this but by all means take advantage of natural slopes. You can tell that you have too much slope when the saw starts to bog down under it's own weight but you will have to be pretty steep by then. If you get the slope close to just right and the chain is sharp the saw will self. Some CSMillers add some weight to their mill once they get started (like a cookie or two) to provide some extra oomph to drive the mill down the log. Any static weight added will a constant additional downward force so it will help with smoothness.

On your setup I would thank about starting with 3 bricks at the start and 2 at the other end.
 
Great looking job there for your first cuts!! Like BobL stated, slanting the log will make it better, cutting a small Vee into a couple support logs work better than cinder blocks, IMO. When I started I used blocks as well, then switched to a couple 4' logs about 10-12" in dia. I like the logs better, as the Vee allows me to cant the log slightly with the tip of the bar down a bit putting the powerhead up a little, making it more comfortable of a position for me.
 
Sounds like good advice. I milled a second similar size log today before it got hot outside. Used a slight incline and could tell the difference. Less physical work on my old bod is a good thing. The V-block sounds like a good idea, I'll have to make one up and try it. I'll fit it to the cinder block.
 
Looks great, and I'll also agree with sloping the log to be cut, works great eh? :msp_w00t:

One other thing, I think you should have another sticker or two in that stack, they are just a bit far apart for my liking, but then again they are your slabs :biggrin:

One or two more stickers would decrease the space between stickers enough, IMHO.

Cheers!
 
What do the stickers do besides provide space for air flow? The slabs are 2" thick. If they are going to bow or warp an extra sticker won't change that will it? Already I see quite a bit of moisture leaching out of the slabs.
 
If you make a V block, make the V shallow or it will get in the way of the bar/head on the last slab.
 
What do the stickers do besides provide space for air flow? The slabs are 2" thick. If they are going to bow or warp an extra sticker won't change that will it?

Every little thing you can do helps. The most common mistakes (I made them too) I see are not enough stickers, not lining up the stickers vertically and not using stickers on the very ends of the slabs.
 
I'm kind of surprised nobody commented on my Stihlvarna. No blasphame, no ridicule .... I'm hurt! :)

Stihl chain and stihl bars I like, their saws, not so much. They are good in their own right, I just have never been a fan...
 
What do the stickers do besides provide space for air flow? The slabs are 2" thick. If they are going to bow or warp an extra sticker won't change that will it? Already I see quite a bit of moisture leaching out of the slabs.

It was just a friendly suggestion, I'd make the spaces between stickers less. I like 12" on most stuff between spacers. I've had 3" thick slabs warp. I like to strap my piles down, I find I don't get as much warpage, and you don't have to deal with heavy stuff on top of your piles. I live in earthquake country, so piles of wood with heavy things on top is not a great idea. Straps work well, and spacers at 12" intervals worked well for me. I thought your spacers were a bit far apart is all. By your thinking why have more than two spacers then, one on each end, that way you will get lots of air flow, and you won't need as many spacers.....? :D

Really do what you want, I just just making what I thought was a helpful suggestion :msp_smile:

Cheers!
 
Back
Top