


Wet1
Addicted to ArboristSite
I decided to sit down and do some basic mods to my EPA 3120xp yesterday. I didn't want to put a lot of money in this saw, so I did what I could for as little money as possible.
Like others, I finally got fed up with the 9,600 rpm limiter in my EPA 3120. I know husky has a non-epa coil and flywheel for this saw (I believe this limits around 11.5k) that is still sold in the ROW, but I wasn't crazy about spending a couple of hundred dollars on a saw I only paid $600 for to begin with. Romeo had told me the unlimited 272 coil can be adapted by changing the center poll/laminate and swapping in the stock piece, so I thought I'd give that a try. I should warn anyone considering doing this swap, the 272 has no limiter in it so it's very possible you could damage your saw since there's no safeguard with is coil... Please understand you could throw a rod or break your crank by doing this!!! Just want to make sure everyone knows this is a possibility when removing rev limiters...
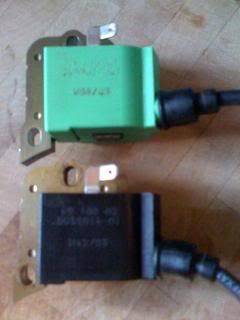
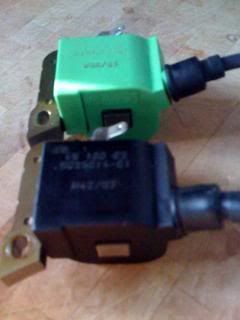
I bought a clean used 272 coil off ebay for $25 for this swap. Looking at the two coils, they appear almost identical other than the color. The spark plug wire comes out at a slightly different angle and the plug wire itself on the 272 coil was a little shorter.
I started off by finding out what the timing was with the stock coil. I crudely found TDC and marked both the FW and a spot on the jug so I could read it with my timing light from the top. I suspect I didn't find exactly TDC, but I'm sure I was very close (+/- a degree or two). Close enough was fine with me, I just needed a reference point since my Snap On digital inductive advance timing light allows me to dial in the advance. With TDC marked, I found the stock green 3120 coil was giving me about 53° BTDC and advanced to around 24° as it reved up. Now that I had this info, I knew what timing numbers I needed out of the 272 coil.
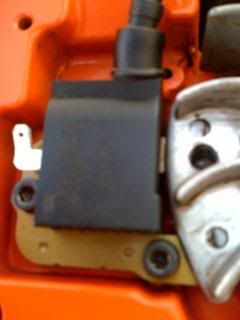
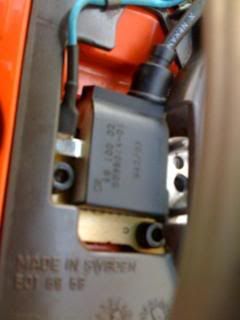
Since the pole/laminate in the two coils looked to be identical, I went ahead and installed the 272 coil without changing out the center laminate. The coil fit just as the factory coil did and with no issues. The plug wire location/angle did not hit the case on the saw, so I didn't have to notch the case at all (I thought I might have to given the slightly difference in the angle of the plug wire). The plug wire was a little short if I used the factory wire locations (clips in the plastic), but I just bypassed one or two of the clips and found it was still very secure and fit just fine. I could have changed the plug wire(s), but this worked so I decided not to screw around with it and chance breaking something.
Not knowing what was going to happen, I decided to see if it would start w/o making any other changes other than installing the 272 coil. To my surprise, the saw started and seemed to run well. Checking the timing I found the saw was idling at around 51°, which was very close to what I was seeing with the factory green 3120 coil. After building up the rpm's with the 272 coil installed, the timing was again sitting around 24° BTDC... right where it was with the factory coil. I suppose the timing could be advanced a little to get a little more performance out of the saw, but I didn't want to bother. If the timing was not correct after installing the 272 coil, I would have tried swapping the center sections. If it was out by a lot, I would have needed to re index the FW. I would have done this by removing the FW and the key, and then relocate it to get the proper timing. Luckily, I didn't have to do this. The best part, no premature hammering of the limiter... music to my ears!!!
Since the non- epa saws come with a larger high speed jet, and I wanted to open my muffler up a little, I had to richen my carb up a little. This saw doesn't have an adjustable high jet (I HATE NON ADJUSTABLE CARBS!!!), so I had to do some mods to the factory jet. To do this you have to access the carb and take out the high speed jet. You first have to remove the aluminum casting that sits over the carb (four allen screws). Once that plate is removed above the carb, the carb is free to be removed from the saw. You don't have to remove the carb to do this mod, but I wanted to clean the saw up a little so I elected to remove it by disconnecting the two linkages and the fuel line. You next remove the top plate on the carb (four small screws) to expose the high speed jet as shown below...
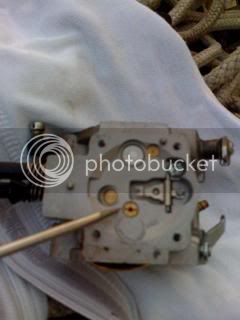
The size of the jet is stamped right into the jet itself. My saw is fairly new and it had a 1.12mm jet in it. The non-epa saws sold in the ROW come with a larger 1.16mm jet. If I were only doing the coil change, I would have wanted this 1.16mm jet. Since I was going to open up the muffler a little as well, I decided to go a little larger. Warbo jets can be bought, but I didn't have one on hand (this was kind of something I just decided to sit down and do yesterday), so I reamed out my factory jet to about .0465", which is about 1.18mm. I don't know how close this will be to ideal, but I'm hoping this will be close enough. Once I get some time to do some cutting with it, I'll keep a very close eye on the plug for a while. I'm hoping this should be sufficiently rich to keep the saw safe since I wont be using it to mill. Did I mention I hate non-adjustable carbs???
I next wanted to open the muffler up a little. I did this by removing the muffler and drilling four 3/8" holes around the factory exhaust exit. This area is curved and kind of tough to drill into because of the shape, so I drilled pilot holes with a 1/8" bit first before going to the larger drill bit. After I was done I removed any major burs and completely blew out the muffler to remove steel chips. Four 3/8 holes isn't a lot of additional surface area, but it should allow it to breath quite a bit better. The holes are actually a little larger than this because of the angle they are drilled at, but 3/8" was the size of the bit I used. I could have made the holes larger, but I didn't want to go crazy with it. I next cut the louvers out of the cover that holds the spark arrester screen. I started the saw w/o the screen in place and let it run for a minute or two to make sure any remaining steel chips that might have been stuck in the muffler had a way to escape. I later reinstalled the screen. I forgot to take some pics of this mod, but it's difficult to tell the muffler has been modded by looking at it... unless you know what to look for or start it up. The saw is noticeably louder, but it's not obnoxiously loud like some other saws I've opened up with much larger ports... kind of a nice balance IMO.
My saw has always leaked a little black crud where the muffler meets the jug, not a lot, but it was noticeable. While I had the muffler off I wanted to find out what was causing this 'leak'. Placing a straight edge over the flange of the muffler, I found it had a couple of low spots, the worst being on the top where I was seeing the black build up. The flange area on the muffler is fairly thick steel, so I took a file to the flange to level it off. After filing it for a minute or two, you can clearly see the low spots in the pic below... and this was after I had already removed some material...
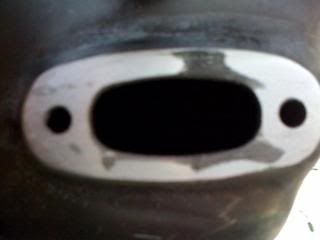
I filed it down until these low areas were almost completely gone and then reassembled everything. After starting the saw, I did not see anything coming from this location, but time will tell. Although, I'd be surprised to see another leak there.
I also installed a 8 pin sprocket and converted over from .404" to .375" chain. Pretty straight forward, but I did screw something up... I was cold and rushing to get back in the house while doing the final reassembly. In my rushing, I stepped on the bar plate and really disfigured it. I tried reshaping it, but it needs to be replaced now. Dummy...
So how does the saw run? I wish I had more time to play with it before I had to cleanup. I went ahead and made a couple of cuts anyway and it's like a totally different saw. It really rips now! It's so nice not hearing that limiter banging away. With the unlimited coil it now seems to run like it should, before hand you had to really put a lot of pressure on the saw to keep it bogged and below the limiter. I need to get the bar plate replaced and spend some more time running it. I'll have to make an effort to watch the spark plug and try to keep the revs at a reasonable level with no load on the saw. All this only took a few hours with me tinkering around and cleaning everything as I went. I though about doing some porting and dropping the jug, but I decided against doing so for now since it already has plenty of snot. I can tell you its seems to run much better now and if nothing else, it should be much more fun to use (assuming it stays glued together ). The parts cost me just under $70 for everything (coil, 8 pin rim, bar tip, and chain), so far it seems like I got a lot of bang for my money considering I also got a new rim and chain in the process.
 ")
BTW, sorry about the pic quality... I was using my POS phone.
Like others, I finally got fed up with the 9,600 rpm limiter in my EPA 3120. I know husky has a non-epa coil and flywheel for this saw (I believe this limits around 11.5k) that is still sold in the ROW, but I wasn't crazy about spending a couple of hundred dollars on a saw I only paid $600 for to begin with. Romeo had told me the unlimited 272 coil can be adapted by changing the center poll/laminate and swapping in the stock piece, so I thought I'd give that a try. I should warn anyone considering doing this swap, the 272 has no limiter in it so it's very possible you could damage your saw since there's no safeguard with is coil... Please understand you could throw a rod or break your crank by doing this!!! Just want to make sure everyone knows this is a possibility when removing rev limiters...
I bought a clean used 272 coil off ebay for $25 for this swap. Looking at the two coils, they appear almost identical other than the color. The spark plug wire comes out at a slightly different angle and the plug wire itself on the 272 coil was a little shorter.
I started off by finding out what the timing was with the stock coil. I crudely found TDC and marked both the FW and a spot on the jug so I could read it with my timing light from the top. I suspect I didn't find exactly TDC, but I'm sure I was very close (+/- a degree or two). Close enough was fine with me, I just needed a reference point since my Snap On digital inductive advance timing light allows me to dial in the advance. With TDC marked, I found the stock green 3120 coil was giving me about 53° BTDC and advanced to around 24° as it reved up. Now that I had this info, I knew what timing numbers I needed out of the 272 coil.
Since the pole/laminate in the two coils looked to be identical, I went ahead and installed the 272 coil without changing out the center laminate. The coil fit just as the factory coil did and with no issues. The plug wire location/angle did not hit the case on the saw, so I didn't have to notch the case at all (I thought I might have to given the slightly difference in the angle of the plug wire). The plug wire was a little short if I used the factory wire locations (clips in the plastic), but I just bypassed one or two of the clips and found it was still very secure and fit just fine. I could have changed the plug wire(s), but this worked so I decided not to screw around with it and chance breaking something.
Not knowing what was going to happen, I decided to see if it would start w/o making any other changes other than installing the 272 coil. To my surprise, the saw started and seemed to run well. Checking the timing I found the saw was idling at around 51°, which was very close to what I was seeing with the factory green 3120 coil. After building up the rpm's with the 272 coil installed, the timing was again sitting around 24° BTDC... right where it was with the factory coil. I suppose the timing could be advanced a little to get a little more performance out of the saw, but I didn't want to bother. If the timing was not correct after installing the 272 coil, I would have tried swapping the center sections. If it was out by a lot, I would have needed to re index the FW. I would have done this by removing the FW and the key, and then relocate it to get the proper timing. Luckily, I didn't have to do this. The best part, no premature hammering of the limiter... music to my ears!!!
Since the non- epa saws come with a larger high speed jet, and I wanted to open my muffler up a little, I had to richen my carb up a little. This saw doesn't have an adjustable high jet (I HATE NON ADJUSTABLE CARBS!!!), so I had to do some mods to the factory jet. To do this you have to access the carb and take out the high speed jet. You first have to remove the aluminum casting that sits over the carb (four allen screws). Once that plate is removed above the carb, the carb is free to be removed from the saw. You don't have to remove the carb to do this mod, but I wanted to clean the saw up a little so I elected to remove it by disconnecting the two linkages and the fuel line. You next remove the top plate on the carb (four small screws) to expose the high speed jet as shown below...
The size of the jet is stamped right into the jet itself. My saw is fairly new and it had a 1.12mm jet in it. The non-epa saws sold in the ROW come with a larger 1.16mm jet. If I were only doing the coil change, I would have wanted this 1.16mm jet. Since I was going to open up the muffler a little as well, I decided to go a little larger. Warbo jets can be bought, but I didn't have one on hand (this was kind of something I just decided to sit down and do yesterday), so I reamed out my factory jet to about .0465", which is about 1.18mm. I don't know how close this will be to ideal, but I'm hoping this will be close enough. Once I get some time to do some cutting with it, I'll keep a very close eye on the plug for a while. I'm hoping this should be sufficiently rich to keep the saw safe since I wont be using it to mill. Did I mention I hate non-adjustable carbs???
I next wanted to open the muffler up a little. I did this by removing the muffler and drilling four 3/8" holes around the factory exhaust exit. This area is curved and kind of tough to drill into because of the shape, so I drilled pilot holes with a 1/8" bit first before going to the larger drill bit. After I was done I removed any major burs and completely blew out the muffler to remove steel chips. Four 3/8 holes isn't a lot of additional surface area, but it should allow it to breath quite a bit better. The holes are actually a little larger than this because of the angle they are drilled at, but 3/8" was the size of the bit I used. I could have made the holes larger, but I didn't want to go crazy with it. I next cut the louvers out of the cover that holds the spark arrester screen. I started the saw w/o the screen in place and let it run for a minute or two to make sure any remaining steel chips that might have been stuck in the muffler had a way to escape. I later reinstalled the screen. I forgot to take some pics of this mod, but it's difficult to tell the muffler has been modded by looking at it... unless you know what to look for or start it up. The saw is noticeably louder, but it's not obnoxiously loud like some other saws I've opened up with much larger ports... kind of a nice balance IMO.
My saw has always leaked a little black crud where the muffler meets the jug, not a lot, but it was noticeable. While I had the muffler off I wanted to find out what was causing this 'leak'. Placing a straight edge over the flange of the muffler, I found it had a couple of low spots, the worst being on the top where I was seeing the black build up. The flange area on the muffler is fairly thick steel, so I took a file to the flange to level it off. After filing it for a minute or two, you can clearly see the low spots in the pic below... and this was after I had already removed some material...
I filed it down until these low areas were almost completely gone and then reassembled everything. After starting the saw, I did not see anything coming from this location, but time will tell. Although, I'd be surprised to see another leak there.
I also installed a 8 pin sprocket and converted over from .404" to .375" chain. Pretty straight forward, but I did screw something up... I was cold and rushing to get back in the house while doing the final reassembly. In my rushing, I stepped on the bar plate and really disfigured it. I tried reshaping it, but it needs to be replaced now. Dummy...
So how does the saw run? I wish I had more time to play with it before I had to cleanup. I went ahead and made a couple of cuts anyway and it's like a totally different saw. It really rips now! It's so nice not hearing that limiter banging away. With the unlimited coil it now seems to run like it should, before hand you had to really put a lot of pressure on the saw to keep it bogged and below the limiter. I need to get the bar plate replaced and spend some more time running it. I'll have to make an effort to watch the spark plug and try to keep the revs at a reasonable level with no load on the saw. All this only took a few hours with me tinkering around and cleaning everything as I went. I though about doing some porting and dropping the jug, but I decided against doing so for now since it already has plenty of snot. I can tell you its seems to run much better now and if nothing else, it should be much more fun to use (assuming it stays glued together
). The parts cost me just under $70 for everything (coil, 8 pin rim, bar tip, and chain), so far it seems like I got a lot of bang for my money considering I also got a new rim and chain in the process. BTW, sorry about the pic quality... I was using my POS phone.
Last edited:


