


goatchin
ArboristSite Operative
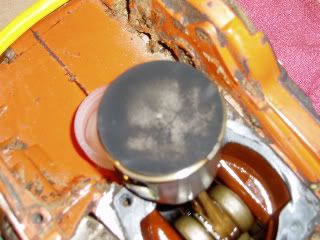
Background info: My 372xp was lackin power so i had it checked for compression, resulted in 120 psi. I pulled muffler off and looked at piston and cylinder walls from exaust port...piston and cylinder walls looked shiny and no visible scratches. I decided i would order just rings and scotchbrite the cylinder walls as i have no access to a hone (see question at end of post) to help seat new rings. My rings arrived from Bailey's, I tore down saw, but...now...that i pulled off the cylinder and looked at everything I'm concerned, or maybe just thinking too negitively.
Piston: As far as i can see this is the biggest of my problems. I'm assuming the dimple/hole in the top of the piston is from a "too" hot of a spark plug (bout the saw used) and burned through the chrome layer. The second concern of the piston is that on the intake side of piston the outer edge is shined up and the exaust side has black carbon like most of piston top...is this to be expected since the exaust side is where the "dirty" exaust is leaving from (lack of better terminalogy).
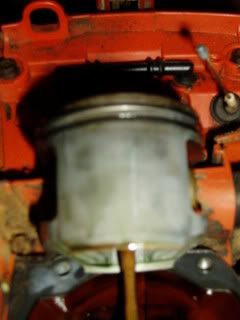
This second pic shows some "heat damage" on the bottom of the exaust port side of the piston skirt...sign of new piston in need??
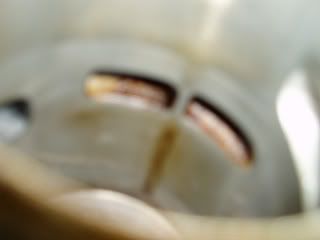
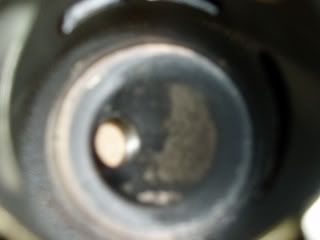
Cylinder: I see only a few concerns with the cylinder other than differnt colorations at differnt levels. It seems that there are either oxidiztion or "heat damage" imprints of the piston skirts on both sides at BDC on the cylinder walls. Second concern is that above one of the "wall ports" there is a light brown streak, i feel no scratches w/ my fingernail. 3rd concern is that at the top of the cylinder there are white chuncks of carbon, one area is large and spotted (bout a bit less than half of the cylinder head) and the other is small but a thick chunk (bout half the size of a std. nail head). I'm thinkin these may have been from when the saw was running way lean-discovered that when i had the saw's compression checked by a friend at small engine shop. Are these "concerns" of mine actual eventual problems or are they just usualy cylinder features after a long time of use.
Now for the scotchbrite honing. I know that I'm only lightly roughing up the "glaze" that the old rings had created so that the new rings will be able to create their own "glaze" and be able to seat themselves after 6 or so tanks of fuel...am i on the right track. Any other things i should do before/after i use the scotchbrite pad. Clean the cylinder w/ mix after scotchbrite??
Thanks for any help or suggestion yall may be able to offer to me, it will be greatly appreciated.
p.s. sorry the large pics...tried resizing w/ photobucket but didnt work and also for some of the pic quality, it was hard gettin the camera at right angle for the cylinder pics
Piston: As far as i can see this is the biggest of my problems. I'm assuming the dimple/hole in the top of the piston is from a "too" hot of a spark plug (bout the saw used) and burned through the chrome layer. The second concern of the piston is that on the intake side of piston the outer edge is shined up and the exaust side has black carbon like most of piston top...is this to be expected since the exaust side is where the "dirty" exaust is leaving from (lack of better terminalogy).
This second pic shows some "heat damage" on the bottom of the exaust port side of the piston skirt...sign of new piston in need??
Cylinder: I see only a few concerns with the cylinder other than differnt colorations at differnt levels. It seems that there are either oxidiztion or "heat damage" imprints of the piston skirts on both sides at BDC on the cylinder walls. Second concern is that above one of the "wall ports" there is a light brown streak, i feel no scratches w/ my fingernail. 3rd concern is that at the top of the cylinder there are white chuncks of carbon, one area is large and spotted (bout a bit less than half of the cylinder head) and the other is small but a thick chunk (bout half the size of a std. nail head). I'm thinkin these may have been from when the saw was running way lean-discovered that when i had the saw's compression checked by a friend at small engine shop. Are these "concerns" of mine actual eventual problems or are they just usualy cylinder features after a long time of use.
Now for the scotchbrite honing. I know that I'm only lightly roughing up the "glaze" that the old rings had created so that the new rings will be able to create their own "glaze" and be able to seat themselves after 6 or so tanks of fuel...am i on the right track. Any other things i should do before/after i use the scotchbrite pad. Clean the cylinder w/ mix after scotchbrite??
Thanks for any help or suggestion yall may be able to offer to me, it will be greatly appreciated.
p.s. sorry the large pics...tried resizing w/ photobucket but didnt work and also for some of the pic quality, it was hard gettin the camera at right angle for the cylinder pics
