dissecting an earthquake chainsaw

Arborist Forum

Help Support Arborist Forum:

This site may earn a commission from merchant affiliate links, including eBay, Amazon, and others.
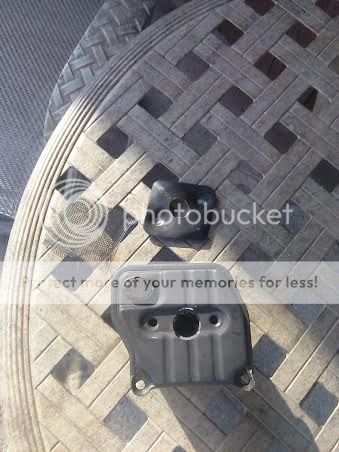
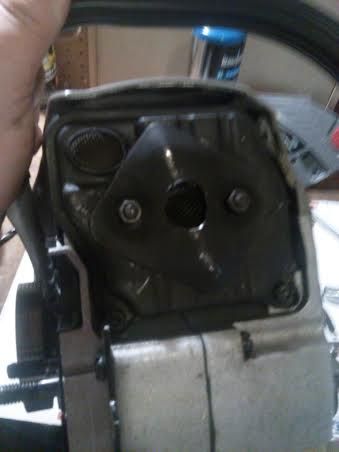
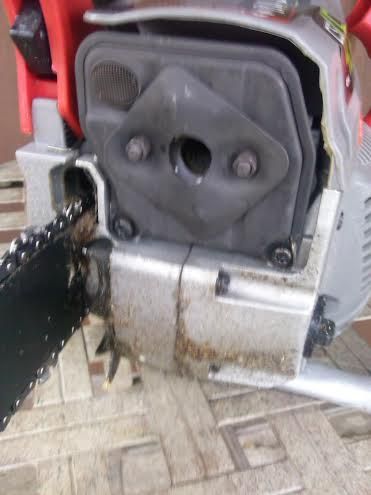
I am sure they will make it all good. Just finished the last ghetto muff modd:cool: Took and patiently pried the flange and opened up the muffler, roundfiled the entire plate with the cat, knocked the box off the flange, and drilled 3 holes between the mounting holes. Then got out my gentle hammer and beat that redheaded stepchild back into shape. The little plate on the front was slightly adjusted with my pliers so the exhaust could escape. Spark arrestor is still there but I did not add any screen to the new holes. It looks totally stock aside from the marring on the flange. Noticeable increase in power. Had to fire it up because the neighbors kids are running around screaming. Oddly enough after I fired the saw they became quiet, hmmmmmmm As soon as I figure out how to remove the mix screws, I will slot them so I can bring these fat pigs into some reasonable running order.
 
#3 quaker came today. No bar, file, or wrench in the box :( I am not happy I got screwed out of a bar, maybe they will make it right.

Early on in the first round of 38s that came out, I was sent a saw without a chain. I wrote the seller a nice note, and said I realized it was "as-is" but was expecting a chain to come with the saw. They sent me a new chain right away - and paid the shipping too. I'd like to think it was my approach that got them to help me, but either way, it was good customer service in my book.
 
When I first started working on saws I bought a clutch removal tool, like the one on the left. Later, one of the guys here said they used old sockets with material ground away to make the tool. Now, instead of $8.95 + shipping for a removal tool, I pay 50 cents each at a local pawn shop and grind it down to suit my needs. I keep several old sockets on hand in various sizes for whatever comes up. The one on the right fits the Earthquake clutch.

The threads are LEFT hand. I have never seen a saw with right hand threads on a clutch.

Caution: When using a piston stop, be careful. I (and others here) have caved in the top of a piston using a metal piston stop. The plastic piston stops work pretty well, but when I want to prevent movement in the piston I generally use a piece of starter rope threaded through the spark plug hole. It isn't as fast but removes the danger of damage to the piston.

View attachment 320413
Owning a metal piston stop. I have always used the rope trick. I feel that it poses less of a risk to the saw.
 
Speaking of the clutch, I'm having a heck of a time trying to get mine off. Looks to be marked LH thread, but I'm getting nowhere trying to budge it. Really want to investigate the oil leak mine's got.

Suggestions? Maybe I'll make a clutch tool that'll adapt to an impact if all else fails. Right now, I'm just using a brass drift punch and hammer (with a piston stop installed).

I had the oil leak in one. Don't take off the clutch right away! I broke mine and it is brittle. The Leak turned out to be a weak spot in the magnesium case that can crack when dropped in shipping. You have to take the plastic case off and get to the front case seam. Those black circular plugs come out exposing pins with screwdriver slots. They come off but are in with loktite on them so use the alpha male technique on them. The other star drive screws are sprinkled around but it comes apart eventually. I used acetone and then Silicone and a long time to cure. Probably JB weld is better? but didn't have any handy at the time.
If you break the clutch new ones are on ebay.....
 
Last edited:
Buddy ordered one of the 45's and they dropped it off today and over he comes with a bottle of Evan Williams and parked himself on a stool and said "Do your thing" with a grin. I tuned it and had him cut with it a little bit so he had a before and after experience.

Here's some pics of the down and dirty muffler mod to start, 3/4" hole starting at the back all the way through the cat and front cover plate.
Quake18_zps645fd8e4.jpg

Quake19_zps087be00a.jpg

Quake22_zps25fcc488.jpg

Next was the Walbro carb mod, no more special screwdriver needed. I wired tied the linkage up out of the way and used a vacuum nipple to keep debris out of the purge inlet.
Cut through the shroud casting on both sides and slotted the screws with a dremel and thin cutting disk.
Quake16_zps16fc3817.jpg

Quick spray off with some carb cleaner and it's ready to go back together
Quake17_zpsc6107bfd.jpg

And the finished project, final tuning on the high side from rich to lean in the cut was between about 1/8 of a turn. It cuts like it's mad at the wood now and he's lovin his new toy. Unreal the difference it makes with simple mods to one of these. Oiler is just right set about halfway out.
Quake15_zps33d14b21.jpg
 
I just got done looking at the G5000 IPL here: http://www.redmax.com/ddoc/RMXI/RMXI2008_USen/RMXI2008_USen_G5000AVS_SN608281 and up.pdf

There's a whole lot of similar going on there.

Upon my research Steve- these are like the Redmax-Zenoah G450AVS. I think they are as close to a direct match as we are going to find. I am getting ready to order a couple. Call me optimistic, but if there are ANYTHING like a Redmax, they will be a good running and hopefully long lasting saw.
 
TrophyHunter, from a quick read at your last post I thought you said your Quake came with a bottle of Evan Williams lolol.
 
TrophyHunter, from a quick read at your last post I thought you said your Quake came with a bottle of Evan Williams lolol.
They wouldn't have any saws left in stock for that price! We got into that after the saw got put away, ya know it's not expensive bourbon by any stretch but I always preferred it to some of the more popular brands. Seems fitting to drink the bottom shelf after modding a $48.00 saw :)
 
Buddy ordered one of the 45's and they dropped it off today and over he comes with a bottle of Evan Williams and parked himself on a stool and said "Do your thing" with a grin. I tuned it and had him cut with it a little bit so he had a before and after experience.

Here's some pics of the down and dirty muffler mod to start, 3/4" hole starting at the back all the way through the cat and front cover plate.
Quake18_zps645fd8e4.jpg

Quake19_zps087be00a.jpg

Quake22_zps25fcc488.jpg

Next was the Walbro carb mod, no more special screwdriver needed. I wired tied the linkage up out of the way and used a vacuum nipple to keep debris out of the purge inlet.
Cut through the shroud casting on both sides and slotted the screws with a dremel and thin cutting disk.
Quake16_zps16fc3817.jpg

Quick spray off with some carb cleaner and it's ready to go back together
Quake17_zpsc6107bfd.jpg

And the finished project, final tuning on the high side from rich to lean in the cut was between about 1/8 of a turn. It cuts like it's mad at the wood now and he's lovin his new toy. Unreal the difference it makes with simple mods to one of these. Oiler is just right set about halfway out.
Quake15_zps33d14b21.jpg
Exactly what I did to 3 carbs yesterday morning:rock: 
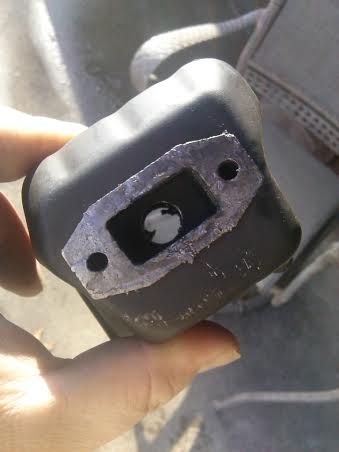
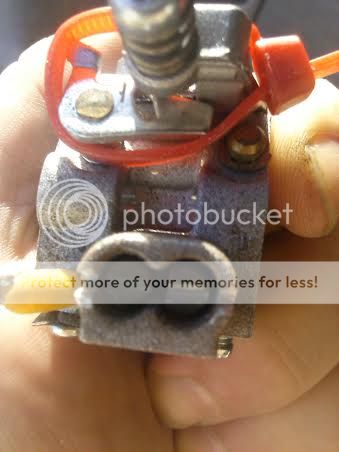
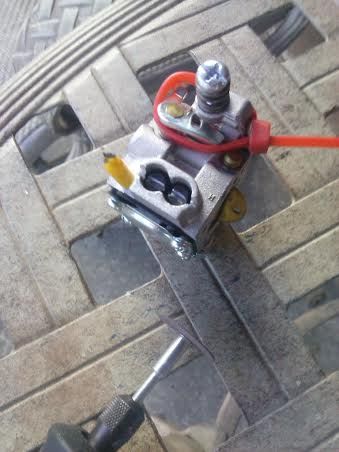
Factory setting was 3-3/4H 2-5/8L on mine. Any idea where you ended up? I went in 1 turn on the H and 1/4 on the low from the preset position. Ordered a tach so this weekend I will see if I can get it dialed in all proper.
 
The one I did today ended up at 1/4 turn in from factory setting on the low for best throttle response and about a 1/16th in on the high for the sweet spot in the cut. Basically it was pig rich at the factory settings before the muffler mods.
 
The one I did today ended up at 1/4 turn in from factory setting on the low for best throttle response and about a 1/16th in on the high for the sweet spot in the cut. Basically it was pig rich at the factory settings before the muffler mods.
1/4 was about max for response, they are fat as hell so i went a full turn on the H, but have no wood on hand so further tinkering will be required. I modded the mufflers, pretty much gutted them and popped 2 or 3 holes behind the plate. Nothing was measured, just an eyeball and a unibit:D
 
Have two on the way guys... better be good or I am blaming Scott!

My second 45 cc saw was waiting on me when I (finally) got away from work. Another long night and looks like a week full of overtime coming up, but at least I'm employed.

Anyway - I only had a few minutes to check the saw over. The little yellow spacer where the bar should be was still there, the bar is untouched and the chain was still in the package. Not even a hint of sawdust. It looked like someone had filled the tanks, started the saw, then shut it off and drained the fuel out before shipping. Bar oil had leaked a little but the tank was still half full. The bar cover, scrench, file and manual were in the box also. The starter felt like it was binding really bad when I tried to crank the engine. Hmmmm....


I wonder....


Wow! After 10 quick pulls on the cord the compression was at 203 psi. :chainsaw: 203 psi! :chainsaw:


For $48.40 I am not seeing a "down side" to these saws yet. I hope to have time for a muffler mod and thorough check of the saw this weekend.

dd
 
Holy Crap
The one I had out of the box at 192psi has seated the rings and gained some more since I started cutting with it. I'll slap the gauge on it tomorrow and see what it's blowing, you can really feel it when you go to pull it over.

Wonder what a batch of 32:1 or 25:1 mix will do for compression on one of these?

Do you have more starter rope? :laugh:

Edit: I wish I had some extra Christmas dollars to buy a few more of these. :cry:
 

Latest posts

Back
Top