Sawbuck Design Options

Arborist Forum

Help Support Arborist Forum:

This site may earn a commission from merchant affiliate links, including eBay, Amazon, and others.
Joined
Jan 10, 2008
Messages
12,552
Reaction score
9,198
Location
Omaha, Nebraska
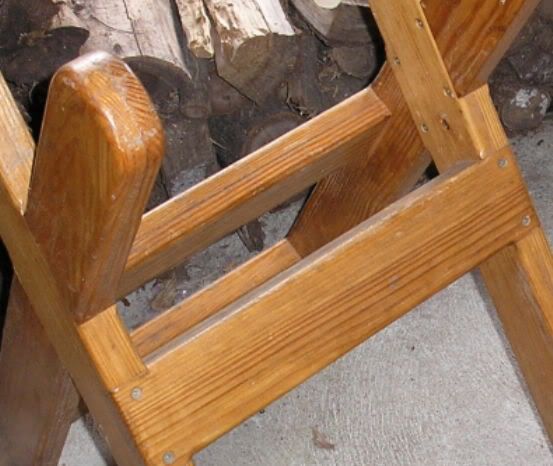
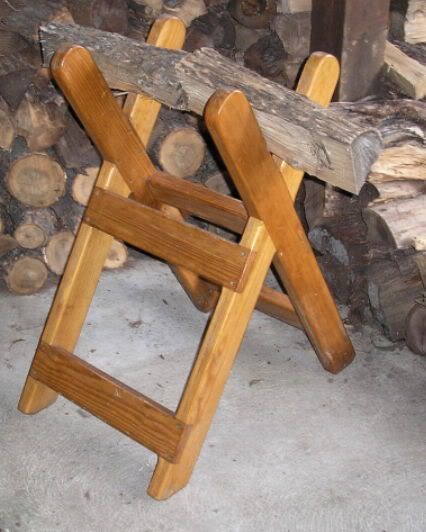
In the past, I have usually built and made my sawbucks with only two crossed uprights 16" to 18" apart. If the log is being bucked in half, I cut between the uprights, the two ends never pinch the bar during the cut and fall to the side. If I buck the log into thirds, I overhang one end long, cut that first, and then cut the second one between the uprights. This usually works very well.

Nowadays, I see more wider sawbucks being built with three crossed uprights.

(1) What is the advantage of three uprights over two?

(2) How far apart should they be if you want an average log length of 18" to 21"?

If you have any other tips on the design you like, please chime in.
 
Here's the sawbuck that I use today. Should I change it by building a new one and add a third cross-lapped vertical support?

Sawbuck3.jpg


Sawbuck1.jpg


Sawbuck2.jpg


Seems like a simple question. Please advise. TIA.
 
Well, I just built our first sawbuck last week. Haven't had much chance to use it yet but I followed the plan by BlueRidgeMark, post #19, here: http://arboristsite.com/showthread.php?t=68764&highlight=sawbuck&page=2

Shari
Shari, it looks to me like the spacing between the vertical crossed supports should be about the same length or just an inch or two under the length of the logs you are going to burn. If the supports are too far apart, logs will pinch the bar in the center and stop the saw as you cut top down.

If you intend to make three supports or more, I cannot see why they should not be the same width apart. Note also that once that third support is added, you will have to manually remove one side of any log that is halved. It will not drop by itself as both ends do in the sawbuck that I am now using (Post #2).

I still cannot figure out the advantage of three or more crossed uprights.
 
I had some oversized pieces that I had to cut down to fit my insert. Other than that, I didn't have a big need for a sawbuck, but I knew it would be better to have one. The thing I didn't like about most of the ones I saw was the rails being so high. I searched for images typing in "sagebock", can't remember how I came across it, but I believe it German for sawbuck.

This was my winner:
attachment.php
attachment.php


The other thing I liked was with four uprights, I could cut in between them and the wood would still be stable. I made mine out of oak, unlike the picture, all of the uprights are the same height and I tapered the tops so the wood would sit a little lower. I'll post some pics of mine if I get a chance.

The one in the picture looks pretty cool. It has lap joints and a little captured cam disk that locks it together, when apart it folds flat. I think if you were going to make one just like it, you would need some nice clear straight grained wood otherwise you would be fighting it everytime you went to put it together or take it apart.
 
Excellent joinery, and I like the idea of folding flat while still maintaining the half-lap joinery. The captured cam disk is ingenious.

However, I stll have to wonder what the extra two center supports add. If you make two cross cuts on each internal side opening, it seems that one log still remains lodged in the center and has to be lifted out.

Make one center cut to any log less than about 40" and the two halves will not fall to the sides.
 
Last edited:
However, I stll have to wonder what the extra two center supports add....Make one center cut to any log less than about 40" and the two halves will not fall to the sides.

I think the center supports are there to hold the two halves after a center cut.

I agree about the joinery & design. I didn't need to save space, so I just borrowed the overall design and assembled it with screws. I think it would be handy if you had to transport it for use, such as having a lot of smaller wood to cut and if there were more than one person--one to move wood & one to cut.
 
Shari, it looks to me like the spacing between the vertical crossed supports should be about the same length or just an inch or two under the length of the logs you are going to burn. If the supports are too far apart, logs will pinch the bar in the center and stop the saw as you cut top down.

Not a problem. I've made hundreds of cuts on mine. There is RARELY a pinching problem. I should add that I'm cutting small stuff. Usually from about 8" down to 2 or 3 inches. Bigger stuff is usually cut on the ground.

If you intend to make three supports or more, I cannot see why they should not be the same width apart.


The leftmost pair are different. Take a look at the measurements:

attachment.php


I make all my cuts on the RIGHT sides of the uprights. Wood that is cut just falls down.

Note also that once that third support is added, you will have to manually remove one side of any log that is halved. It will not drop by itself as both ends do in the sawbuck that I am now using (Post #2).


Yep. The last piece (or pieces) just sit there, until they are removed manually. No big deal - I usually just tip them off with the (not moving) bar of the saw. OR one of my helpers just grabs an armful of wood from a convenient height. :clap:

I still cannot figure out the advantage of three or more crossed uprights.

Mass production. I stack multiple long pieces, then make 4 cuts. This gives me 5 cut sections (of however many pieces I loaded) nicely cut to length, plus another section of random length. I've got boys scrambling to load new wood and remove what I've cut, so the whole process just floooows.

Let's walk through it:

  1. Boys load up with wood, lining up left ends. Right side just hangs off.
  2. Dad starts cutting from right to left:
    • First cut: Ragged ends fall from right side.
    • Second cut: First section is cut on its left end. Right side is still supported. Wood falls when cut is completed.
    • Third cut: Second section is cut on its left end. Right side is still supported. Wood falls when cut is completed.
    • Fourth cut: Third section is cut on its left end. Right side is still supported. Wood falls when cut is completed.
  3. Fourth section is removed manually.


Rinse. Repeat. Works great. I have found this to be VERY fast and efficient. :cheers:
 
Last edited:
Cutting 8' to 12' Slabs

Good post, Mark. I have to wonder if average log length has a lot to do with the design also. I have a cutting-to-length job forthcoming that requires working with 8' to 12' slabwood. The slabs vary a lot in mass as well. Most pieces will then require 1 to 2 splits after first being cut to length using the sawbuck.

My theory is that simplicity might work best here with a little leg work thrown in. Suppose we are using my narrower, 2-upright buck shown in Post #2.

(1) Drop the slab on the sawbuck dead center on its length. That leaves about 4' to 5' on each side of the buck. Stack as many as the buck will hold.
(2) Cut a 20" length off one end. Slabs should still stay put.
(3) Walk to the other end and cut off two 20" lengths.
(4) Cut the rest of the lengths with the final cut in the center of the buck.

In this case, it appears a buck with more crossed uprights like yoiur design will only reduce the effort required to maintain the balance, perhaps walking to the other end in step (3). However, if you have 500 slabs to cut up, that could be significant. :popcorn:

Psstt... sure wish I had the luxury of all those kids helping out.
 
What about one like this for long pieces?
attachment.php
I must admit that little contraption fascinates me. Bailey's carries it, but for $60 worth of angle iron and bolts I could probably make one in my shop. I imagine it would hold about any slab section that has to be cut except rejected log cores that really get heavy.

Looks like it might even fold flat for transport. Take a look at this one from Bailey's for $110 + S&H:
http://www.baileysonline.com/itemdetail.asp?item=15730

Not sure if it's the same one, but looks like it works like a charm. Rave reviews from users.
 
Last edited:
And the 'use the search function' fails again. I tried to find my post "another sawbuck for limbs' and it insists it doesn't exist. I made the post over a year ago someting winter of 08/09

It is simple, not pretty, but very functional. Loads multiple limbs to be cut at once.

Harry K
 
And the 'use the search function' fails again. I tried to find my post "another sawbuck for limbs' and it insists it doesn't exist. I made the post over a year ago someting winter of 08/09

It is simple, not pretty, but very functional. Loads multiple limbs to be cut at once.

Harry K

Harry,

Here is the post you speak of but your pictures have been replaced(?).http://www.arboristsite.com/showthread.php?t=87226&highlight=sawbuck

Can you post it up again? Always looking for an easier way to do things...

Shari
 
Oooooookay!

So THAT's what that was! I went looking for that thread a while ago, but the pictures didn't make sense.

Leave it to a woman to spot the obvious right away, while we superior men puzzle over it! :laugh:


Harry, fix those pics, willya? :)
 
Well, I won't post pics of mine but as I said I followed BlueRidgeMark's plans & used carriage bolts w/wing nuts so I can fold it up. Oh, yes, 3' of chain at the outside bottom on two sides to control the spread of the x. Mine is just six 8 ft. 2x4's with a carriage bolt at the cross (three pair). Cross is at about 32". (I'm short!) You guys are making me feel bad - some of these examples look like furniture quality to me. I can run a chop saw & a drill - that's it.

Hubby & I were building something else the last two days. His meds make his hands shake so much he can't handle the tools very well. He's the brains, I'm the brawn I guess. He was showing me how to use a certain tool and I said "Geez, I didn't know it worked like that!" To which he replied, "You never had to know. You know how to use makeup, I don't know how to do that." :)

Anyway, back to sawbuck plans or photos - show'em if you got 'em (please).

Shari
 
Harry,

Here is the post you speak of but your pictures have been replaced(?).http://www.arboristsite.com/showthread.php?t=87226&highlight=sawbuck

Can you post it up again? Always looking for an easier way to do things...

Shari

I learned the hardway that if you post pictures from photobucket _never_ delete one. It screws up all your past posts.

I tried a few minutes ago to see if those pics were still there. Havingproblems with that program refusing to load for the past few months. Will try again. If not there, I will shoot some more tomorrow.

Ah, Good! I see Aandabok's pics are still there. That is almost an exact copy of mine. I'll try for the old pics though as they show it in actual use.

Found 'em (I hope)

001-9.jpg


003-7.jpg


005-4.jpg


I've put at least a cord of 'limbs' through it, did another pile the other day. The 2x6's are getting pretty well chewed up.

Harry K
 
Last edited:
Aha, a very different approach! I cut mine right NEXT to the uprights, not at the halfway point between.


What is that wood that's loaded on it? Bark sort of like locust, but not really, and the wood has a shine to it? Is that it?

I picked up some of that this year, but don't know what it is. Burns nicely, though.
 
I agree, that most of these saw bucks look like furniture! (that’s a complement, not a dis!).

I live in the city and scrounge firewood as opportunities present themselves, so I made a fold-up saw buck out of scrap 2X4’s, scrap plywood, and a few carriage bolts. My ‘full-size’ one is larger, and has 3 ‘X’s. The one in the photo is my ‘portable’ or ‘mini-buck’ (it wasn’t buried as deep in the garage) that I can throw in the car or drag out for a few pieces to keep them off of the lawn.

Make it any size you want. I spaced them around 16” because that is the size I burn. Glue and nail/staple/sheetrock screw the plywood to the 2X4’s to keep things rigid. Keep things square and make sure that the holes line up if you want it to fold easily.

(*Note: photos replaced with similar ones - may not be the originals)

Large Buck.jpg Little Buck 1.jpg Little Buck 2.jpg Little Buck Folded.jpg

I like the ones made by Aandabok and turnkey4099 in the photos above, and would consider making a similar one if I was cutting a lot of firewood, especially from longer, thinner logs. In an earlier thread we discussed welding a cross piece across each set of uprights (making them more like an ‘H’) so that the logs would be held up above the base, and you could saw all the way through without hitting the two-by’s or timbers used for the base.

Philbert
 
I agree, that most of these saw bucks look like furniture! (that’s a complement, not a dis!).

I live in the city and scrounge firewood as opportunities present themselves, so I made a fold-up saw buck out of scrap 2X4’s, scrap plywood, and a few carriage bolts. My ‘full-size’ one is larger, and has 3 ‘X’s. The one in the photo is my ‘portable’ or ‘mini-buck’ (it wasn’t buried as deep in the garage) that I can throw in the car or drag out for a few pieces to keep them off of the lawn.

Make it any size you want. I spaced them around 16” because that is the size I burn. Glue and nail/staple/sheetrock screw the plywood to the 2X4’s to keep things rigid. Keep things square and make sure that the holes line up if you want it to fold easily.

attachment.php


attachment.php


I like the ones made by Aandabok and turnkey4099 in the photos above, and would consider making a similar one if I was cutting a lot of firewood, especially from longer, thinner logs. In an earlier thread we discussed welding a cross piece across each set of uprights (making them more like an ‘H’) so that the logs would be held up above the base, and you could saw all the way through without hitting the two-by’s or timbers used for the base.

Philbert
Philbert, I have only two easy suggestions to make:
(1) Increase the length of the bottom to add a couple of inches in height. Leave the cross pieces the same width.

(2) Counter bore holes about 3/8" deep for the bolts, nuts, and washers to bury them (and then use a shorter carriage bolt) so that the saw's chain can't ever hit them.
 
Back
Top