Frank Savage
ArboristSite Operative
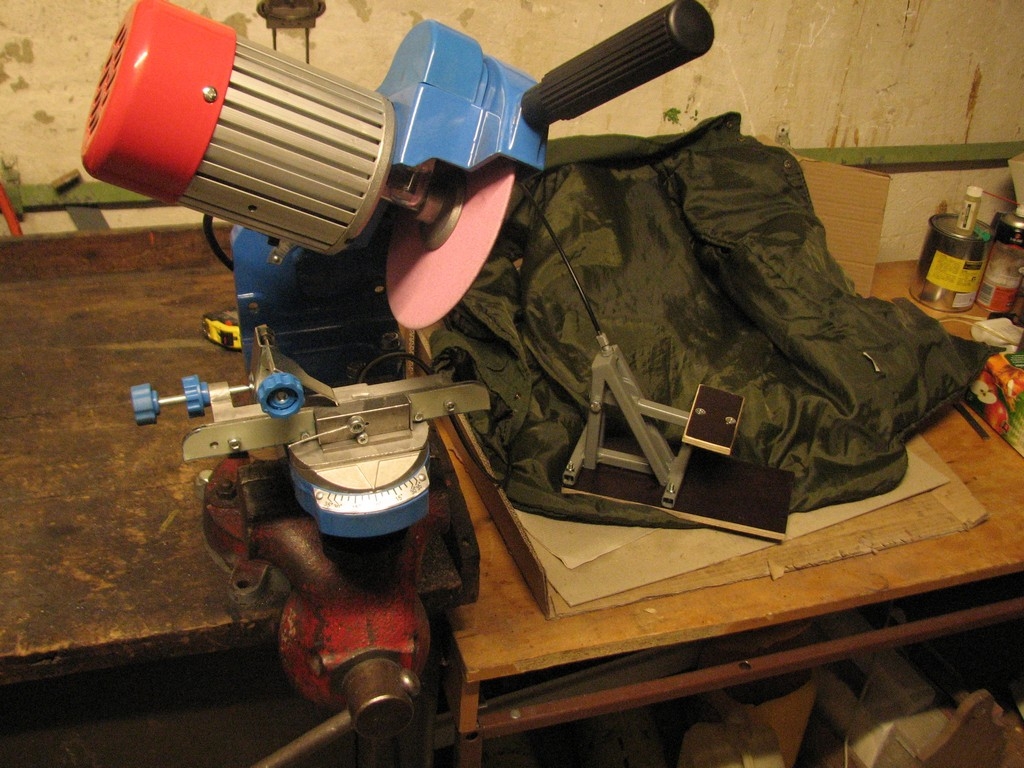
There is a bunch of knock-offs of 511 grinder with "mechanical asist" instead of hydraulic one, like this one:
http://www.alibaba.com/product-detail/145mm-230W-Power-Low-Noise-Induction_60011258359.html
Good idea, but piece of sheet (you know how to read this properly) metal barely wide for one drive link, pulled by the cheapest and flimsiest bicycle brake handle the chinese have in production makes one hell of a FUBAR outta them. Frankly, in stock form, they are without any doubt the worst PITA from the bunch.
Since seeing troubles with wear or breakage in bolt-tightened (as original 511) or excenter-tightened vices, even on original Oregon units, I decided that $80 delivered from local european dealer will not burn me as much and I will try to make it into something useful.
There are many other threads dealing with other issues of these grinders, I will not repeat them and focus on what I did new (but I suppose some people have done it before, the idea is pretty straightforward).
The flimsy guide rails with "clamping device" made of sheet metal, "precision guided" on three M3 bolts is what goes off, as well as the bike brake handle. Whole new set of rails is to be made to fit original tilting table, from 2 mm stock or sheet metal. Do not use any thicker, this will do unfavourable things to geometry with the wheel wear. No 1018 steel or similar weak and soft metal here, you want something a bit hard and solid. In a pinch, some old school computer cases (about pre-2000) can give useable material. The newer ones are thin and flimsy. As to the rails:
-it is better to make them a little (like 1/25") taller than original, or generaly 1/16" over the bar to which they are bolted to
-make them taller than your intended clamp block and footplate are tall, since you need room to trim for precise fitting them together
-outer rail (closer to operator) has 2 1/4"-2 1/2" missing section symetricaly to original bowden hole. This will permit holding tight both drive links of the cutter to grind.
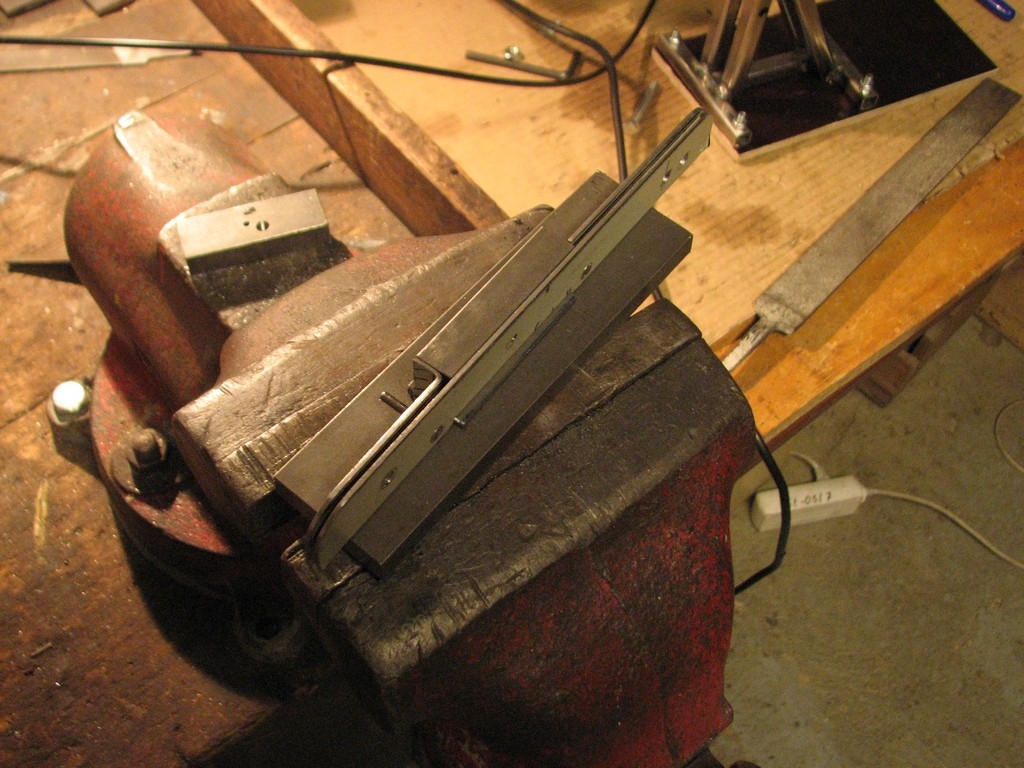
The pictures are quite self-explanatory:
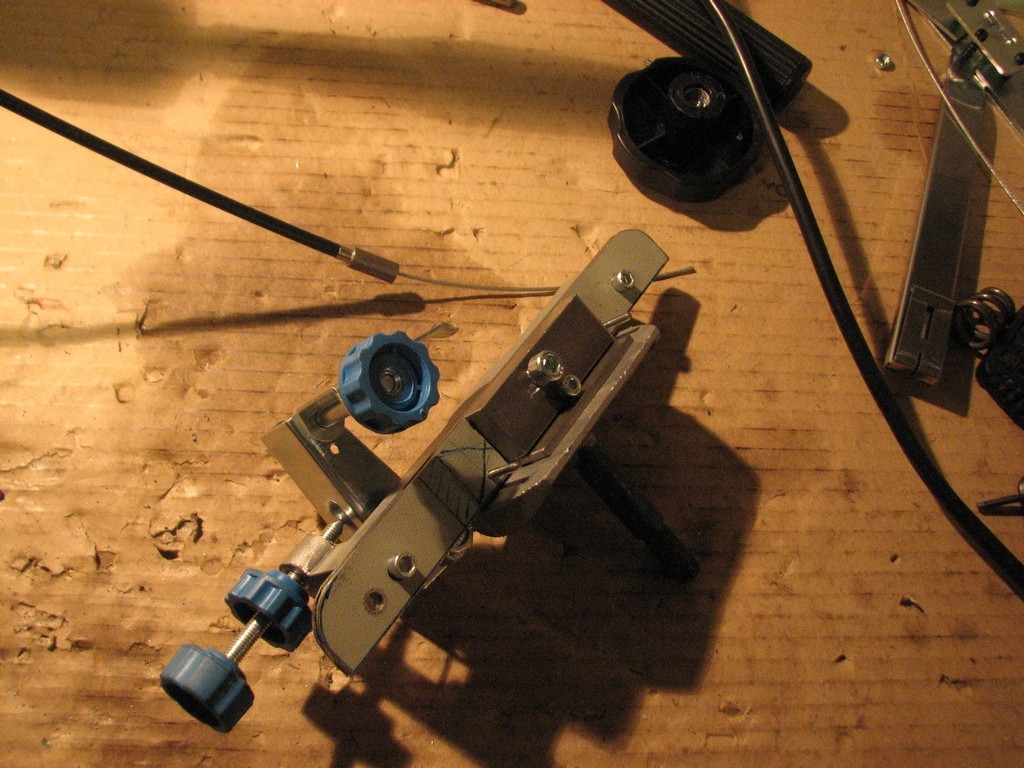
Overall view of new rails and clamp block-which is 4/5"x1/2" and 2 1/4" long. The 1/4" allen head bolt is to hold the cable, The 1/8" below is a set screw for drive link width. Long, uncut bolts aside of the clamp lock are M3 (or 1/8") bolts countersunk into rear (full-lengt) rail, the front rail has according thread in it. 1/8" or 3 mm flat bar stock is used under the clamp block and rail.
Top view, note solid steel sleve for bowden end. The surface of the sleeve pushing against the rail must be as flat as possible to spread the force, a lathe is a big help here. Other setup (with flange, bearing against the original backbone bar of the table) is in progres.
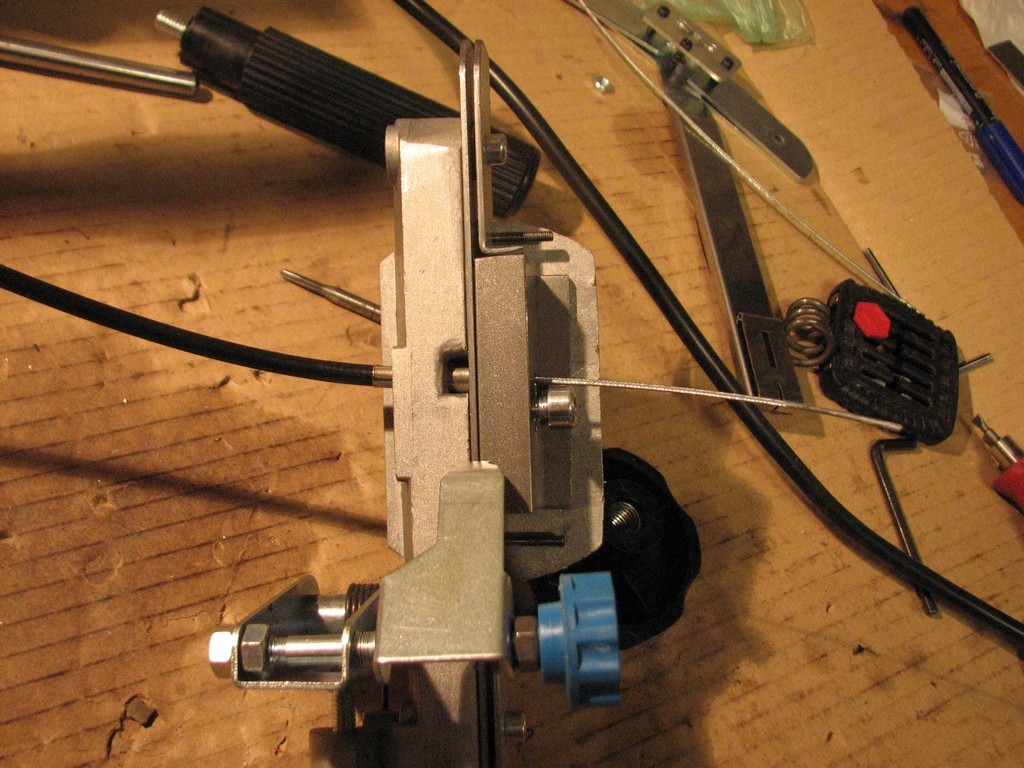
All set up to see if it can work. So far, so good. The idea is clear now.
Detail of the cutout in the rear rail. Take your time and make it precision fit, as the rail is bearing against the botom plate all the way. Light is barely visible only on few spots in mine. Countersunk bolt heads are also shown in the photo.
When the bottom is OK, true up the rail to the height of the clamp block and add little "ramps" on leading edges of the outer rail to make the chain move smooth.
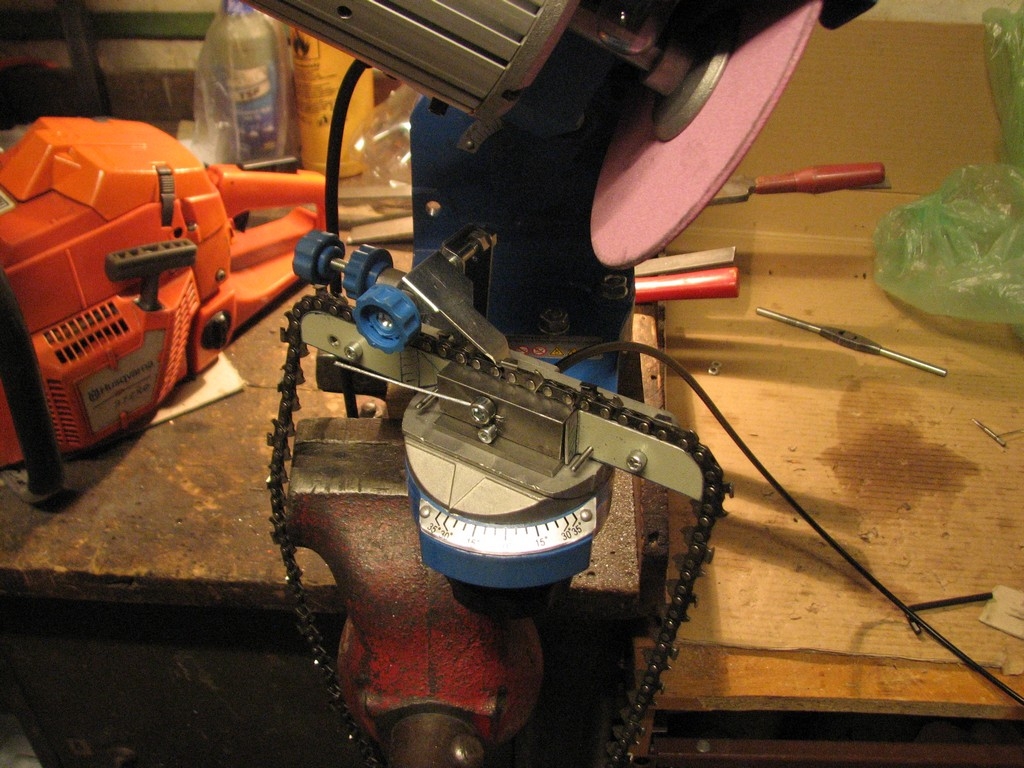
All done and set up. The bolts on sides of the clamp block recieves standard nuts and get shortened acordingly. Bike brake bowden and cable, 5 ft long. Pedal welded from square tubing, short arm (from pivot to cable knuckle seat) 4/5", long arm 5,5". Gives prety enought leverage, you don´t need any stomp onto the pedal. You can use whatever you want here, to your liking with similar leverages used. Half of the succes is proper seting of the lower bolt on the clamp block to real drive link thickness. The drive links are then hold via whole area, not by an edge and you can always adjust for any possible wear. The straps of the chain are firmly resting on metal which has the same base on both left and right side of the chain, so one side does not dog under load anywhere-the mating surfaces are so big that the forces are well distributed.
This way, you clamp in the chain by your foot, so you have both hands free, don´t need run the clamp bolt/excenter lever in and out, so you can be quite pracise with the chain and wheel arm. Nice when clamping chains, which were thrown once or twice and some of the drive links are just not nicely flat, square and consistent.
Even when speeding up, you can maintan good consistency. 0,002" consistency of cutter lenght on worn, flippy, rocked stumping chain, second ever which went through, still with the original flimsy and useless stop arm is pretty darn good I think, given overall time invested of less than 20 minutes for a 64DL, with a lot of time spent on checking this and that. I think you will be somehow amazed by the finish even the chinese wheel can deliver, when the cutter does not flip-flop around in the vice. This was about third chain I´ve run through similar grinder ever in my life, btw...
Now to make real and consistent stop arm and get rid of the other faults (esp. left-right adjustment difference) this have.
This is the basic thing almost anyone can do in their kitchen with a drill press, vice, hacksaw, files and threading dies. No lathe needed, it just makes things faster-a drill press and some clever use of a file will get ´er done.
Nice touch is, if anything goes wrong under warranty, you throw on the original parts and deal with it, since no mods to them are done.
Enjoy!
http://www.alibaba.com/product-detail/145mm-230W-Power-Low-Noise-Induction_60011258359.html
Good idea, but piece of sheet (you know how to read this properly) metal barely wide for one drive link, pulled by the cheapest and flimsiest bicycle brake handle the chinese have in production makes one hell of a FUBAR outta them. Frankly, in stock form, they are without any doubt the worst PITA from the bunch.
Since seeing troubles with wear or breakage in bolt-tightened (as original 511) or excenter-tightened vices, even on original Oregon units, I decided that $80 delivered from local european dealer will not burn me as much and I will try to make it into something useful.
There are many other threads dealing with other issues of these grinders, I will not repeat them and focus on what I did new (but I suppose some people have done it before, the idea is pretty straightforward).
The flimsy guide rails with "clamping device" made of sheet metal, "precision guided" on three M3 bolts is what goes off, as well as the bike brake handle. Whole new set of rails is to be made to fit original tilting table, from 2 mm stock or sheet metal. Do not use any thicker, this will do unfavourable things to geometry with the wheel wear. No 1018 steel or similar weak and soft metal here, you want something a bit hard and solid. In a pinch, some old school computer cases (about pre-2000) can give useable material. The newer ones are thin and flimsy. As to the rails:
-it is better to make them a little (like 1/25") taller than original, or generaly 1/16" over the bar to which they are bolted to
-make them taller than your intended clamp block and footplate are tall, since you need room to trim for precise fitting them together
-outer rail (closer to operator) has 2 1/4"-2 1/2" missing section symetricaly to original bowden hole. This will permit holding tight both drive links of the cutter to grind.
The pictures are quite self-explanatory:
Overall view of new rails and clamp block-which is 4/5"x1/2" and 2 1/4" long. The 1/4" allen head bolt is to hold the cable, The 1/8" below is a set screw for drive link width. Long, uncut bolts aside of the clamp lock are M3 (or 1/8") bolts countersunk into rear (full-lengt) rail, the front rail has according thread in it. 1/8" or 3 mm flat bar stock is used under the clamp block and rail.
Top view, note solid steel sleve for bowden end. The surface of the sleeve pushing against the rail must be as flat as possible to spread the force, a lathe is a big help here. Other setup (with flange, bearing against the original backbone bar of the table) is in progres.
All set up to see if it can work. So far, so good. The idea is clear now.
Detail of the cutout in the rear rail. Take your time and make it precision fit, as the rail is bearing against the botom plate all the way. Light is barely visible only on few spots in mine. Countersunk bolt heads are also shown in the photo.
When the bottom is OK, true up the rail to the height of the clamp block and add little "ramps" on leading edges of the outer rail to make the chain move smooth.
All done and set up. The bolts on sides of the clamp block recieves standard nuts and get shortened acordingly. Bike brake bowden and cable, 5 ft long. Pedal welded from square tubing, short arm (from pivot to cable knuckle seat) 4/5", long arm 5,5". Gives prety enought leverage, you don´t need any stomp onto the pedal. You can use whatever you want here, to your liking with similar leverages used. Half of the succes is proper seting of the lower bolt on the clamp block to real drive link thickness. The drive links are then hold via whole area, not by an edge and you can always adjust for any possible wear. The straps of the chain are firmly resting on metal which has the same base on both left and right side of the chain, so one side does not dog under load anywhere-the mating surfaces are so big that the forces are well distributed.
This way, you clamp in the chain by your foot, so you have both hands free, don´t need run the clamp bolt/excenter lever in and out, so you can be quite pracise with the chain and wheel arm. Nice when clamping chains, which were thrown once or twice and some of the drive links are just not nicely flat, square and consistent.
Even when speeding up, you can maintan good consistency. 0,002" consistency of cutter lenght on worn, flippy, rocked stumping chain, second ever which went through, still with the original flimsy and useless stop arm is pretty darn good I think, given overall time invested of less than 20 minutes for a 64DL, with a lot of time spent on checking this and that. I think you will be somehow amazed by the finish even the chinese wheel can deliver, when the cutter does not flip-flop around in the vice. This was about third chain I´ve run through similar grinder ever in my life, btw...
Now to make real and consistent stop arm and get rid of the other faults (esp. left-right adjustment difference) this have.
This is the basic thing almost anyone can do in their kitchen with a drill press, vice, hacksaw, files and threading dies. No lathe needed, it just makes things faster-a drill press and some clever use of a file will get ´er done.
Nice touch is, if anything goes wrong under warranty, you throw on the original parts and deal with it, since no mods to them are done.
Enjoy!
")