


I finally got an OEM Husqvarna coil for my 681. It is installed on my 681 and running like a top. I thought several of you might be interested in knowing exactly what was done to make this happen.
The next part of the installation is required for correct ignition timing. The internal electronics of the replacement coil do not fire at the same time as the original. The saw will not run with the flywheel installed with the key. The flywheel must be advanced (rotated counter clockwise) aproxiamtely 27° from the original keyed position. Even two degrees variation will make a significant difference. I worked my way from 13° all the way to 30°. Just a couple degrees in either direction will cost you nearly 1500 RPMs, throttle response, and power. Here is how to set the timing on your saw. A timing light is not needed.
I HIGHLY advise that you tune the timing to your saw. It's not hard to do. My saw is ported, so the timing may need to be slightly different on your saw. Change the timing a couple degrees in both directions. Retune and check to see if max RPMs rise or fall. If they rise, continue a couple more degrees in that direction. I left mine where I made the most RPMs. At that point, the saw had the best throttle response, and made the most power. Here's what you need to do to change the timing a couple degrees.
If you have trouble with the flywheel slipping on the crankshaft, even after tightening, use a polishing or valve lapping compound. Also take care to ensure the both the flywheel and crank are perfectly clean and grease free. Technically, the key is only there for indexing, and the taper actually locks the flywheel onto the crank.
Hopefully I didn't leave anything out.
Now for the disclaimer. I am not suggesting that you should do this to your saw. I'm simply telling you how to, should you choose to do so. It is not something to be done sloppily or carelessly. Too much timing advance can damage your engine. There is added risk of you flywheel slipping, since no key is use. However, I've found that if it does slip, it will slip in the direction that it retards the timing. You are less likely to incur damage with the timing retarded, rather than advanced. You will simply have poorer throttle response and less power.
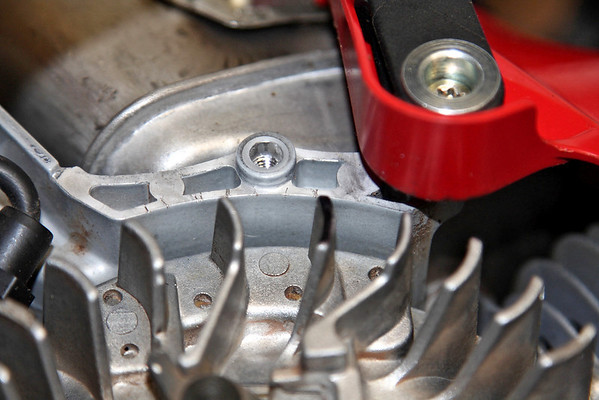
Indexed at 0°.
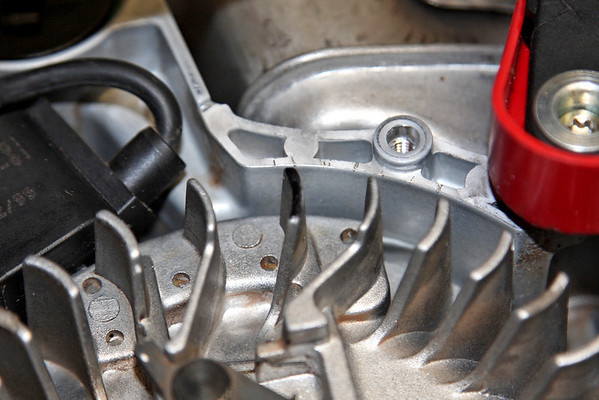
Indexed at 27°.
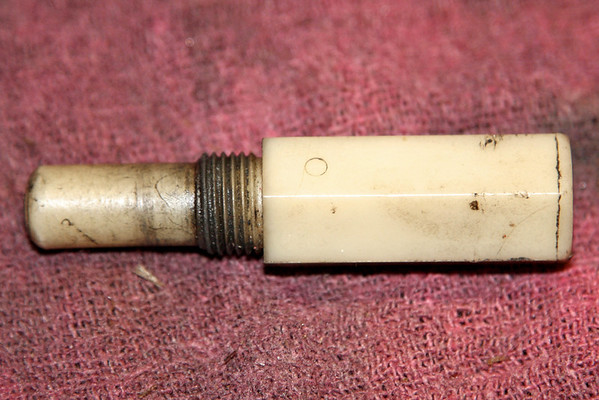
- Purchase a coil for any one of the following Husqvarna models. 50,51,55,61,254,261,262,268,272, or 394. There are a couple different OEM PNs that are used on these saws. I believe that the only difference is the length of the spark plug wire. I used PN 5033014-01.
- Remove the air filter cover.
- Remove the sparkplug.
- Remove the recoil assembly.
- Remove the flywheel.
- Remove the hold downs for the spark plug wire.
- Remove the original coil and spark plug wire.
- Remove the metal core from both coils. It will simply press out. Take care so as to not crack the case of the coil.
- Remove one layer of the laminate from the metal core of the original coil. It is too thick to go in the replacement. Take a pair of needle nose pliers and simply peel it over the rivets. Re-peen or crush the rivet heads to keep the laminates tight.
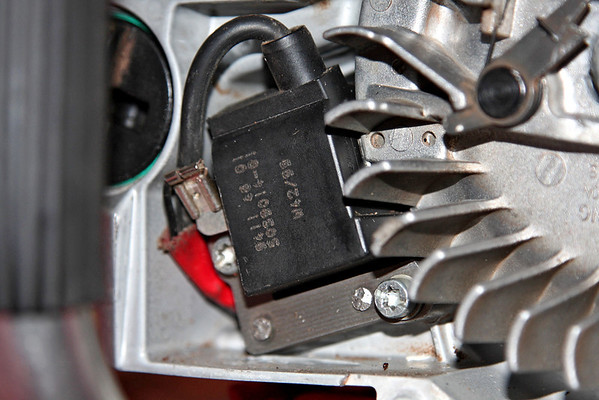
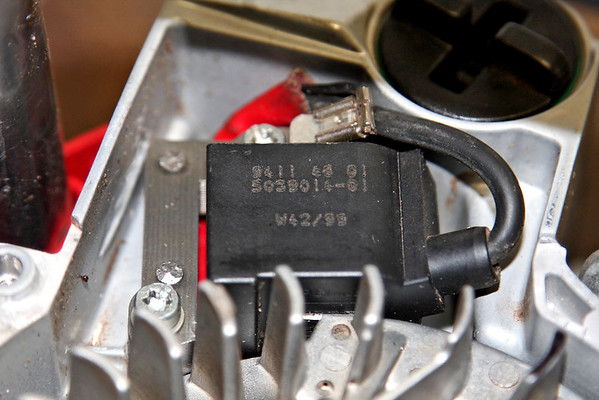
- Press the lamite steel core into the replacement coil. Make sure to seat it all the way to the bottom. It will slightly stick out the far side of the coil.
- Fit a new section of spark plug wire to the new coil. It simply threads onto a stud in the coil. You will not be able to use the little dust boot where the plug wire goes into the coil.
- Thread the new spark plug wire through the protective sleeves and grommets used on the original. Leave it long on the spark plug end for now.
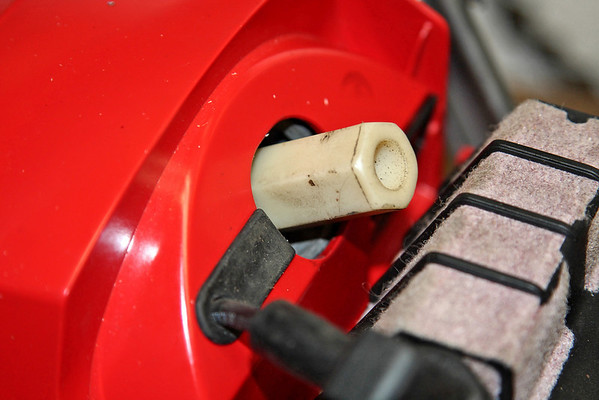
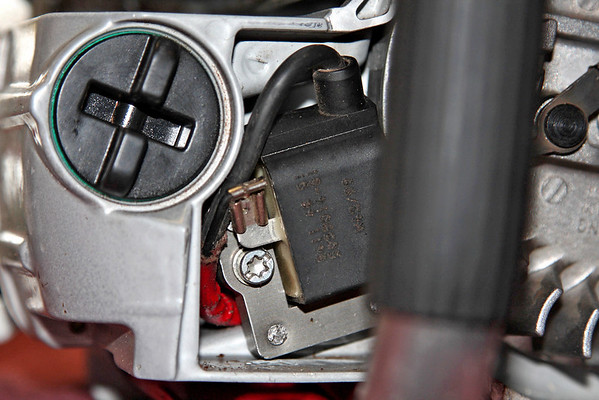
- Bolt the replacement coil into the saw, with the plug wire routed as shown below.
- Connect the ground wire to the coil.
- Lay the plug wire into the groove in the case and reinstall the keepers.
- Position the full length of the new plug wire as it needs to be, and terminate it on the plug end.
- That concludes the installation of the coil.
The next part of the installation is required for correct ignition timing. The internal electronics of the replacement coil do not fire at the same time as the original. The saw will not run with the flywheel installed with the key. The flywheel must be advanced (rotated counter clockwise) aproxiamtely 27° from the original keyed position. Even two degrees variation will make a significant difference. I worked my way from 13° all the way to 30°. Just a couple degrees in either direction will cost you nearly 1500 RPMs, throttle response, and power. Here is how to set the timing on your saw. A timing light is not needed.
- Thread a piston stop into the spark plug hole.
- Reinstall the flywheel. It is not necessary to tighten it down. You do want to use the key.
- Mark any fin on your flywheel to be used as a pointer.
- Using a degree wheel, scribe marks onto the case of the saw every 5°. I marked from 0° to 25°, with a couple additional marks added along the way. You won't need those. I'd go ahead and mark 27° as well since that's way I ended up with.
- Back up the flywheel until it hits the piston stop.
- Adjust the piston stop by threading it in or out, until the fin on the flywheel that you marked lines up directly with 0°. I recommend using the edge of the fin since the fin is too thick to be used as an accuarate pointer.
- Remove the flywheel and key.
- With the piston against the piston stop, slip the flywheel on the crank until the marked fin is pointing at 27°.
- Use a socket around the threads of the flywheel, and tap the flywheel onto the crank. That will lightly lock it onto the crank.
- Install the flywheel lockwasher and nut. Allow the crank to rotate until the piston hits the piston stop. Tighten it slightly.
- Rotate the flywherl back around the other direction and check that your marked fin is still on the 27° mark.
- Since this is not the proper type of piston stop, remove it and use the proper type to torque down the flywheel nut.
- Remove the piston stop, and reinstall the spark plug. Hook up the spark plug wire.
- Set the airgap on the coil to flywheel to .010" and tighten down.
- Reinstall the recoil housing.
- Start the saw.
I HIGHLY advise that you tune the timing to your saw. It's not hard to do. My saw is ported, so the timing may need to be slightly different on your saw. Change the timing a couple degrees in both directions. Retune and check to see if max RPMs rise or fall. If they rise, continue a couple more degrees in that direction. I left mine where I made the most RPMs. At that point, the saw had the best throttle response, and made the most power. Here's what you need to do to change the timing a couple degrees.
- Remove the air filter and recoil housing again.
- Screw the piston stop in and adjust until the marked fin on the flywheel lines up with the 27° mark, or where ever you last had it adjusted. You are now "re-zeroed". There's no need to reinstall the flywheel with the key and find 0° again. As long as you line back up with the mark you previously set it too, you're good to go.
- Loosen the flywheel nut, and tap the flywheel loose.
- Making sure the piston is against the piston stop, slip the flywheel on the crank shaft a couple degrees in the desired direction.
- Proceed to lock and tighted down the flywheel as previously.
If you have trouble with the flywheel slipping on the crankshaft, even after tightening, use a polishing or valve lapping compound. Also take care to ensure the both the flywheel and crank are perfectly clean and grease free. Technically, the key is only there for indexing, and the taper actually locks the flywheel onto the crank.
Hopefully I didn't leave anything out.
Now for the disclaimer. I am not suggesting that you should do this to your saw. I'm simply telling you how to, should you choose to do so. It is not something to be done sloppily or carelessly. Too much timing advance can damage your engine. There is added risk of you flywheel slipping, since no key is use. However, I've found that if it does slip, it will slip in the direction that it retards the timing. You are less likely to incur damage with the timing retarded, rather than advanced. You will simply have poorer throttle response and less power.
Indexed at 0°.
Indexed at 27°.


")