Ongoing MS 200T Carburetor Issue

Arborist Forum

Help Support Arborist Forum:

This site may earn a commission from merchant affiliate links, including eBay, Amazon, and others.
I replaced the accelerator pump in a S61D a month or two ago for a local tree guy and he told me yesterday that the saw is still running great. I think it was a $12 kit.

I'm not sure whether that is something you want to try or not, but it likely is what is causing your problem.
 
Accelerator Pump

What were the symptoms before you did the repair, ZeroJunk?
 
What were the symptoms before you did the repair, ZeroJunk?

The symtoms were poor or too fast idle, and a real bog in the transition from idle to full throttle.

It is a simple repair , but you need to be very careful in how you do it.

Take the throttle butterfly out being very careful not to bugger the screw. Take the throttle shaft out.

Take the welch plug out that covers the accelerator pump. The pump and spring will fall out.

Replace with the new parts in the kit.

When you replace the butterfly make sure it is in the exact same position.

Red Loctite the screw.

I put a Phillips screw driver in a vice and placed it aginst the screw on the butterfly. Then I had a helper hold it in place while I tapped the end of the screw with a punch to spead it enough that it can't come out.

If it comes out there will be a mess.
 
Last edited:
MCW: No worries. You mentioned having your "new" carburetor installed by a dealer, so I knew there was no way for you to know whether or not anything had to be modified to accommodate the non-compensating carb in your saw now, the Zama C1Q-S16A 3YR. Thanks for helping out. I wouldn't know what a compensating carb is, otherwise. ;)

Lone Wolf: I checked into the Stihl part number you gave me for a replacement carb -- 1129 120 0653 -- and the result was a dealer price of $95.70 (without sales tax). Obviously, this is yet another reason to be sure about which carb we should buy to replace the P.o.S. Zama C1Q-S61D 434A that's currently strangling this particular MS 200T. I also understand that you've been using the carb you recommended -- the one identified in the first sentence -- for more than six months. Considering that you run so many MS 200Ts, I'm sure that you put your new carb through its paces.

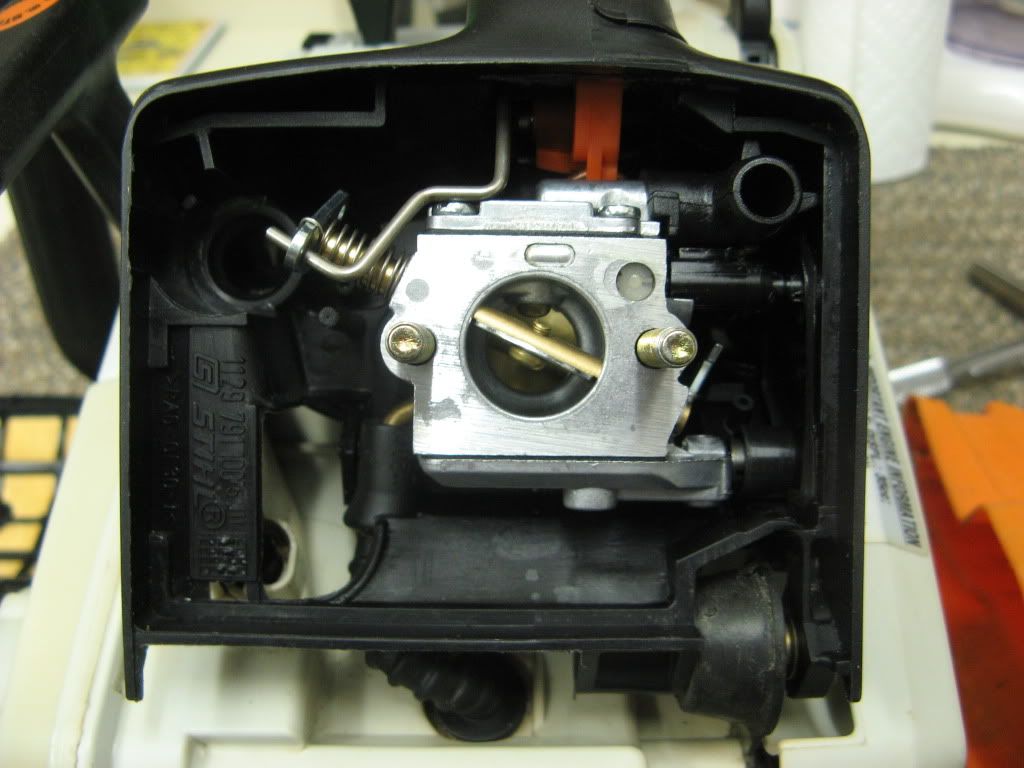
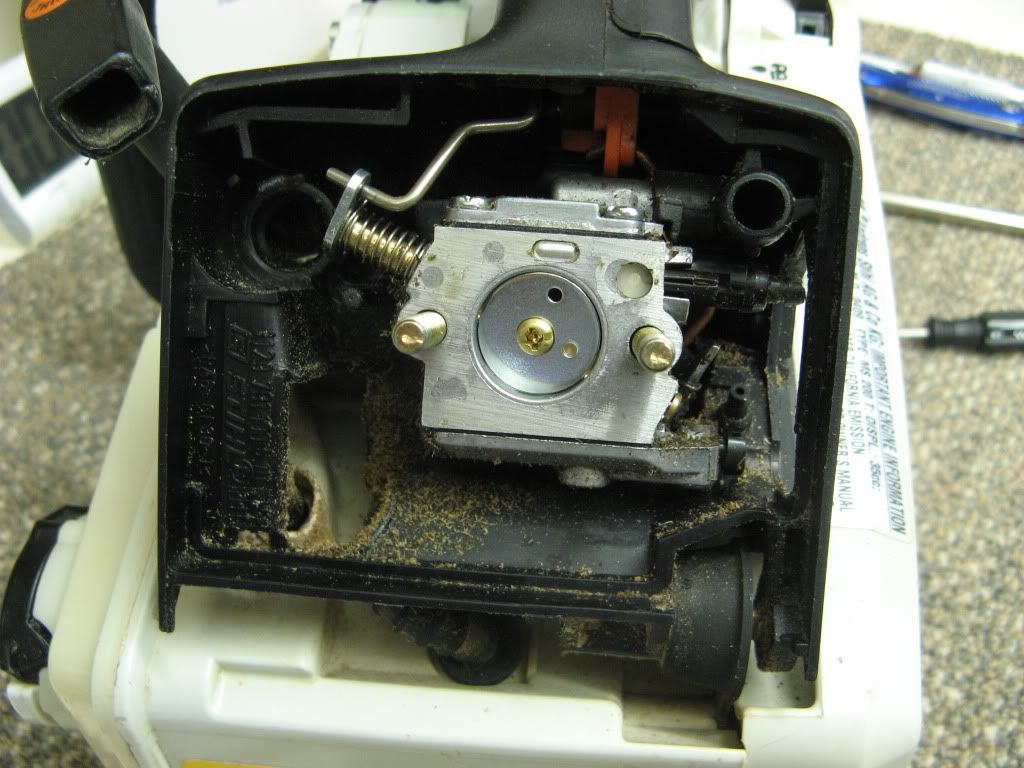
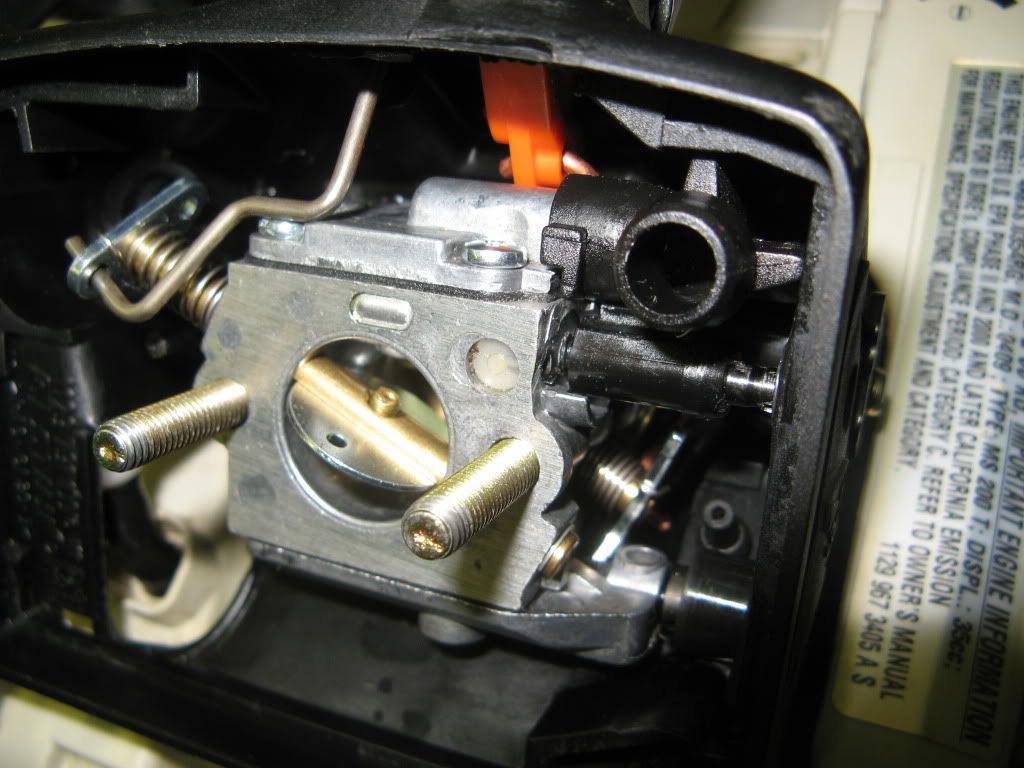
Here are the photos of our MS 200Ts air box area, as you requested, Lone Wolf:

221052d1328074789-img_0254-jpg


And here's one the air box side of the C1Q-S61D 434A

221051d1328074783-img_0246-jpg
That is the compensating type see the snorkel on the right side.That new one should fit on there.
 
The symtoms were poor or too fast idle, and a real bog in the transition from idle to full throttle.

It is a simple repair , but you need to be very careful in how you do it.

Take the throttle butterfly out being very careful not to bugger the screw. Take the throttle shaft out.

Take the welch plug out that covers the accelerator pump. The pump and spring will fall out.

Replace with the new parts in the kit.

When you replace the butterfly make sure it is in the exact same position.

Red Loctite the screw.

I put a Phillips screw driver in a vice and placed it aginst the screw on the butterfly. Then I had a helper hold it in place while I tapped the end of the screw with a punch to spead it enough that it can't come out.

If it comes out there will be a mess.

ZeroJunk: This sounds a lot like what we're going through with our sick MS 200T. After we modified the limiter cap assembly on the Zama C1Q-S61D carburetor in our sick saw, we reassembled it and attempted to tune it properly. Although the modification we completed worked very well, the carb is still [by all indications] not functioning properly. Do you recall the part number and the source of your carburetor repair kit?

Are you aware of the accelerator pump issue that plagues some of these earlier Zama C1Q carburetors?

From all that I've read, which is quite a bit now, it seems that the o-ring on the accelerator pump piston wears out fairly quickly, which leads to actual carburetor body damage. Once the carb's body is damaged, it's new carb time. I've read some thread posts relating to eliminating the accelerator pump circuit altogether, but this particular modification seems to be meeting with mixed results.

Here's an MS 200T carburetor repair thread which includes posts by Lakeside Andy (Lakeside 53). He taught me more about all of our Stihl saws than I thought I'd ever know, so I tend to heed his advice.

200T carb thread with several Lakeside53 posts included: MS 200T Dies at Idle
 
No Pics?

You're seeing none of the photos, Lone Wolf?

I've logged in and out and can still see every photo. Hmmmm... :popcorn:
 
ZeroJunk: This sounds a lot like what we're going through with our sick MS 200T. After we modified the limiter cap assembly on the Zama C1Q-S61D carburetor in our sick saw, we reassembled it and attempted to tune it properly. Although the modification we completed worked very well, the carb is still [by all indications] not functioning properly. Do you recall the part number and the source of your carburetor repair kit?

Are you aware of the accelerator pump issue that plagues some of these earlier Zama C1Q carburetors?

From all that I've read, which is quite a bit now, it seems that the o-ring on the accelerator pump piston wears out fairly quickly, which leads to actual carburetor body damage. Once the carb's body is damaged, it's new carb time. I've read some thread posts relating to eliminating the accelerator pump circuit altogether, but this particular modification seems to be meeting with mixed results.

Here's an MS 200T carburetor repair thread which includes posts by Lakeside Andy (Lakeside 53). He taught me more about all of our Stihl saws than I thought I'd ever know, so I tend to heed his advice.

200T carb thread with several Lakeside53 posts included: MS 200T Dies at Idle


1129 120 9700

It was $8.50

Man says the saw is running great. The O ring and part of the plating on the brass plunger was worn away. I don't know how long it will last, but I don't see any logical reason why it won't last a long time, or any eveidence that the carb body was worn.

Anyhow, for $8.50 it is worth a try over $140 for a new carb.

I wonder how many thousands of those carbs have been tossed out because of that?
 
Photos anyone?

Wow, I'm trying to create a good updated MS 200T Zama carburetor thread, so the fact that no one -- other than me -- is seeing photos in this thread is troubling.

Are you guys seeing anything where the photos are supposed to be? Blue question marks? Green hyperlinks?

I'd really like to get this rectified ... :popcorn:

Not in this post.
 
Hopefully the photos show up this time

== Post 27 has now been deleted from this thread (due to lack of critical photos). The text and, more importantly, the photos are added in this post ==


Lone Wolf: I'm going to add some photos that should clarify a couple of things about the MS 200T we're currently working on.


First, here's a photo of the carburetor area of the sick 200T. As you can see, unlike your new saw, there is no hose and no boot to vent the tank.

IMG_0233.jpg


Next, here's a photo of the tank vent assembly on our 200T. It's not easy to see, but, if you look at the mid-left section of the photo, you should see a white "vent cap" at the end of a hose. Unlike your new saw, the vent cap is merely tucked under the air box.

IMG_0235.jpg


Here's a photo of the impulse line. This shot was taken while the saw was initially disassembled to modify the limiter cap assembly on the carb's high-speed (H) adjustment screw.

IMG_0192.jpg


To clarify for anyone else with 200T carb troubles, the "modification" I'm referring to here involves a limiter cap assembly that was added to the carburetor design by the carb's manufacturer (Zama). This design was added, presumably to satisfy EPA regulations, to restrict the travel of the high-speed (H) adjustment screw. In effect, this assembly restricts the saw owner from being able to tune their own saw properly. In fact, it wouldn't allow the high-speed screw to be turned 3/4 CCW (from full CW stop), as called for in Stihl's published carburetor adjustment procedure.


Here's what the limiter cap assembly looked like before the modification.

IMG_0154.jpg


Here's what the limiter cap assembly looks like after some careful Dremel work is completed. Note that the steel post and the skirt have both been cut away, which allows the plastic limiter cap -- which was placed over the high-speed adjustment screw by Zama -- to turn with the adjustment screw. In short, the black plastic limiter cap no longer restricts and/or hinders the rotation of the carburetor's high-speed adjustment screw.

IMG_0246.jpg


View attachment 221182
View attachment 221183
View attachment 221181
View attachment 221195
View attachment 221184

Hope this helps other MS 200T owners with this nasty Zama carburetor issue,
HandLogger :cheers:
 
Last edited:
Replacing the butterfly

The symtoms were poor or too fast idle, and a real bog in the transition from idle to full throttle.

It is a simple repair , but you need to be very careful in how you do it.

Take the throttle butterfly out being very careful not to bugger the screw. Take the throttle shaft out.

Take the welch plug out that covers the accelerator pump. The pump and spring will fall out.

Replace with the new parts in the kit.

When you replace the butterfly make sure it is in the exact same position.

Red Loctite the screw.

I put a Phillips screw driver in a vice and placed it aginst the screw on the butterfly. Then I had a helper hold it in place while I tapped the end of the screw with a punch to spead it enough that it can't come out.

If it comes out there will be a mess.

ZeroJunk: How do you go about making sure that the butterfly is replaced "...in the exact same position?" :popcorn:
 

Latest posts

Back
Top