McCulloch Chain Saws

Arborist Forum

Help Support Arborist Forum:

This site may earn a commission from merchant affiliate links, including eBay, Amazon, and others.
What the hell is that white thing back there?!?!?!! That better not be a creamsickle... :msp_mad:

Randy's 790 sure looks nice, as well as your Super 250...

But that hideous white thing... what is that doing there?!?!?!!


Easy tiger. That little sucker is what I use for the dirty/scratchy brush and pruning work. Saves the paint on the Homelite E-Z's and the Poulan XXV. Everybody needs a good little beater saw...

How is the progress coming on the two?

The Super 250 has had the bar removed and it has been moved from the garage to the shop. It's been wiped down with my 'secret sauce' (WD40/ATF mixture) that I use as a cleaner and corrosion preventative. Works well at keeping the white death at bay, and doesn't hurt the existing paint. This concludes the progress with that saw so far. Got a couple saws ahead of it in line still........such as Randy's 790 and John's Homelite 750...

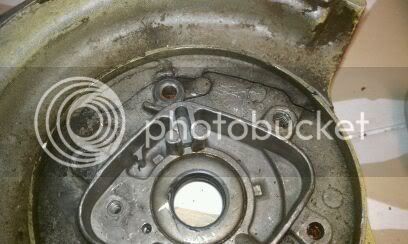
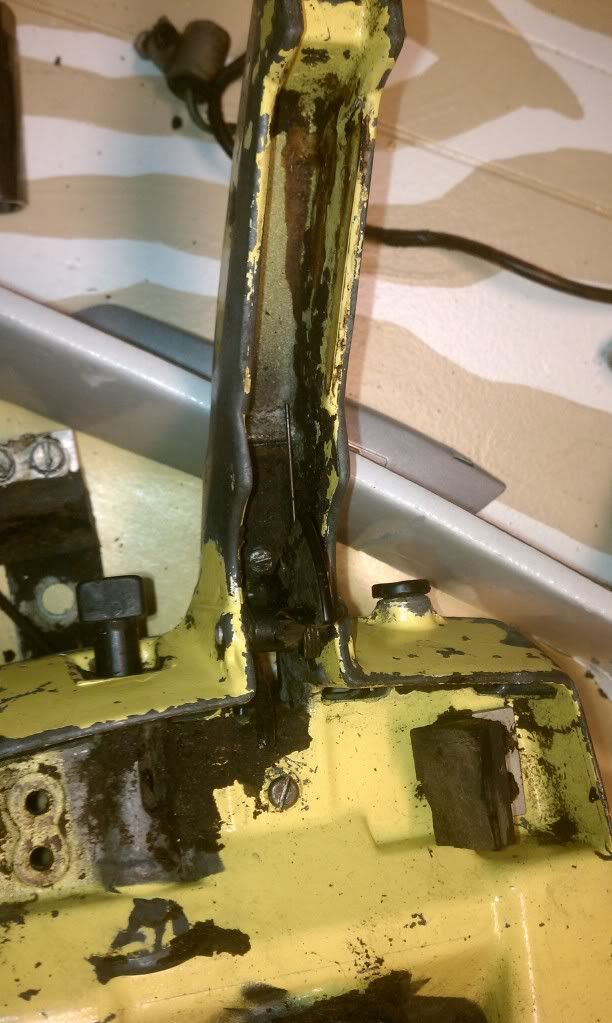
Randy's 790 is cleaned up and awaits a carb from Randy. I replaced the bottom handle bracked assembly with one sent to me by Lee. The primer shatback currently upon the saw could possibly be salvaged, if that's what Randy directs me to do. Alternatively, I could rebuild one of my Tilly HL's for it or he could send something else to run. Randy's call. That's the minor issue. The major issues are a ruined oil tank and crankcase stuffer. The oil tank is beaten and broken (both inside and out). The bar stud holes are hogged out and the steel 'tie strap' that holds them in place (inside of the tank) is broken as well. Somebody attempted some extensive 'repairs' on the tank long ago with some type of epoxy. The lower section of the stuffer is also filled with some kind of nasty off-white epoxy substance that looks to be pulling away from the stuffer. Dunno how it got broken. Maybe there was corrosion pinholes from water in the oil tank. In any case, I'm urging Randy to replace that stuffer, since it'd be a crying shame to roach the perfect piston/cylinder/rings that are in there now with an air leak through the stuffer. It also has one broken starter pawl spring. The saw now sits on the shelf awaiting parts......

I recently got back some back. A few years ago little Ray and I were preparing to scan in a bunch, like 200 photos. We had them all laid out, that night we had a hurricane, a window blew in, bringing in a ton of water. I sent the whole mess, negatives and all, to a friend who ran a photo lab in Nevada, who was going to try to restore them. He was doing it in his spare time as a favor, his lab blew up and burned. I got a handful back. The Super 16 film is completely destroyed, it had some chaotic falling on it.

Crap Randy. Sucks about the loss of film footage...


Not so fast laddy.

ignore the two tone doorstop.

Now there's a serious Whiskey Tango logger photo! Is that the creamsicle you smashed?

Apologies to Eccentric, I haven't been able to get to the 77 yet but did get side tracked on a couple of saws that I just wanted to get cleared off the bench.

First up was a 3-10 DSP that I picked up at the Iowa GTG last May. Muffler was broken in a few places, saw was pretty dirty, and the fuel tank was a mess.

I was totally amazed at what 45 minutes of scrubbing with purple cleaner did for the varnish when solvents wouldn't even begin to cut it (check the time stamps on the phot's if you don't believe me).


Finished product

Mark

Stop skipping that dang 77 Mark!!!:jester:

Bad news, good news.

The bad
The PM800 had eaten a broken exhaust bolt, dinged the piston. Pics later.
I took the piston to the guy I bought it from, the look in his eyes said he knew it already.
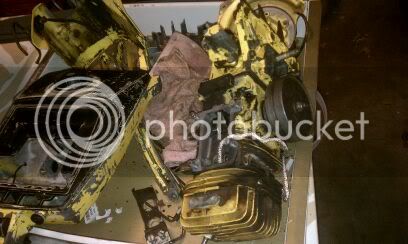
The good.
He gave me a big pile of parts saws. I found two nice 82cc motors and one that shows wear but should run.
Also in the pile was a PM80 and a PM55, both started and run, they will need some attention.
As an afterthought, he gave me a D44, it is mostly there, shows it has been in the weather some.

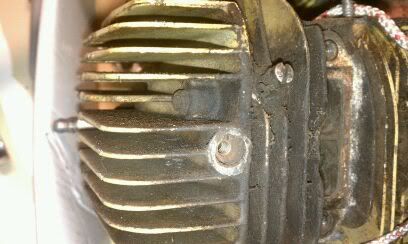
The 800's cylinder looks ok, other than thread marks at the "V" on the exhaust port. The chrome seems to have escaped damage. I have two 82cc motors that still have machining marks on the pistons. I think I will put the 800 together with the all but new motor I got last May and build a saw for me with the other motor. I haven't gotten a look at the PM80 that runs or the PM55, too many other things to do, will need to wait for next weekend.
Also in the parts pile, along with ten pounds of crap, are drive-side covers, one has the chainbrake intact, with handle.

Sounds like some good scores Randy. Hope you get that PM800 squared away. If you have extra oval-head starter screws for those saws in that boxa parts....................I know Aaron Lynch could use three and Ron Woods could use two.......:msp_rolleyes:
 
Last edited:
I need to replace the fuel line and line in the tank on my 250 and wondering what the ID on the line is.

Will you still speak to me if I use Tygon?

No. Only at GTG's. I will still communicate with you via the computer site known as AS, though.
 
Wendell - I think 3/16" I.D. will work, but you will have to use a grommet or something similar where the line passes from the tank to the carburetor through the air box. The O.D. of the tygon will be much smaller that the O.D. of the original fuel line, and will lack the molded in grommet like the line we used on your saw at my place. Failure to seal up that opening will lead to a lot of dust getting into the air box and into the carburetor.

189758d1309990038-dscn3405-jpg


Mark
 
Decided to rip the CP125 apart tonight and start to clean her up. First time I've torn one down and it's relatively easy, 30 minutes and that was it. She had a broken front handle, rear tank mount, front brace was a piece of sheet medal and after I had her apart this... broken crank cover, hadn't planned on that one! It probably wouldn't have mattered as the seal was good and any flexing would have been only the shielding for the flywheel.
100MEDIA_IMAG0436.jpg


Also missing this part, the plastic insert so it doesn't hurt your hand, I noticed on my other 125s that a screw goes in the middle and there is no screw hole for this one. Does it fit by compression when you tighten the screw?
100MEDIA_IMAG0435.jpg


Lastly, the DSP valve is stuck, I can tell it's a slotted head screw and the other cylinders I have that are for the SP125 are blocked off in this tapped hole, anybody seen one of these or know where to get one if I break it?
100MEDIA_IMAG0437.jpg

I could replace it with a SP125 valve but it's a CP and will defeat the purpose!

This saw has 140lbs compression and the muffler was trash, half of it fell back into the cylinder when it came off. Cylinder looks great, bearings are good. She'll get seals, muffler, handle, mounts, new rubber for fuel system and the starter was missing, have a NOS starter and cover in bright yellow to put on it and will be as good as new!!

Here she is in a box about half way down.
100MEDIA_IMAG0438.jpg


MATT, hurry up and send the box!:msp_biggrin:

I Here ya!
But there is only one yellow fever part!
The main stay is a drooling 100CC green-red beast with a SWEET muffler!!!!!!!!!!!!!!!!!!!!!!!!!!!!!!!!!!!!!!!!!!
 
Nice project Watson,
The dsp valve is the same as the 795,895 and 797.
A hard part to find these days. Soak in some good
penetrating oil for a bit. Then heat the cylinder around
the valve with a torch and it should come out. Be very
carefull in the heating process not to damage the cylinder.


Lee
 
I Here ya!
But there is only one yellow fever part!
The main stay is a drooling 100CC green-red beast with a SWEET muffler!!!!!!!!!!!!!!!!!!!!!!!!!!!!!!!!!!!!!!!!!!

Another green and red beast found me tonight, 112cc's of snarling tree death, send it, the others are lonely for their brother!:msp_tongue:
 
Nice project Watson,
The dsp valve is the same as the 795,895 and 797.
A hard part to find these days. Soak in some good
penetrating oil for a bit. Then heat the cylinder around
the valve with a torch and it should come out. Be very
carefull in the heating process not to damage the cylinder.

Lee

I'm trying not to tear it down to parade rest, just enough to clean it up good. The valve has to come out as it's frozen. Thanks for the tip!

Randy
 
you folks have any thoughts on the gear ratios on a gear drive saw? I've got two different ratios - one is a 3:1 and I 'assume' the other is a 2:1, but didn't stick the sprocket shaft back in to verify. 3:1 would drive a longer blade, 2:1 would go a bit faster. Anything else of interest? I would imagine the 3:1 would handle some huge load, and can't believe they made too many that way v. the 2:1, but I don't know.

thx,
Vic
 
According to the IPL's that I have there were at least three different ratios used on the large gear case saws, 3.6:1, 3:1, and 2:1. I don't know what the ratio is in the small gear cases used on the 650/660 saws or the 10 Series saws.

I found my 2:1 gear set in a 1-62, the 1-85 was equipped with 3.6:1 but I swapped it with the 1-62 to give some additional chain speed on the 1-85. I think my 840 has the 3:1 set but I would have to turn in over by hand and count it out to know for sure.

For the older saws pulling 1/2" pitch chain and a long bar, the higher ratio (3.6:1) was probably necessary. I have 1/2" pitch chain on a 48" bar on the 840 and it will continue to grunt away when the bar is burried. It I was clever I could link to the video, but there is You Tube posting of that saw cutting through a sycamore that consumed the full 48".

Mark
 
just griping here...

i thought I had my first 'easy' clutch pull on a tapered shaft. I tightened up the puller, whacked it with the hammer, tightened some more and 'pop' it came right off... a little bit. the woodruff key got fang-dangled in the keyway and ended up lodging into the babbit/brass pressed sleeve. After modifying my puller to get some more throw, I managed to drag the key through the sleeve for a bit and get the silly thing off. It looks like I can polish up the sleeve and reuse it. I once again managed to guide the simple into the realm of the difficult - that's just how I roll.

Those keys are a pita. I munched up a roller bearing pulling a clutch not too long ago.
 
Clutch removal

You have to learn to pull just the clutch mechanism itself, leave the drum in place. Sometimes if there are no threaded holes in the clutch for the puller you can use the drum to pop it loose, then remove the clutch mechanism, remove the key, then the drum can come off without causing any collateral damage.

Mark

I have been meaning to make something that I can pull just the clutch with. My puller is too wide. I know its simple to make one just havnt got around to it yet. Sometimes I just forget about the key, its a small over-site that can screw your day up LOL.
 
Was bored this morning and decided to go play with that carb some more. Took it apart and checked everything, cleaned everything. Tried it again, and it will pull fuel on it own. However it will make it to the diaphragm and no further. For what ever reason it will not spray out the jets. My guess is something under the welch plugs. No worries though, I have a good Tilly coming from Chris, so many thanks to Chris. I do think this carb is fixable, just going to have to track down some plugs and give that a shot.
 
Back
Top