cutting squish by hand

Arborist Forum

Help Support Arborist Forum:

This site may earn a commission from merchant affiliate links, including eBay, Amazon, and others.
I'm guessing that one is adjustable and uses a carbide insert. John
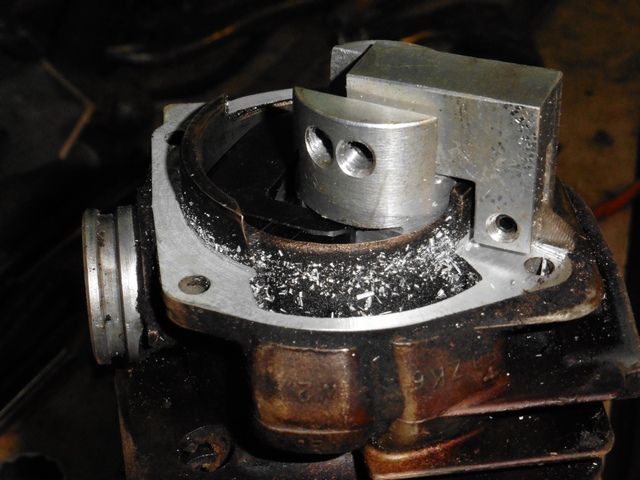
Yes, the black delrin block is screw adjustable much like a boring head. I wanted to try it in various configurations, manually, under power,etc, so I put in a slot for mounting options.
In the pic it has a T handle I was using for field demonstration where there was no vise to clamp in onto. Normally I affix it to a piece of bar stock in a vice and it gets used much as you see in the tree monkey video.
It's pretty small, the aluminum body is 1.25" x 2", using three different sized delrin 'guide blocks', it will cut a cylinder as small as 38mm and in excess of 60mm.
I want one. How much?
 
Yes, the black delrin block is screw adjustable much like a boring head. I wanted to try it in various configurations, manually, under power,etc, so I put in a slot for mounting options.
In the pic it has a T handle I was using for field demonstration where there was no vise to clamp in onto. Normally I affix it to a piece of bar stock in a vice and it gets used much as you see in the tree monkey video.
It's pretty small, the aluminum body is 1.25" x 2", using three different sized delrin 'guide blocks', it will cut a cylinder as small as 38mm and in excess of 60mm.

I think I like this idea better than mine. Very nice work.
 
I am curious to see what the price tag and availability of this work of art is? I would be totally game to spring for one.
 
Time to index that insert. Gonna start riding on that dulled region and cutting a stepped top.
Betcha they almost always crunch off in that region where the plating blends out into the chamber.
at the least they'll get a rounded off look , sorta like you took a small stone and rubbed it dull.
Shallow cut into a hardened coating, Just a danged pain in the rear type of cut to have to make.

I like the tool though, when's the stop screw option coming?
You just leave the screw out , during a particular cutting, if the chamber wont accommodate it.
 
I'm not sure what I'm looking at in the picture. ....Please explain for a dumb me.
That's the brush holder from a "3G" type Ford alternator.
Those are the very worn ones from my personal unit.

IMG_6208 You'll see a hole in the holder [purple arrow]
and a hole in the carbon brush itself [ green arrow]
When you need to instal the brush/regulator assy, you gently press the brushes back into the holder until the brush hole is aligned with the holder hole.
While you hold the brushes back, You carefully insert an appropriate sized wire
into the holes and this stops the brushes from popping back out until the holder is in place.

You need to do this so as not to break or otherwise damage the spring-loaded brushes
or holder, while you place the assembly into position on the end frame of the alternator.

IMG_3497 shows the brush holder/voltage regulator in its approximate location
to the inner guts of the alternator.
You see where the brushes ride against copper slip rings as the alternator rotor is turned by the engine.

IMG_2792 shows the are where the brush/regulator assy fits and you see the slip rings
at my fingertip.

IMG_6038 shows the brush/regulator assembly in its installed position on the end frame.

Pretty cool when you get to see how some of our stuff is made and how it works!

Sorry I'm a bit slow with the answer, took me a bit to find the right pics to use.
I should really learn to organize them better than I do/don't.
edit: Duh, I forgot to insert R DeLawters quote/question.
 

Attachments

  • IMG_6208 10x7 .JPG
    IMG_6208 10x7 .JPG
    72.4 KB · Views: 94
  • IMG_3497 t.jpg
    IMG_3497 t.jpg
    36.7 KB · Views: 96
  • IMG_2792  t.jpg
    IMG_2792 t.jpg
    30.9 KB · Views: 98
  • IMG_6038  t.JPG
    IMG_6038 t.JPG
    87 KB · Views: 88
Time to index that insert.

It's neither chipped nor dull, that hasn't been an issue at all, the insert has an overly large corner radius so I honed it back a bit.
Never bothered with a screw adjust stop either, a simple locking collar and feeler gauge work fine.
It's designed to be modular, a lot of options can be added to that mounting slot, including a base/flange cutter...
 
Ah the joys of how digital compression makes photos look to my eyes
and makes me sound like an idiot.

Rest of the time, I manage to look like an idiot with much technological help.
 
Possibilities...

base%20cut%20adaptor_zpszfrrdmhi.jpg
 
Back
Top