Echo 21cc Trimmer Mods (SRM-210SB, GT-2000, etc)

Arborist Forum

Help Support Arborist Forum:

This site may earn a commission from merchant affiliate links, including eBay, Amazon, and others.
Warping

I hope warping won't be an issue, as the thickness of the head below the fins is almost .250". So that's a 2.5" x 2.5" x.25" thick plate being bolted on top of the cylinder. The bolt circle is just outside the cylinder section, so there isn't a lot of cantilever to distort things when I clamp it together with the bolts. I expect cooling to be adequate because the total cooling fin surface area is more than the stock fins I removed.

I still have to work out sealing the head to the cylinder, but my plan is to machine an o-ring groove in the head, and then make an O-ring from copper wire with some "crush" designed into the dimensions. If I get it right, the two aluminum surfaces should seat together with the copper O-ring providing the sealing.
 
Geez, and I thought I did a good job with my Ryobi SS30...

You're raising the bar!


Dammit, now I need to get a Bridgeport... bad. Blasted college, if I didn't go, I could've bought a BP...
 
Thanks!

Your Ryobi String Trimmer mods thread was actually an inspiration for me to move out on my project. So I can now tell my wife its all your fault :)

I have a Ryobi trimmer that a co-worker gave me in good (running) shape. I think it may be the same model as yours. I will check tonight.

The thing I like about the Echo trimmers is the bottom end is really solid. Two main bearing crank with forged conecting rod = lots of high rpm goodness. I wish the crank was full circle like a proper two stroke race crank. I suppose I could machine my own, but the dynamic balancing would be tricky.
 
Last edited:
TeamFast;

Great job as usual!

How are you going to stop the head from warping? Maybe use the stud method with a spacer collar to act as a limit stop? (The cylinder fins are not uniform in their shape at the top of the cylinder, maybe it doesn't matter.) Thanks again for sharing.

Pretty much all 2 stroke dirt bikes are built this way and all they use is a head gasket.
 
Cylinder head test fit

Here is the cylinder head installed:

IMG_6345.JPG


This side shows one of the new fasteners added by me.
IMG_6346.JPG


Here's the cool part. The new head fits under the stock plastic cover!
IMG_6347.JPG


Another view:
IMG_6341.JPG


One last pic:
IMG_6344.JPG


:)
 
great mod

I have never had any desire to cut the head off a blind clinder before, but after this post I am all fore it. I am looking at some new toys and as soon as I have them I am going for it .GREAT POST.:rock: Steve
 
Porting Question

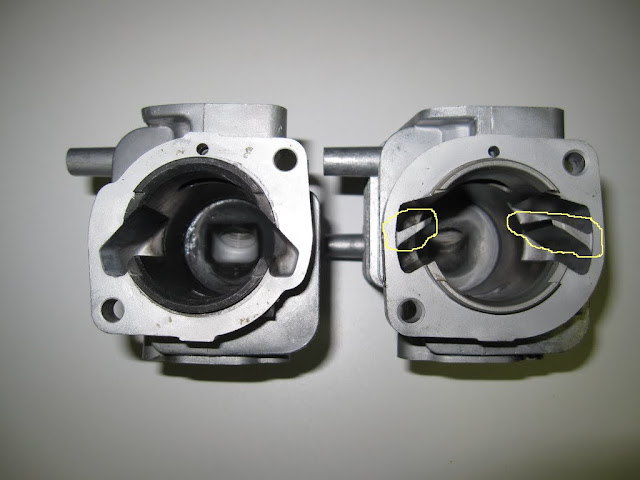
I have a question. I am considering eliminating the divider between the two small transfers on the Type Ie cylinder to make them larger single transfers. Does anyone see any problem with this?

Based on what I've seen from my MOTA computer models, and also my experiences with kart engines, bigger transfers are rarely a bad thing.

Thoughts?
 
Still enough rings support to avoid catching ?
I have a question. I am considering eliminating the divider between the two small transfers on the Type Ie cylinder to make them larger single transfers. Does anyone see any problem with this?

Based on what I've seen from my MOTA computer models, and also my experiences with kart engines, bigger transfers are rarely a bad thing.

Thoughts?
 
I think so. There are single ring and double ring pistons available from Echo. I Don't know what drives them to use one vs. the other. There are performance gains to be had from a single ring piston, but probably longevity benefits from a dual ring piston...seals better and holds compression longer over operating hours.

What is the rule of thumb for the amount of ring support needed across a port window so as to avoid hanging up a ring on the edge of a port?
 
I know that an ex port should not be larger than around 65 % of bore to avoid problem,should the same % for tranfer i guess.

I think so. There are single ring and double ring pistons available from Echo. I Don't know what drives them to use one vs. the other. There are performance gains to be had from a single ring piston, but probably longevity benefits from a dual ring piston...seals better and holds compression longer over operating hours.

What is the rule of thumb for the amount of ring support needed across a port window so as to avoid hanging up a ring on the edge of a port?
 
I'll check it out. It's also going to depend on where the ring end gaps fall.

I need to acquire some porting tools, small carbide stones, etc. to get the cylinder porting done.

Here's a pic to clarify what I am talking about. I want to possibly get rid of the ribs (or divider walls) that I circled.

IMG_4928.JPG
 
Last edited:
to rib or not to rib

you can remove the ribs below th rings travel and still have the suport. if you are wanting more transfer port area take the the port closes to the intake towards the intake the thickness of the divider.I have made this mistake in a dirt bike years ago, just my blunder but it may work for you.great post Steve
 
Any more updates?

I'd love to know what your predicted HP is. I'm sure the software will give you a value.

Are you trying to go with practical power or is this an "all out" exercise in power production?
 
Any more updates?

I'd love to know what your predicted HP is. I'm sure the software will give you a value.

Are you trying to go with practical power or is this an "all out" exercise in power production?


I will post some updates this weekend showing some predicited gains in horsepower due to porting, carb, etc.


I started out thinking this would be a "practical power" mod, however when I started acquiring all the spare parts, I rationalized that I could build an all out fire breathing effort. After all, that's what its all about right? MORE POWER. But as I document my progress along the way, you can determine which levels of "mod" is right for your application.

As a result of the feedback I have been getting from this thread (including several non-members who visited the site) I am considering a couple of new ideas for this project which would really make it stand out. One thing I am contemplating is building a dyno to test the engine for real. I could also then test other folks saw engines.


I'm also tempted to have a go at the Poulan "Wild Thing" build off.
 
Last edited:
I will post some updates this weekend showing some predicited gains in horsepower due to porting, carb, etc.


I started out thinking this would be a "practical power" mod, however when I started acquiring all the spare parts, I rationalized that I could build an all out fire breathing effort. After all, that's what its all about right? MORE POWER. But as I document my progress along the way, you can determine which levels of "mod" is right for your application.

As a result of the feedback I have been getting from this thread (including several non-members who visited the site) I am considering a couple of new ideas for this project which would really make it stand out. One thing I am contemplating is building a dyno to test the engine for real. I could also then test other folks saw engines.


I'm also tempted to have a go at the Poulan "Wild Thing" build off.

I'm looking forward to it. I think the Wild Thing build would be great, too. Nothing like a cheap, universally available saw to experiment on.
 
dyno

I am wanting to build a dyno myself.I am looking forward to you thoughs on design for one. GREAT POST.Steve
 
Some things arrived at my shop in the past two weeks:

A Ford 3G alternator:
IMG_6360.JPG


And a Hubbell Resistor Load bank with enough capacity to absorb power from probably half my house:

IMG_6363.JPG


I have no idea, but they might be really handy for someone who wants
to build an eddy current dynomometer. I don't know. Maybe? :)

I already had several load cells, and a variable voltage DC
power supply handy as well.

Alternator has already been cleaned, torn down, rebuilt, modified.
 
Back
Top