050 051 075 076 Info Thread

Arborist Forum

Help Support Arborist Forum:

This site may earn a commission from merchant affiliate links, including eBay, Amazon, and others.
No Darrel its alot more complicated than that. First off the oiler is kind of and integral "built in" part. Second The jug is bigger and so are the studs, the need to be retapped out to allow for the new jug. Also there are some other things that need to be done. Many, many folks have converted a 051 to 075/076 but I have yet to see one with a manual oiler. With your skill you just might be able to do it!! I have an old style 051 air filter cover if you need one, was just about to throw it on flea bay.
I knew about the larger threads for the studs, just wasn't sure on the oiler. IPL looks like it just connects into the hole where the plunger goes. Would anybody have a pic of the case, showing what you're talking about there, Rocky? This isn't something I would be doing right away, I would just like to get it figured out.

I'm good on the air filter cover, but thanks for offering.

Forgot to mention in earlier post, real sorry to hear about your Mom's health, best wishes.
 
Yes it can be done but the 051 oiler filler is on the side where the 075-076 is on the top. The cases would also have to be tapped to accept the bigger cylinder.
I'm going to have to back up a few pages & refresh my memory (that's a constant). So, ALL 076's have top oil fill?
 
Still chugging along, so much real life crap gets in the way of chainsaw fun :)
Got all the parts ready for powdercoating except the case halves, I got the coil off, not sure how the clutch comes off, is it threaded on the crankshaft? or do I just beat it with a hammer till it submits to my will?
IMG_5728_zps3c4f9810.jpg

IMG_5730_zps9ff246b3.jpg

IMG_5729_zps99a73ef3.jpg

Dave,
Here is the tool Stihl offers. http://www.ebay.com/itm/STIHL-CHAIN...188?pt=LH_DefaultDomain_0&hash=item35e3de4444
I took a 9/16 deep well 1/2 drive socket and welded 3 legs on it so it goes
 
And Dave it is opposite thread meaning right to loosen. Use a block of wood to hold the piston. Normally the jug would be on and you would use a piston stop. Some guys like the impact wrenches because it jars the threads loose, you really want to give her a good snap (opposite!!!) and i have never bought the tool I always use a drift, sshhhh! Parts blaster and a heat gun!! It will come off.
 
Thanks Darrel her stage 4 has morphed into brain cancer. Every day is a gift my friend.

So I ran my baby today and holy smokes, what a beast!! I'm going to blue lock tight everything!!!! The compression came in at 165#'s, very happy with that!! Cant wait to get to the wood :) I did have one little snaphuu. Saw would run for a while and die. Changing the tank also changed the venting system. I needed to swap out gas caps to allow air to go in as fuel went out, she was creating a vacum. lol
 
Ok Darrel I scoured the net quickly and coudnt come up with anything so I put the gloves on and dug around in my kero bathtub and voila,.. Theres quite a few built in features into the casting that would be hard to make, but anything's possible. That very top hole has a spring and a ball. Some kind of check valve maybe? The center hole in the big cylinder I believe is where the oil comes from the pump and into the the exit channels.IMG_0635.JPG IMG_0637.JPG
 
Ive seen some serious milling setups where they have remote oil containers and add as necessary. I wish I could mill again,....
 
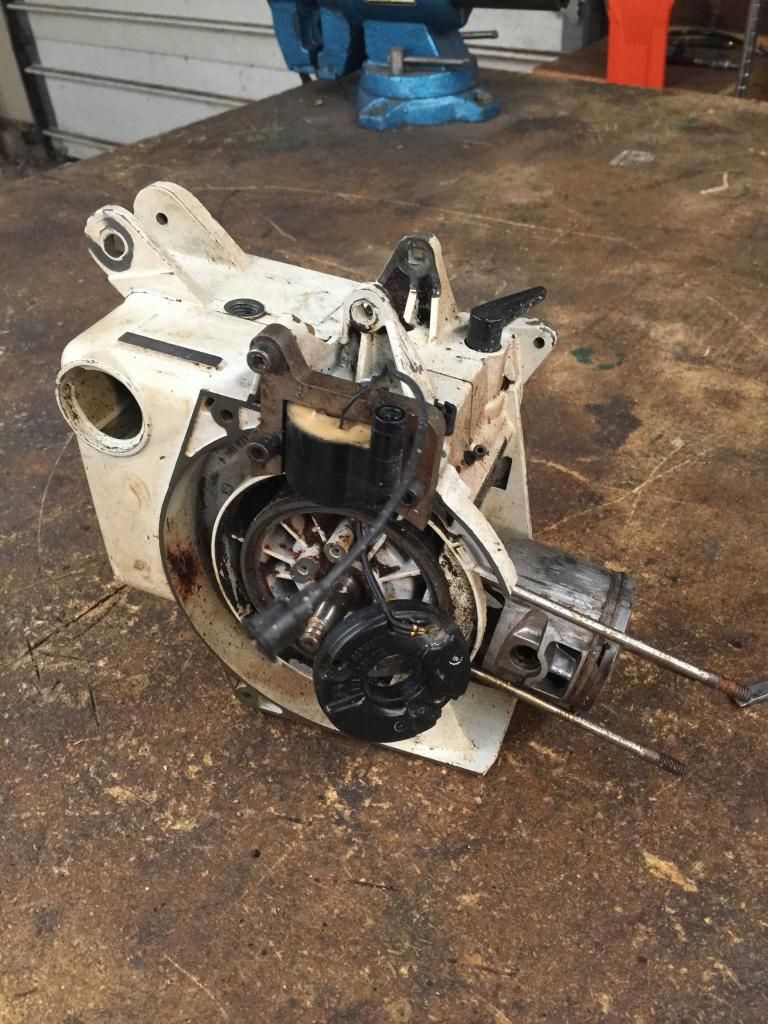
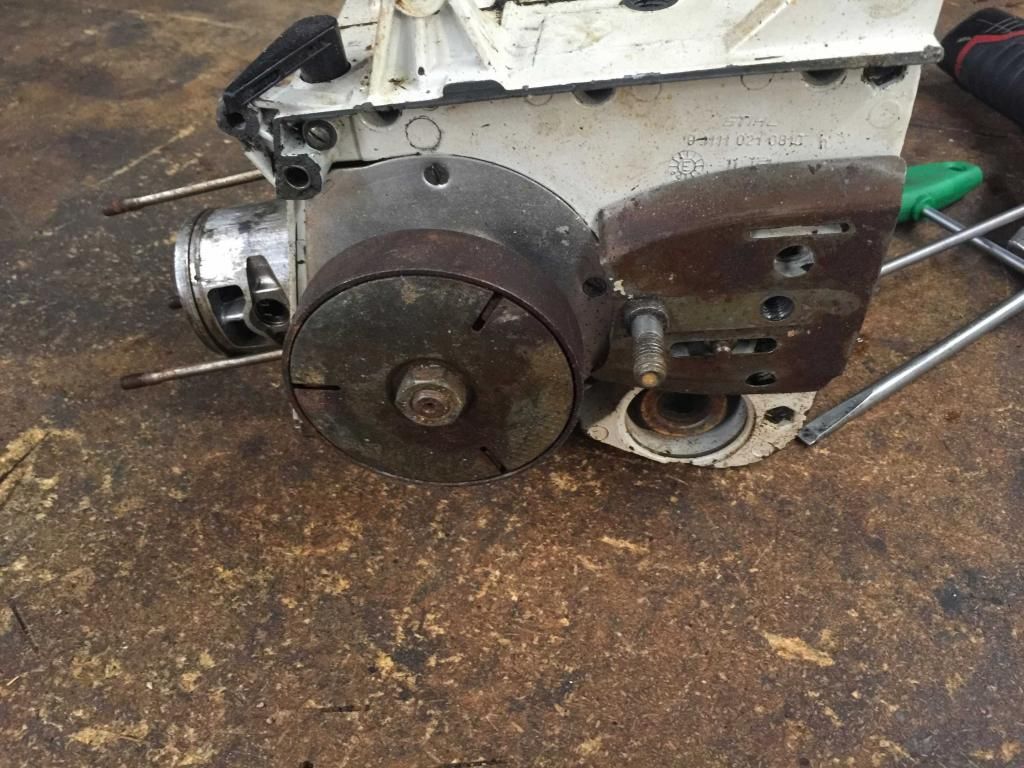
Thanks for the pics, Rocky. It looks like retrofitting the oiler should be very doable. The 051 case has a plastic elbow (that's what Stihl calls it) that mounts in the same spot as the manual oiler. It utilizes the same mounting bosses. The lower oil passage (the one directly in between the mounting bosses) is used on, both, the auto & manual oilers. The upper one is used only on the manual oiler and it would need to be drilled. The side mounted oil fill gives you a direct visual of that area & I can see that, not only is the casting there, it's already partially drilled & machined for the rubber seal that goes there! To complete the passage, one only has to drill from the exit location (directly above the existing auto oiler hole), into the case to intersect with the delivery passage. That is an angled hole, & the casting is provided for that as well. One would need to be accurate on the direction & angle of that passage. Actually, if you look at Dave's 2nd pic, you can see that casting protrusion where the oil passage exits into the feed channel. It's directly above the rear bar stud, at the end of the channel (the long, skinny one). That dark spot, at the forward end of the channel, appears to be a hole, but is not (that had me going for a bit).

The only hiccup (and it's a minor one) is the creation of the threaded boss where the pump screws into the top of the tank/case. The raised flat portion, that the pump seats against, on the inside of the tank, is already in the casting. That's a GOOD thing, because that measurement is crucial, for the pump to seal against it (you can see that area at the very top of Rocky's last pic). That only leaves the need to drill & tap the threads for the special nut that screws into the top of the case. By looking at Dave's first pic, it appears that the threaded area is raised a bit & there is a bevel, above the threads, where the O-ring seats. That step will require a little more indepth scrutinizn'.

I will provide step by step pics when I do the mod.

Anybody know where I could pick up a manual oiler? The IPL says the pick-up hose that is connected to the 051 "elbow" is the same # as the 076 hose.

Rocky, thanks for dragging those parts out & taking pics. Dave, your "clutch" pics were also helpful.
 
Sorry. I have that backwords. 051 on top 076 on side.
Thanks for the correction, you had me scratchin' my head for a bit. Actually, according to the OP, the 051 & 075 came both ways (page 1 of this thread). My 051 is a side mount oil fill & Rocky's 075 is a top mount oil fill.;)
 
If you pull that one off, cudo's to you!!! I think you can find a manual oil pump. I'll look.

heres one in the UK

http://www.ebay.co.uk/itm/STIHL-075...hainsaw_Parts_Accessories&hash=item3aa0781577
I don't see anything that should keep it from happening, guys, unlike my Homie 540 oiler project. On that one, I wanted to convert a Homie dm54 cut-off saw to a 540 chainsaw. It was looking like a go, until I ran into a couple issues. 1st, a blank was inserted into the oil filler hole, using a liquid metal product, which flowed into the threads. I could probably overcome that one, BUT, when I looked inside the gas tank, I noticed that same stuff squeezing out between the case halves! Can you believe it? They stuck the case halves together with liquid metal! I'm still trying to figure out if that stunt was performed at the factory (it definitely appears that it was). Can't hardly imagine an 88cc cut-off saw would be considered disposable because of a bad crank bearing?

Ok, enough Homie typin' on a Stihl thread, but I thought EVERYBODY would like to know about that one.

Thanks for puttin' your feelers out there for a pump. I'll look into that one. Also, I wouldn't mind coming up with a "totally junk" 075/076 case to use for measuring the angle of the hole that needs to be drilled, as it is crucial not to screw that step up!!! I don't want a case that's even remotely usable, because my mission is to modify an 051 case, not replace it with an 075/076 one.
 
Ya I really don't know. It said overseas shipping was "possible",...?

Funny thing about my 076 build. Saw would run great for a couple minutes and die. Check, look, probe, wonder, then I realized she's hungry for fuel. The white gas tank cap has no vent, it was creating a vacuum. Swapped caps and it ran great. Then I did my comp test. Not bad at 165#'s. That's hot and wot. I did use blue lock tight on all the exterior case screws. I remember milling once with an 051 and the tank came loose in the cut and took out half the fan blades on the flywheel
That's cool that you're up and runnin'. I noticed 2 different fuel caps on the IPL. I put my old cap on my new tank so, hopefully, should be good to go.

I emailed the blokes about that pump. What I thought was a check ball, on the tablet pic, looks like a chunk of dirt, on the zoom on the real puter. As you can see, the spring is there, so you would think that the ball would be there as well. I also asked about the shipping. I don't know what time it is there, it might be tomorrow before they reply. I haven't done much looking yet, I'll do that tonight. Maybe a closer one will turn up.

Regardless, thanks for the tip.
 

Latest posts

Back
Top