Another "cheap tool"

Arborist Forum

Help Support Arborist Forum:

This site may earn a commission from merchant affiliate links, including eBay, Amazon, and others.

Wife'nHubby

Addicted to ArboristSite
Joined
Oct 9, 2008
Messages
1,387
Reaction score
306
Location
Milwaukee, WI area
chop_rack.jpg


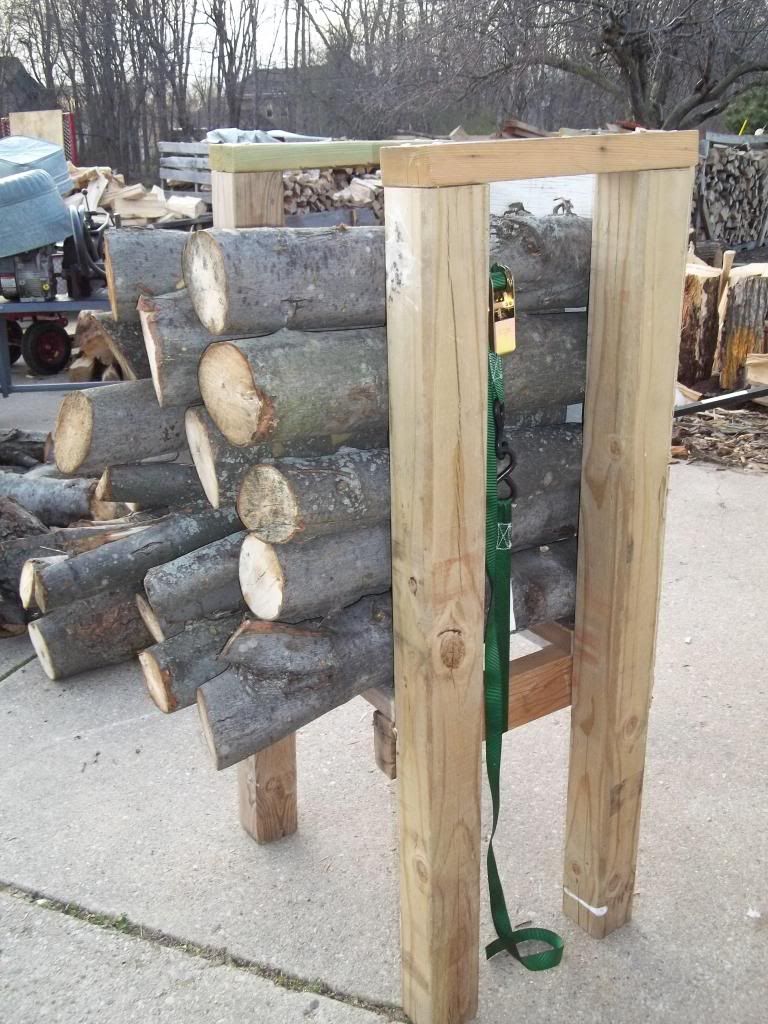
Design taken from 'others' and made for my needs. Yes, I do have a sawbuck, but when working with multiple 'slightly too long' pieces, I was looking for a way to saw more pieces at a time than my sawbuck would hold.

I haven't got a good stack in here to show you, but I think you'll get the idea. There is a ratchet strap holding pieces in place. One swipe with my chainsaw and all will be cut to length. Best part: No green backs were expended during construction. :)

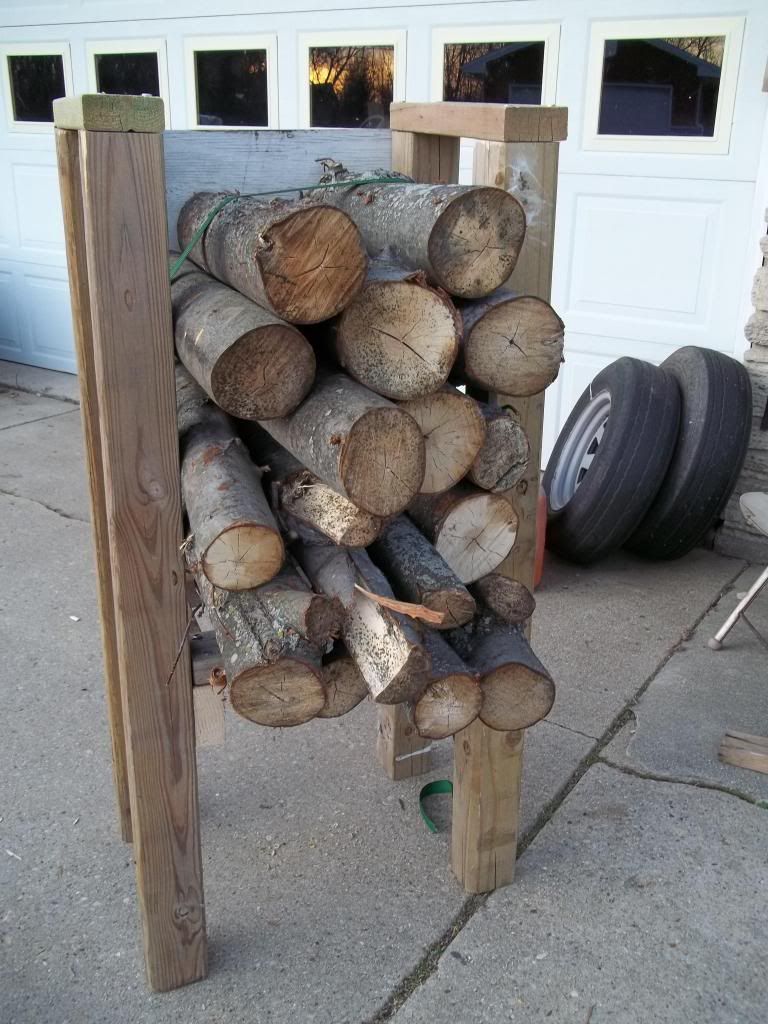
Okay, went out and filled it up so you can get a better idea:

chop_rack2.jpg


chop_rack3.jpg


Shari
 
Last edited:
I'm gonna build one of those... we had quite a few large pieces that made it past the measuring stick... and barely fit in the stove. Some had to be brought back out... and cut. Not fun bent over like a slinky.
 
Nice work, it's a lot safer than the method we use, having some one hold them over a big round while someone runs the saw to trim them, one at a time. We're going to have to build one. Thanks and rep sent!
 
Nice work, it's a lot safer than the method we use, having some one hold them over a big round while someone runs the saw to trim them, one at a time. We're going to have to build one. Thanks and rep sent!

Just a suggestion: Before I built this I used to use my splitter like a vise - hold those 'a tad too long' pieces sideways in the splitter instead of having another person hold them = safer. Using the splitter like a vise works but you are still doing one piece at a time. The above design allows many pieces to be cut at the same time = time saver. :)

Shari
 
I do something similar by strapping them to a pallet on the ground. Its amazing how much time it saves. Getting it up waist high would be much easier, like you are doing. Maybe I will mount some legs to the pallet.
 
I do something similar by strapping them to a pallet on the ground. Its amazing how much time it saves. Getting it up waist high would be much easier, like you are doing. Maybe I will mount some legs to the pallet.

Yeah, just take some treated 4x4's and nail 'em on the pallet. All done. :cheers: I has a few pallets around here... may make a big lifted wood-cutting skid with one of them now... :)
 
"Waist high" is an arbitrary measurement depending on how tall one is. :) Hubby (6') and I (oh, somewhere slightly above 5' and shrinking with age) debate that "waist high" thing all the time. He keeps telling me "Grow up!" :)

Just for grins: The above 4x4's were cut 4' long. The bottom cross brace was mounted 20" up. Other dimensions are what ever length your bar is on your saw for the cross cut and the depth is whatever you want for length of splits.

I've seen other designs that use 2x4's for the uprights but we had the 4x4's and I just thought I wanted something "a little more sturdy on it's feet".

Shari
 
Last edited:
Nice work, it's a lot safer than the method we use, having some one hold them over a big round while someone runs the saw to trim them, one at a time. We're going to have to build one. Thanks and rep sent!

Make one 34" wide out of steel piping(I know you have some old gates around somewhere. Then slap a 36" on your 660. Put some wood on the front so your chains don't get hurt. You could even make a big one for long branches and load them with the front loader.

Scott
 
Oregon Easy Cut Sawhorse

Hi Shari you seem to be full of common sence for a woman:rock:

I like your saw horse Idea I have a folding one made out of wood.

I really like this oregon brand one it seems to only be available in the UK.YouTube - OREGON EASYCUT SAWHORSE

David
 
Last edited:
Turnkey posted pics of his Oregon-like item here but his pics got messed up so slide down until you see another members variation:

http://www.arboristsite.com/firewood-heating-wood-burning-equipment/87226.htm#post1349666

Shari

It is very similar thanks for locating it. What I did like about the Oregon one was this metal bracket that slid down two vertical rods as you cut the wood. It prevented the wood from jumping out of the sawhorse or being pulled towards the saw as your cutting. I could possibly make one but I have no welding skills and would need to hire someone.

David
 
David,

I've watched the video you linked to now at least 3 or 4 times and don't see the sliding metal piece you refer to...... - but - I guess I don't see why you couldn't fab up a sliding piece out of 2x4's, afterall, per your description, the metal piece you refer to is simply acting as 'weight'.

Shari
 
Since I cut all my own wood, irregular length pieces are not an issue. I have a 10' stick that is graduated in 16" on one side and 18" on the other. Once I fell and limb a tree I just move up the trunk with my stick marking each length. I crank up the saw and move up the trunk cutting at each mark.

For those with pieces longer than needed, this is a great time saver.

Sounds like you have a good set up there!

I scrounge all my wood so I very seldom get the same length rounds... :)

Shari
 
David,

I've watched the video you linked to now at least 3 or 4 times and don't see the sliding metal piece you refer to...... - but - I guess I don't see why you couldn't fab up a sliding piece out of 2x4's, afterall, per your description, the metal piece you refer to is simply acting as 'weight'.

Shari

Hi Shari, actually it does not act like a weight it slips down as the bundle of wood compresses from the cut rounds and prevents the wood from rolling back toward the saw and jamming it. Kind of like your nylon binder to keep the stack of wood secure while you cut it. There is more than one video of the Oregon Sawbuck. David
 
Last edited:
Just a suggestion,

if you move the cross braces (the ones parallel with the wood you are going to cut) down several inches, you can cut right though with your saw and not hit them.

This idea came up with the cutting buck design referenced in Post #11.

Philbert
 

Latest posts

Back
Top