Building a Chainsaw mill, looking for input..

Arborist Forum

Help Support Arborist Forum:

This site may earn a commission from merchant affiliate links, including eBay, Amazon, and others.

ELITER

ArboristSite Lurker
Joined
Nov 11, 2007
Messages
29
Reaction score
6
Location
Oregon
So I am not good with the computer at drawing stuff up and posting it to explain my design but let me try to explain what I want to do...

I have a ps 7900 Blue dolmar, a little tuned up bought it from Cut4Fun off the forum.

I would like to attach a chainsaw mill to it to make some lumber out of some of the logs that would otherwise become firewood...

Most are smaller than 20" but I often have access to cool pieces that would make awesome slabs with the right setup...

I initially will put it onto my current 24" bar but will eventually determine how large of a bar I think this Chainsaw is good for and buy one and drill it.

I was thinking of buying one but in looking at them I think they are about a $50 to make product.. I am planning for a combo of the Granberg style with the railomatic style.

I have bought 8020 1" extrusion to make the planing deck out of.(the part that slides on top of the cant or guide) I have 2 ~6' bars of it and enough T-brackets to make a shape with 2 long pieces and 2 cross pieces (like a large "H" with two horizontal bars instead of one), all could be quickly and easily adjusted in the field. Shaped like:
_____
_|_|_

Question: What length should I go with for the long guide bars? For the cross bars?

I was initially thinking like 40" for the long guide bars and ~16" for the cross bars, but before I cut any of this what is an ideal width for the planing deck? I think I will likely go with 36" length cause I can easily buy more later and make a different sized deck for a bigger saw.

I plan to attach the frame to the saw with two 1" steel angle iron brackets spanning the top of the planing deck each sporting a plate with a square sleeve, also threaded for the all-thread height adjustment (Ala Railomatic). The verticals would be 1" square steel tube riding in sleeves (also like railomatic) with a plate on the bottom to attach to the bar by drilling the bar and bolting them directly. (with a large roller on the bottom of the bar near the power head as railomatic also has)

I plan to change on his design slightly by eliminating one crank and using a bicycle style chain to make the height adjustment acurate, parallel, and faster.

Anyway help me out here what am I missing? Besides the all-thread height adjustment what would be needed to keep the height from loosening and wandering..

What am I forgetting? I would also put on a home-made oiler to provide more oil when sawing larger items..

Please help me out here with pictures or drawings of what might help me from making my own mistakes.. I prefer to learn from others lessons!!

Anyway love this forum.. I look forward to the feedback!
 
Question: What length should I go with for the long guide bars? For the cross bars?

I was initially thinking like 40" for the long guide bars and ~16" for the cross bars, but before I cut any of this what is an ideal width for the planing deck? I think I will likely go with 36" length cause I can easily buy more later and make a different sized deck for a bigger saw.
What do you mean by the planing deck - do you mean the width of the rails you place on the log or the width of the actual mill?

In terms of the mill width, if the mill is too wide it makes it harder to lift and start the cut straight unless you use rails.

I plan to change on his design slightly by eliminating one crank and using a bicycle style chain to make the height adjustment acurate, parallel, and faster.
This sounds good but you then have to change the length of the chain if you change bar lengths. I though about moving to one crank but 2 cranks is actually so easy I'm not bothering even when I build my next one.

Anyway help me out here what am I missing? Besides the all-thread height adjustment what would be needed to keep the height from loosening and wandering..
You should add a locking bolt just to make sure.

Please help me out here with pictures or drawings of what might help me from making my own mistakes.. I prefer to learn from others lessons!!
Everything you have described so far has been discussed somewhere on this site. Instead of asking people to post pictures it sounds like you should just do some serious searching of this site and then ask more specific questions about how, why etc. Then build something yourself and post pictures of it and ask for comment.

Good luck
 
Last edited:
What do you mean by the planing deck - do you mean the width of the rails you place on the log or the width of the actual mill?
The "planing deck" I refer to is the part attached to the risers on the chainsaw that slides along the top of the log/cant/starting rails.
What I am mostly looking for is a good length to put between the two rails parallel to the bar. In using your mill for example you have only one "cross bar" between your two main rails, what is the width between your two rails?

In terms of the mill width, if the mill is too wide it makes it harder to lift and start the cut straight unless you use rails.
but it allows you to use the mill with a shorter bar and just having overhang on the back side of the log.. correct?

You should add a locking bolt just to make sure.

Everything you have described so far has been discussed somewhere on this site. Instead of asking people to post pictures it sounds like you should just do some serious searching of this site and then ask more specific questions about how, why etc. Then build something yourself and post pictures of it and ask for comment.
I have searched the forum rather thoroughly and besides your posts on your "BIL" mill most threads are lacking and real substance about the construction of the mill. And yours doesn't really apply as your BIL went way overboard in many aspects of your design.

The design I am most interested in is Aggies. From reading Aggie's posts he is happier with his throughbolt setup than the GB style mount also the chain removal and tensioning is unaffected. Also throughbolts would make removal and installation much simplified compared to a GB style mount or a clamp.


Here are the parts I am most concerned about: where the risers attach to the bar, what can be done to ensure this connection is perpendicular? Is there any trick here? Assuming I am through bolting rather than clamping.

On the height adjustment is there any trick to this? How about slick ideas on clamping square tube? I was half contemplating just drilling and pinning at common heights..

Thanks!
 
The "planing deck" I refer to is the part attached to the risers on the chainsaw that slides along the top of the log/cant/starting rails.
OK - I call those the main or primary mill rails.

What I am mostly looking for is a good length to put between the two rails parallel to the bar. In using your mill for example you have only one "cross bar" between your two main rails, what is the width between your two rails?
That's not quite correct The BIL Mill main rails are held apart by 3 pieces. Two are bits of 1/4" thick Ally Angle at either end and one is cross piece in the middle made of the same stuff as the rail - it's 12" long. The rails are about 1 1/2" wide so the overall width of the mill is 15".

but it allows you to use the mill with a shorter bar and just having overhang on the back side of the log.. correct?
Sure - we're just getting our lengths and widths confused. Length is the length of the mill rails parallel with the bar and width is the width of the mill. The problem with lifting anything by hand is having to hold it too far out from your body. If the mill is too wide it's like lifting a board up horizontally but from only one edge of the board.


I have searched the forum rather thoroughly and besides your posts on your "BIL" mill most threads are lacking and real substance about the construction of the mill. And yours doesn't really apply as your BIL went way overboard in many aspects of your design.

The design I am most interested in is Aggies. From reading Aggie's posts he is happier with his throughbolt setup than the GB style mount also the chain removal and tensioning is unaffected. Also throughbolts would make removal and installation much simplified compared to a GB style mount or a clamp.
Sure, through bolts are by far the easiest mounting method but you lose some cutting length and the powerhead is slightly further out from the log which can unbalance the mill. FWIW, I have used mills with both bolts with and cams, and cams beats bolts by miles. Nevertheless I acknowledge through bolts or simple clamps are WAY easier to make - especially if it is your first mill.

Here are the parts I am most concerned about: where the risers attach to the bar, what can be done to ensure this connection is perpendicular? Is there any trick here? Assuming I am through bolting rather than clamping.
It depends on how you connect the risers to the rails and cross pieces. On my small mill I made my risers from 3/4" SHS so they slide through a 4" section of 1" SHS which was welded perpendicular to a cross piece. I held the 1" SHS sections in place against the cross pieces using right angle magnetic holders and tack welded them into place. Then I slid the 3/4" vertical risers into place and used some big set squares to check my right angles. A little tweak here and there to make them spot on and the welded them up.

On the height adjustment is there any trick to this? How about slick ideas on clamping square tube? I was half contemplating just drilling and pinning at common heights.
Pinning is one way of doing it and it's quite a good option for a first mill however I would still prefer bolts over pins. Also Bolts work best if they lock into a corner since the hold the risers vertical and the corners do not crush as easily as bolts locking onto the sides.
 
Last edited:
simple homemade csm

made from free stuff of course.

IMGP05061.jpg


All I bought was the threaded rod.

The "feet" that clamp to the bar are narrower than on my alaskan. I made it that way to be able to push the rails out a little farther without pinching the roller on a roller nose, or to go nearly to the end of the bar on a hardnose.

This weighs at least 1/2 of what an alaskan weighs. Very light even with the ridiculously long 44 in rails on it.

The aluminum is salvaged mobile home awning pieces.

1 x 1 square tubing was also salvaged. I simply migged nuts onto the bottom of the 1x1's. All adjusting is quick and easy. A pair of 9/16 inch wrenches and pre made blocks of wood to adjust the thickness. (2 inch blocks, slide in, lower top of mill down, tighten nuts, remove blocks).

It's the simplest mill I could think of.

I'm experimenting with the on off bar, thats why its not in the picture. I planed a 5 inch wide piece of birch, and have been waxing it. I hate moving the on off bar all the time. Figure I'll move it less if its 5 inches wide. We will see.

This was the 1st. I only use this one to mill big logs into cants. Then I switch to one of my alaskans. Once I build a few more of these (enough scrounged stuff so far to build one more) I'll sell of my alaskans, as these weigh much less, are far cheaper, and as easy to adjust.
 
Cool mill stony - I like these simple low cost solutions.

The one thing on that design that would improve the starting and finishing would be to add a cross piece so that its bottom is level with the bottom of the main rails. That way one can start and finish boards level.

attachment.php
 
its just not on in the picture

Cool mill stony - I like these simple low cost solutions.

The one thing on that design that would improve the starting and finishing would be to add a cross piece so that its bottom is level with the bottom of the main rails. That way one can start and finish boards level.

attachment.php

I guess you skimmed over that part of the description.

The on off bar isn't on in the picture. I'm making a new one. A wider one, so I don't have to adjust it as often.

What you described and drew is what granberg calls the on / off bar
 
Just to get back into this as this "on-off bar" length was one of my initial questions..

I have decided to go with 14" to make the total width 16" from outside to outside of the main rails.

I am planning on 2 on-off bars, both with easy quick adjustment, I figured 2 would be better than one plus it will really provide a lot of structural rigidity to the frame.

I am going to get the rest of my material here tomorrow and probably slap her together roughly and take a pic tomorrow night to give a rough idea of the design.


On another note I just found out that a local friend of mine has a lucas swing-blade mill, I knew he had a mill but never knew what kind, and had assumed it was just a bandsaw

now I am wanting to make some boards cause I know those swing mills are fast dimensional production with 2 folks..
 
Stonykill, That is a neat little unit you made.

It would be great if you would post more photos and explain how your clamps and adjustments work. It is almost obvious, but not quite. I am thinking that I should just copy you, and you have already engineered it.

That red thing is your measuring tool? Color for easy spotting in the field?

Does the nearer set of allthreads get a top like the further set? To prevent warp?

Adjustments are made via 9/16ths sockets applied to the nuts atop the 1"x1" top? A little at a time to each nut in turn?

Locktight to keep nuts in place while the entire allthread turns to raise and lower the rack?

How are allthreads mounted to clamps?

I'm sure I missed a question or two.
Frosted Flake


wow, you left me dizzy:dizzy:

I'll try to get more pictures tomorrow, before the :censored: snow starts again.

I'll answer what I can now. I think you are overanalizing this, its super simple.

The rail on top of the far end, is for an old plastic lawnmower gas tank, my auxillary oiler.

The red handle, is only red, because my old man painted it red (retired guys and spary cans:( 
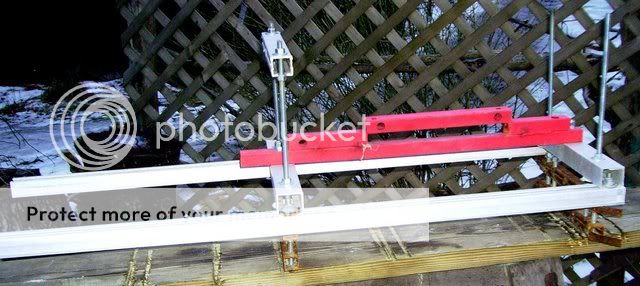
) It is a handle. This is a fixed length handle for my 28 inch bar. Its the length I use most with this. I need to make shorter rails as I hate rails way longer than the bar.

The "allthread" is stationary, in welded nuts at the bottom of the unit. (the nuts are welded to the 1 x 1 stock, allthreads not welded in place) The upper 1 x 1 stock is drilled slightly oversized to slide easily over the threaded rod. The nuts above and below the 1 x 1 stock control the height and clamping pressure.

The adjustment is fast and easy. Loosen the 3/8 nuts with 2 - 9/16 wrenches. Spin the bottom or top nut, whichever is applicable, to the desired depth, slide the 1 x1 stock to the adjusted nut, and repeatthe process with the remaining nuts. And most important, retighten.

If the :censored: snow holds off, I'll get pictures of it tomorrow.
 
I am going to make a "StonyMill"

Going into town today anyway, so I'm gonna get me some toys ... I mean, Parts ... from Industrial Supply (Inc.), and I am going to Build me a StonyMill.

It will be my first mill. I have looked at several designs, and considered just buying the Granberg. Nothing wrong with the Granberg ('cept a hunerd buks) of course. But, all considered, I think Stonykill has the best "First Mill" design I have yet seen.

Naturally, I understand it may seem I am rambling. Not so. I am explaining to Stonykill that I like his work, am going to use it, today, and I thank him for it.

Thanks Stony.

Next week I will have a brand new set of problems. Yay!

Happy Leap Day, All.
Frosted Flake

not rambling.....praise ...thanks. Like I said, it was the simplest design I could come up with. I still haven't had a chance between snowstorms to get pics installed on a saw. More snow tonight. Sucks.

I'm glad you like the design. Build it, and get milling!
 
Back
Top