Cracked Primer Bulb Question

Arborist Forum

Help Support Arborist Forum:

This site may earn a commission from merchant affiliate links, including eBay, Amazon, and others.
Joined
Jan 10, 2008
Messages
12,552
Reaction score
9,198
Location
Omaha, Nebraska
I recently serviced a Husky K760 chop saw that has a primer bulb with a small crack in it. The saw starts and runs fine without even using the primer bulb (choke three or four pulls until a pop and then one or two pulls with choke off). When warm, the saw starts on one pull with choke off.

To replace the primer bulb on this saw requires considerable mechanical take down and potentially several hours of work to replace. That's a poor design, so I recommended running the saw as is because it starts about the same as all my Stihl chainsaws that have no primer bulb and it appears to run OK.

However, I've now been told that after running under load for awhile, the saw starts shooting fuel out the primer bulb and it loses most if its power. Is that true? Seems goofy to me, so I thought I'd ask the Forum for another opinion. Anybody else encounter this?

Please advise and TIA.
 
I'm not familiar with that saw, but if it has a choke then my guess is that you're talking about a purge bulb rather than a primer bulb. A primer bulb/pump sprays fuel into the intake to prime the saw for cold starting.......usually in place of a choke.

A purge bulb pushes or pulls fuel through the carburetor to purge air from the pump and metering section. Most designs pull fuel through the carb and return it to the tank. A cracked bulb can cause an air leak, leaning out the saw. Bad news. I suggest you replace the bulb ASAP.
 
Must of my equipment with purge bulbs will never start if there is a split in the bulb because they suck air.
 
I'm not familiar with that saw, but if it has a choke then my guess is that you're talking about a purge bulb rather than a primer bulb. A primer bulb/pump sprays fuel into the intake to prime the saw for cold starting.......usually in place of a choke.

A purge bulb pushes or pulls fuel through the carburetor to purge air from the pump and metering section. Most designs pull fuel through the carb and return it to the tank. A cracked bulb can cause an air leak, leaning out the saw. Bad news. I suggest you replace the bulb ASAP.
It has a choke. The official parts diagram says that the part is a Primer housing but it also says in the Note: Purge. The part # is 503 93 66-01. However, the starting instructions want you to press the primer several times when starting a cold engine.

So, it may be that the crack is setting up an air leak after running for awhile that is leaning out the saw and robbing it of power? Perhaps, but I've never heard of a primer bulb doing this. I suppose this part could be performing two functions: Prime when starting and purge when running?

Again, my assessment is that this design is atrocious: (1) Very difficult to get to the bulb and (2) The saw is used to cut concrete and steel (such as rebar) in really rough operating conditions. That soft plastic bulb is an expensive, time-consuming repair waiting to occur.

Any other thoughts?
 
You got an air leak for sure.Even if its time consuming to replace,you should do it before disaster.The guy saying kinda losing power under load,he probably doesnt feel the lean condition like he should because of the rev limiter.
 
I don't like purge bulbs at all. The bulb and lines are another potential source for air leaks (and they can be difficult to service as you've pointed out). If the engine has a comp release, than a purge bulb system is totally unnecessary, as you can easily spin the engine over several times, allowing the pump section of the carb to pull fuel and clear out the air.

Even on a non comp release equipped saw, it still only takes a few extra pulls to 'prime' a carb on a saw that has been sitting for a while or that has been ran dry. On large displacement, high compression non-decomp saws I've loosened the spark plug a bit to lessen compression when spinning the engine over to get the carb primed (if they're a real bear to pull over). Funny thing is that the machines that most often have purge bulb systems are the ones with small displacement engines (often consumer equipment) that aren't hard to pull over anyways....

The purge/primer terminology confusion happens quite often, even in factory literature (as seen in your parts diagram and starting instructions). A purge bulb does 'prime' the carburetor in a similar fashion as 'priming' a trash pump (clearing the air out of the pump housing). That has nothing to do with priming the engine (in fact a purge bulb will 'prime' a carburetor even if it's not mounted on the engine at all).
 
Not sure why it would be hard to replace? The husky ones that I've replaced where held in place by two clips. Just take the two lines off and pop it out. The Stihl ones that I've replaced where held in place by four screws,
 
Perhaps you could use some care and replace just the bulb part and not the entire air purge assembly. From the outside I mean. The old one is cracked, see if you can flat end of a toothpick it out, if so, you might could shove just the bulb part back in without all the disassembly. Worth a shot for a few minutes, it is only a two buck part, buy two in case you screw one up and have to finish the job the hard way.
 
Not sure why it would be hard to replace? The husky ones that I've replaced were held in place by two clips. Just take the two lines off and pop it out. The Stihl ones that I've replaced where held in place by four screws,
It's hard to replace because you cannot get to the cracked bulb or to the lines on the K760 without practically dismantling the engine, working from the top down. All the Stihl ones, (such as those on line trimmers) are a piece of cake to reach without taking much of anything apart. Primer bulbs on husky chain saws and others are also easy to get to. This thing is a real bear unless you know something about the K760 bulb replacement procedure that I don't.

IMO, this is another case of an MFG making it almost impossible for the owner or a mechanic to replace a very simple part without returning it to the dealer and picking up a huge repair bill. :bang:
 
Perhaps you could use some care and replace just the bulb part and not the entire air purge assembly. From the outside I mean. The old one is cracked, see if you can flat end of a toothpick it out, if so, you might could shove just the bulb part back in without all the disassembly. Worth a shot for a few minutes, it is only a two buck part, buy two in case you screw one up and have to finish the job the hard way.
Zogger, as usual, you could be right. It just doesn't seem natural to work from the outside and be successful at this repair. The part actually appears to be a bulb nested in a shroud assembly that connects to the lines. What you are saying is that the old cracked bulb portion can be separated from the shroud assembly and then a new one be somehow pressed back in and sealed, kind of like changing a tubeless tire?

If that's the case, then the lines do not have to be reached from the inside and separated from the assembly, nor does the assembly have to be removed? Gadfry!

Here's the Part:
 
Last edited:
Zogger, as usual, you could be right. It just doesn't seem natural to work from the outside and be successful at this repair. The part actually appears to be a bulb nested in a shroud assembly that connects to the lines. What you are saying is that the old cracked bulb portion can be separated from the shroud assembly and then a new one be somehow pressed back in and sealed, kind of like changing a tubeless tire?

If that's the case, then the lines do not have to be reached from the inside and separated from the assembly, nor does the assembly have to be removed? Gadfry!

I don't know in your case with that particular saw, but I do know I have done this *one* time with making one good purge assembly from two broken ones (one good bulb, one good plastic housing)

ya, it just tucked in. BUT, I was doing it with both out loose on the bench too. Not mounted on the saw.

Practice on some junkers first, see if you can do it outside the case. If so, then go for it with the one installed in the hard to reach area.

Hmm, another odd thought, but proly won't work, but..perhaps... a repair, skim it with rubber cement (maybe several layers) after spray cleaning (or rubbing alcohol rub down) the outside of the cracked one.
 
Hmmm... another odd thought, but proly won't work, but..perhaps... a repair, skim it with rubber cement (maybe several layers) after spray cleaning (or rubbing alcohol rub down) the outside of the cracked one.

I thought about this also. However, I rejected that because after a hundred or so presses to prime the saw, the cement will likely give up. I've told the owner not to press the bulb anymore because it starts OK without the prime. However, anyone else who uses it will press it.

Good ideas, regardless. I'll suggest giving it another inexpensive try from the outside in. This saw retails for over $1,000 and the Stihl equivalents are a couple hundred bucks more. Right now it's a crippled horse that could be killing itself.
 
Doc,
Looks to be the plug in style purge bulb. To remove it, side a thin flat blade screwdriver down on the inside of the housing and depress the retaining tab. The retaining tabs are at the 3 and 9 positions on the clock face. The bulb comes out toward you away from the hole. Fuel lines are attached in the back. One side of the bulb has a long nipple, make sure you put the fuel line back onto the new bulb the same way. The retaining tabs are black plastic so use a good light.

The system works by pulling fuel through the carb, moving the air out of the lines and filling the metering chamber for a quick start. As the fuel in the tank warms up, the pressure on the liquid via the lines pushes the fuel out through the cracked bulb.

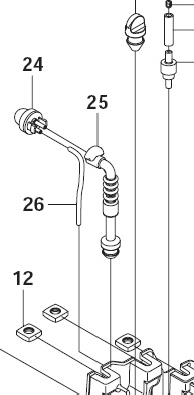
Page F, item 24. Use a magnifier to see the locating tabs;
Husqvarna K760 Parts List and Diagram : eReplacementParts.com

OK, so these lines, parts 25 and 26, are long enough to extend beyond the engine housing so that once the old bulb housing is removed, you can then attach them to the new part 24 and insert it back in once again. I was afraid that the lines could not be reattached to the bulb assembly, part 24, from the outside, so I elected to leave the assembly alone because the saw started and ran anyway. However, I could not test the engine under load because the saw was supplied to me without a blade.

This is all really good to know and looks like I can fix this puppy. At least I can try. :msp_biggrin:
 
Back
Top