Only way to help is a picture of the chain, top and side view.
You are using an out of date browser. It may not display this or other websites correctly.
You should upgrade or use an alternative browser.
You should upgrade or use an alternative browser.
McCulloch Chain Saws
- Thread starter Bruce Hopf
- Start date


Help Support Arborist Forum:
This site may earn a commission from merchant affiliate
links, including eBay, Amazon, and others.
2broke2ride
Addicted to ArboristSite
- Joined
- Jul 20, 2014
- Messages
- 1,862
- Reaction score
- 2,491
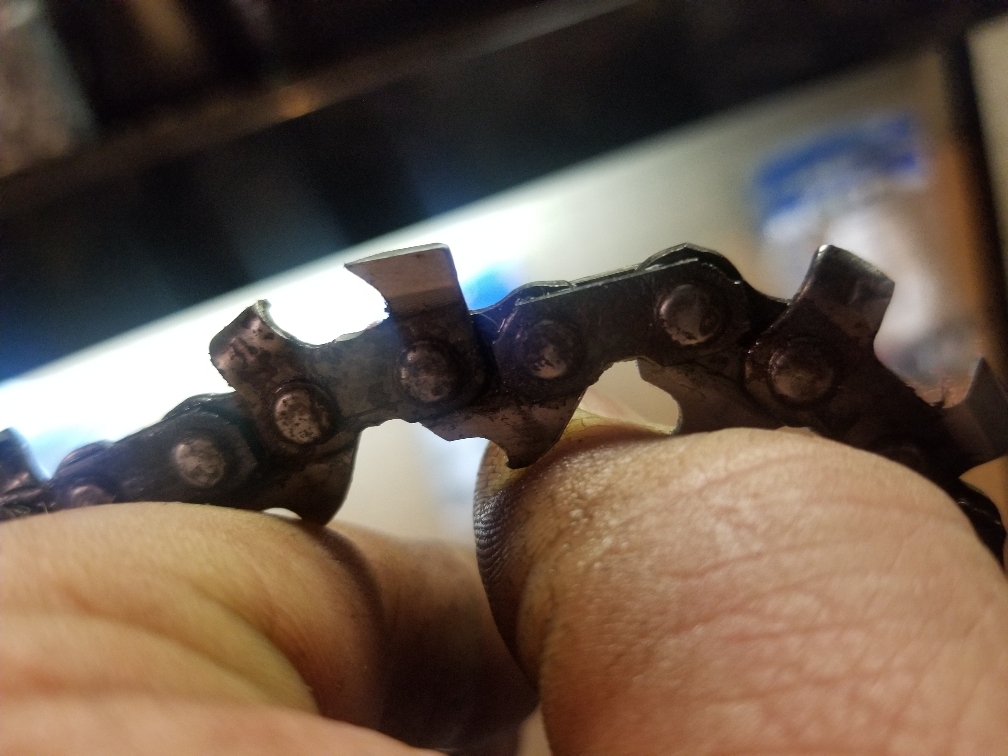
I got frustrated and hand filed the chain so no pictures tonight. I may go through a try it on the grinder again tomorrow and take some pics. It's a sacrificial chain anyway. If a screw it up, no big deal.Only way to help is a picture of the chain, top and side view.
Sent from my SM-G950U using Tapatalk
2broke2ride
Addicted to ArboristSite
- Joined
- Jul 20, 2014
- Messages
- 1,862
- Reaction score
- 2,491
Maybe I'll see if I have another full chisel chain I can throw on there tonight to practice on.
Sent from my SM-G950U using Tapatalk
Sent from my SM-G950U using Tapatalk
The way i set mine up was on a brand new chain. I set the angles so the wheel just barely touched the tooth on the angles. It worked great and ive never changed the tilt since. Works on oregon and stihl just as well. It is a timber tuff. Ive been hand filing alot lately but i use the grinder on other guys chains...usually they are pretty beat up.
30 degrees and 60 degrees is typical. I subscribe to the 'less is better' school of grinding and only remove the material that needs to be removed. Understanding which surfaces of the grinding wheel do what to the different areas of the cutter is a must. The rounded edge of the wheel is for the gullet and the edge of the hook and needs to be adjusted fairly precise with the stops. Don't be afraid to nip the top of the tie straps to get a nice hook and a clean gullet. The side of the wheel is for the face of the cutter. It's common to remove too much material when just learning the subtleties which also means additional work on the rakers to maintain a functioning cutting angle. Also usually results in unnecessary heat to the chain and rapid wear on your wheel. Grinding too much tooth without taking the rakers down isn't gonna cut worth crap no matter how sharp the tooth is. You'll find what works for you. I stick to factory recommendations for the most part. A correctly sharpened chain should look like it came out of the box, just shorter.
BTW, I just used Dirko on the 7-10 exhaust for now. I'll check on a gasket now knowing they're on the earlier saws. Thx.
BTW, I just used Dirko on the 7-10 exhaust for now. I'll check on a gasket now knowing they're on the earlier saws. Thx.
It lives well bugger me it lives. Well done Poge
") very happy for ya man
very happy for ya manOne should never assume...well done Poge.
I like to use 25 degrees for the top angle on chisel, 30 degrees on semi-chisel, and 35 on old fashion chipper. Side plate angles can vary even if you don't touch the adjustments just due to the different geometry of the cutter teeth. For chipper the normal target for side plate angle is 90 degrees, most chisel and semi-chisel would be 60 to 70 degrees. Ideally the radius of the grinding wheel should leave a slight hollow grind on the tooth.

Mark
I like to use 25 degrees for the top angle on chisel, 30 degrees on semi-chisel, and 35 on old fashion chipper. Side plate angles can vary even if you don't touch the adjustments just due to the different geometry of the cutter teeth. For chipper the normal target for side plate angle is 90 degrees, most chisel and semi-chisel would be 60 to 70 degrees. Ideally the radius of the grinding wheel should leave a slight hollow grind on the tooth.
Mark
2broke2ride
Addicted to ArboristSite
- Joined
- Jul 20, 2014
- Messages
- 1,862
- Reaction score
- 2,491
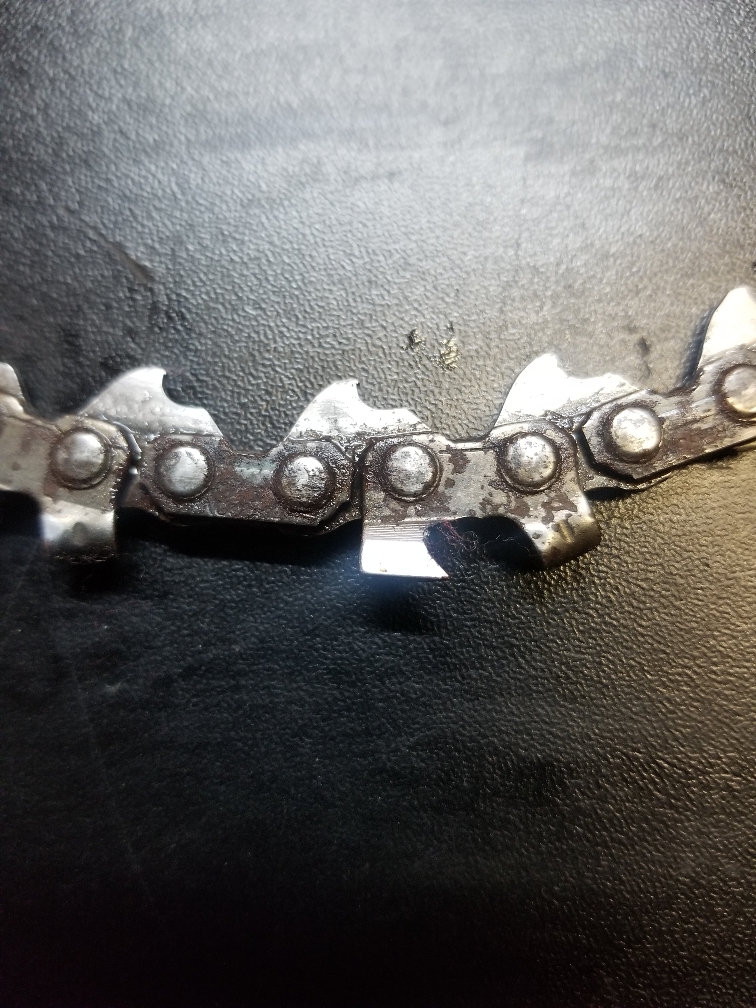
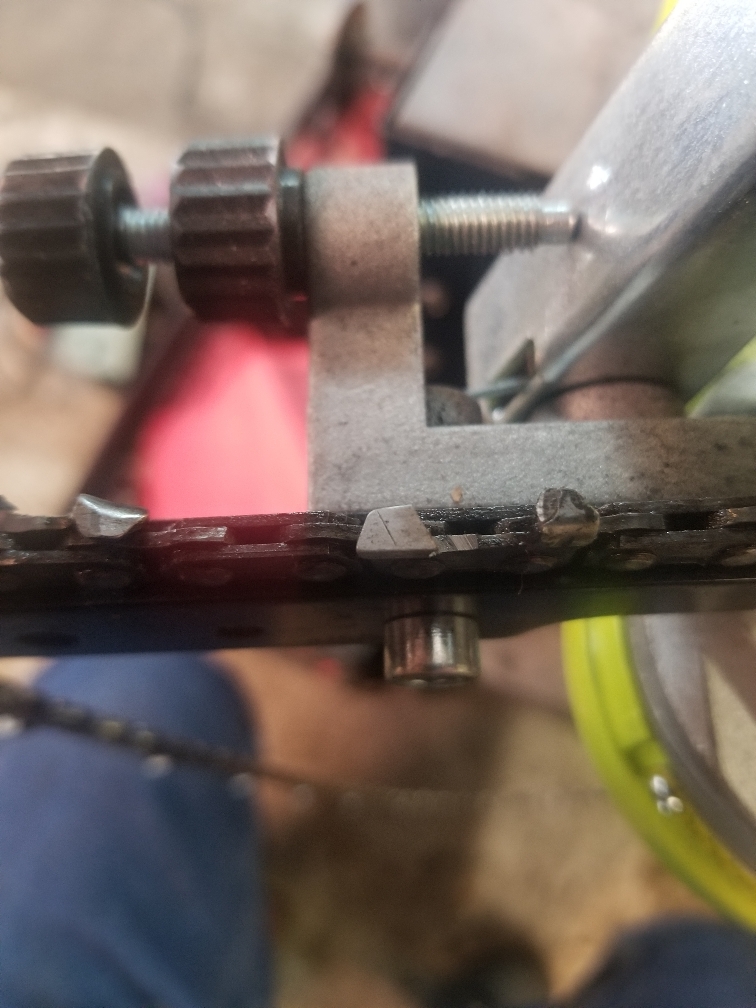
This is what I am getting. Angles are set 60 and 25 and using a 1/8 wheel which I dressed prior to this session (Still on a learning curve for that too) as per the grinder manual. Seems a very deep hook to me. Am I trying to grind too far into the gullet? I am trying to mimic what I do with a file.
My end game is to be able to offer sharpening to my customers but I need to be sure I'm doing a good job first.

Sent from my SM-G950U using Tapatalk
My end game is to be able to offer sharpening to my customers but I need to be sure I'm doing a good job first.
Sent from my SM-G950U using Tapatalk
This is what I am getting. Angles are set 60 and 25 and using a 1/8 wheel which I dressed prior to this session (Still on a learning curve for that too) as per the grinder manual. Seems a very deep hook to me. Am I trying to grind too far into the gullet? I am trying to mimic what I do with a file.
My end game is to be able to offer sharpening to my customers but I need to be sure I'm doing a good job first.
Sent from my SM-G950U using Tapatalk
I've never used a grinder but that tooth has all kinds of wrongness in it.
I think buy going for the gullet your getting past the radis of the wheel and throwing the angles off , which is why out of the box chain has that little bump in the bottom of the gullet, hand filing allows you to almost work the bottom of the side plate independently forming a longer hook than the radis of a stone face.
Just my opinion so take it for what it is hand filing is all I know.
3/8 chain should use a 3/16" wheel. 3/8 LP and .325 use the 1/8" wheel.
Mark
Mark
2broke2ride
Addicted to ArboristSite
- Joined
- Jul 20, 2014
- Messages
- 1,862
- Reaction score
- 2,491
Hmmm, book that came with the grinder does not specify a 3/16 wheel until you get up to .404. Maybe I should step up.3/8 chain should use a 3/16" wheel. 3/8 LP and .325 use the 1/8" wheel.
Mark
Sent from my SM-G950U using Tapatalk
Hmmm, book that came with the grinder does not specify a 3/16 wheel until you get up to .404. Maybe I should step up.
Sent from my SM-G950U using Tapatalk
Mark is on target. Thickness of the wheel makes a big difference. I had a mismarked Dino wheel, drove me crazy until the day I measured it and found it was slightly undersized. Replaced it and all is good. Gave the wheel to a guy who runs .325 and have heard no complaints. It was slightly bigger than 1/8 if I recall correctly.
Ron
By the looks of the rest of that bearing bore and whatever else is on (or off of) the cylinder wall, I'd say it has bigger problems than just that crack.
Yeah, it had a pretty good scuff there, but I wanted to see what I could get out of it. It was actually giving me hope until I found this - I think it's time to turn that jug in for scrap now.
Good to see you've got yours up and running!
Yeah, it had a pretty good scuff there, but I wanted to see what I could get out of it. It was actually giving me hope until I found this - I think it's time to turn that jug in for scrap now.
Good to see you've got yours up and running!
See what old Bob has on his shelf?
Mark is on target. Thickness of the wheel makes a big difference. I had a mismarked Dino wheel, drove me crazy until the day I measured it and found it was slightly undersized. Replaced it and all is good. Gave the wheel to a guy who runs .325 and have heard no complaints. It was slightly bigger than 1/8 if I recall correctly.
Ron
Sorry, it is Dinasaw. The 5 mm is what I use as it is the closest to a 3/16” wheel and the 13/64” file that Stihl recommends. The 4mm is often advertised for 3/8” chain but at .15748” or approximately 5/32” it is actually too small for a proper hook. 1/8” is 1/32” smaller than 4 mm.
Ron
One of the things I have found that for some reason causes my grinder to not sharpen correctly is the wheel gets clogged up with oil and sawdust. It will leave a black streak on the grinding wheel. I have a stone (don't remember what it is called right now) But I run it over the stone and cleans the grinding wheel and I can shape it back to spec. A clean wheel will cut smoother and sharper tooth and less heat.30 degrees and 60 degrees is typical. I subscribe to the 'less is better' school of grinding and only remove the material that needs to be removed. Understanding which surfaces of the grinding wheel do what to the different areas of the cutter is a must. The rounded edge of the wheel is for the gullet and the edge of the hook and needs to be adjusted fairly precise with the stops. Don't be afraid to nip the top of the tie straps to get a nice hook and a clean gullet. The side of the wheel is for the face of the cutter. It's common to remove too much material when just learning the subtleties which also means additional work on the rakers to maintain a functioning cutting angle. Also usually results in unnecessary heat to the chain and rapid wear on your wheel. Grinding too much tooth without taking the rakers down isn't gonna cut worth crap no matter how sharp the tooth is. You'll find what works for you. I stick to factory recommendations for the most part. A correctly sharpened chain should look like it came out of the box, just shorter.
BTW, I just used Dirko on the 7-10 exhaust for now. I'll check on a gasket now knowing they're on the earlier saws. Thx.
Brian
2broke2ride
Addicted to ArboristSite
- Joined
- Jul 20, 2014
- Messages
- 1,862
- Reaction score
- 2,491
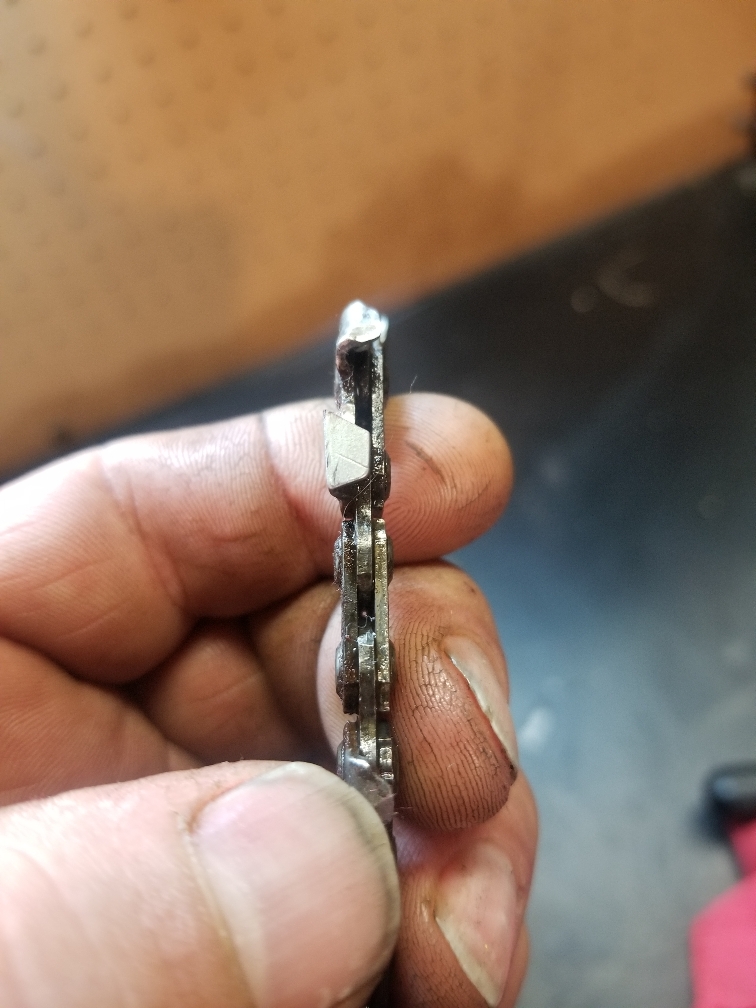
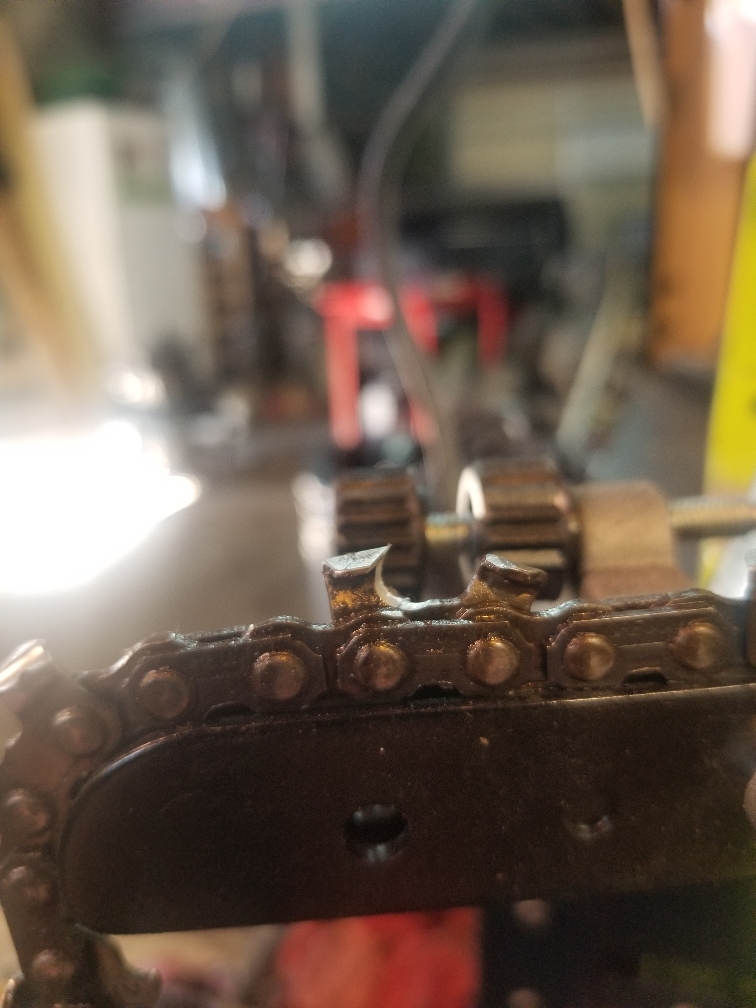
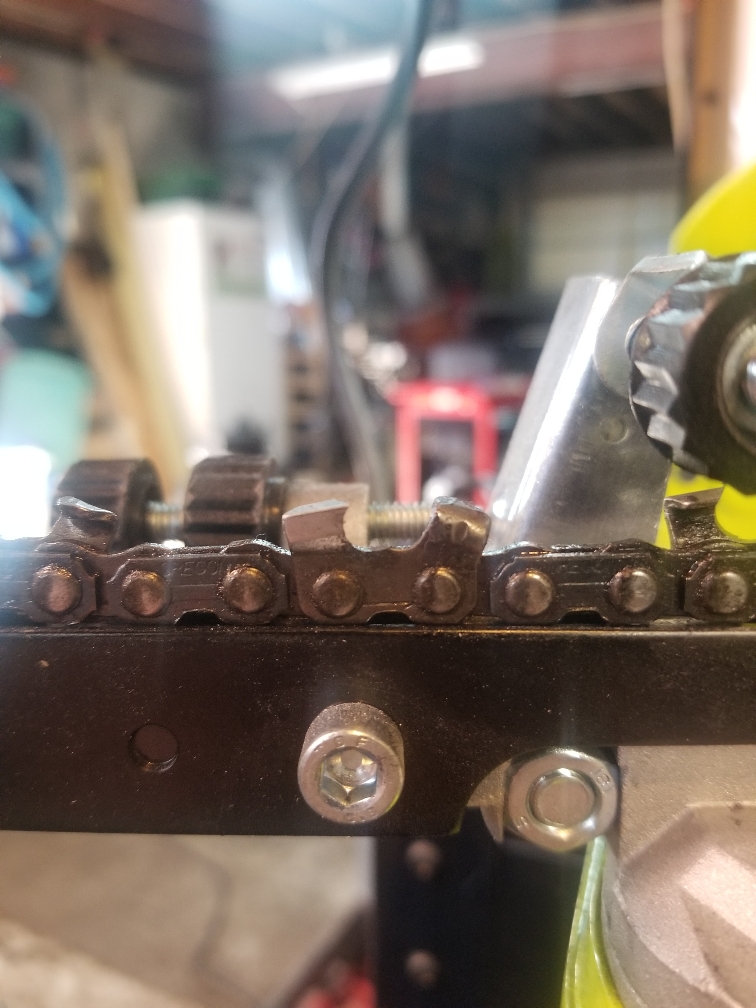
This seems better. This is a 3/16 wheel as suggested.
I am going to need to get a new wheel though, this one that came with the grinder is way out of round. It vibrates like crazy. I actually surprised it did as well as it did.
Sent from my SM-G950U using Tapatalk
I am going to need to get a new wheel though, this one that came with the grinder is way out of round. It vibrates like crazy. I actually surprised it did as well as it did.
Sent from my SM-G950U using Tapatalk
That's more like it. I've found these guys to have some of the better prices for stuff. Do yourself a favor and get a template and dressing stick while you're at it.
http://sharpchain.com/shop/GW1.htm The dressing stick (or block) is a must for keeping the wheel shape correct and de-funking it after doing a dirty chain. I usually do at least a cursory chain cleaning with a wire brush before grinding. Some guys are a lot more anal about it and soak and de-grease and all that stuff. It's faster and easier for me to just clean the damned wheel after a dirty chain and get on to the next one.
If your grinder has an adjustable vise base, there are a few things there you'll want to take into consideration with that feature depending on the available adjustments. The first would be the ability to change the angle to a 10 degree tilt for full chisel chain as some manufacturers suggest. Creates a more uniform cutting face across the full chisel cutter and provides more support under the working corner depending on the design of the cutter. The other handy adjustment is the ability to move the entire vise to accommodate the wheel getting smaller in diameter over time. As it gets smaller, the cutters are contacted with different angles on each side of the chain. There may be a range indicator on the shield that lets you know when you need to consider either adjusting the vise or replacing the wheel.
And do your best to center that wheel before using it (if you must). And if it's vibrating like you say it is, you really shouldn't use it at all. They're brittle and can fly apart...,fast. Always wear eye and hand protection!
2broke2ride
Addicted to ArboristSite
- Joined
- Jul 20, 2014
- Messages
- 1,862
- Reaction score
- 2,491
Thanks for the words Poge. The vise is adjustable for tilt but not to compensate for wheel wear as far as I can tell.That's more like it. I've found these guys to have some of the better prices for stuff. Do yourself a favor and get a template and dressing stick while you're at it.
http://sharpchain.com/shop/GW1.htm The dressing stick (or block) is a must for keeping the wheel shape correct and de-funking it after doing a dirty chain. I usually do at least a cursory chain cleaning with a wire brush before grinding. Some guys are a lot more anal about it and soak and de-grease and all that stuff. It's faster and easier for me to just clean the damned wheel after a dirty chain and get on to the next one.
If your grinder has an adjustable vise base, there are a few things there you'll want to take into consideration with that feature depending on the available adjustments. The first would be the ability to change the angle to a 10 degree tilt for full chisel chain as some manufacturers suggest. Creates a more uniform cutting face across the full chisel cutter and provides more support under the working corner depending on the design of the cutter. The other handy adjustment is the ability to move the entire vise to accommodate the wheel getting smaller in diameter over time. As it gets smaller, the cutters are contacted with different angles on each side of the chain. There may be a range indicator on the shield that lets you know when you need to consider either adjusting the vise or replacing the wheel.
And do your best to center that wheel before using it (if you must). And if it's vibrating like you say it is, you really shouldn't use it at all. They're brittle and can fly apart...,fast. Always wear eye and hand protection!
I will pick up a new wheel next time I'm out. It seems to pilot just fine on the arbor and the other two wheels that came with it spin true so I know it's not the spindle.
The grinder came with a template and dressing stone. I'm just nervous I'm doing more harm than good by trying to dress the wheel. Maybe I'm just paranoid.
Sent from my SM-G950U using Tapatalk
2broke2ride
Addicted to ArboristSite
- Joined
- Jul 20, 2014
- Messages
- 1,862
- Reaction score
- 2,491
In other news, after yesterday's test run with the 2-10, it was acting like it had a bad crank seal so I decided to pressure test it. Look what I found! In really surprised I was able to tune it as well as I was. That is a bad leak for a crank seal! Had a new seal in stock so it's all fixed up now.
Sent from my SM-G950U using Tapatalk
Sent from my SM-G950U using Tapatalk
Similar threads
- Replies
- 20
- Views
- 892