Ok chaps, update time.
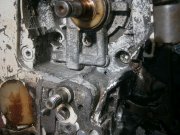
Area prepped and cleaned with solvent 143 or shellite, a petroleum based cleaner, basically petrol without all the additives, and then used acetone.
As the area was heavily abraded, I only used a stiff tooth brush to clean the area.
re cleaned a few times with shellite, followed by acetone, left in the sun to bake, so 2 days of cleaning it every hr or so like this, I was confident that the area was well cleaned.
Taking your valuable advice, I got some new Selleys metal knead it, as my old roll of the stuff was quite old and didnt want to risk it, and made up a small pea sized ball from a larger mix and applied that over the large hole in the oil gallery, I used some plastic clothes line wire that was almost the right size for fitting snugly inside the gallery whilst doing so to ensure the gallery stayed clear and unblocked, but that I could press the knead it firmly onto where it should go.
Using a small screwdriver, I pushed down on the edges to give a good bond, but not to disturb its shape or have it come away from the area being bonded. So press it on, 4 presses to ensure its right well before it began to harden, then leave it alone.
Waited 3 hrs for it to cure fully, (says 1 hr cure time), then got out the Jb Weld. At this point, it looked really good.
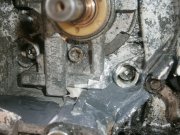
I used some reflective foil tape used for sarking/ blanket under roofing iron to act as dams around the edge of the oil pump outlet, and on one of the case bolt holes, and ensuring all was clean and ready started with the JB Weld.
Mixed it with paddle pop sticks for quite some time to ensure a proper combining of the 2 parts, and then with the saw dogs down, and a lean to its flywheel side, I allowed the collected liquid metal to droop down and onto the spot needing filling and allowed it to fill the area, some gentle pokes with the small screwdriver to help it flow to the edges of the area I wanted covered, and then it was rechecked for the correct angle/ level, and left.
I rechecked several times, first few times within a few minutes to make sure nothing was flowing the wrong way, and the dams held, and then it was left to cure.
So its in the correct spot, nothing seems to have moved where it shouldnt be, the oil gallery is not blocked, and I am letting it set and cure for a good few days before disturbing the saw for further work.
So far it looks good, and I am pleased with the process so far, had a tiny bit left over, so applied that to some of the other pitting to make the area smooth.
I want to say Thank you to all who have offered advice,its the first time I have used JB Weld, so it was very helpful to know what to expect, and plan accordingly, and what to use for cleaning etc.
Hopefuly this is a permanent repair, as replacement cases are not an option at this stage.
T


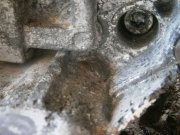
 lol what you are seeing is finger prints and yes there are cracks but those are because I was attempting to smooth out and press the finish with my finger but it had already started to skin and all I did was crack off a section of that skin and it moved and left "crack" marks. The stuff starts to dry pretty quick so I didn't have much time to pretty it up. Well that and I wasn't worried too much about looks. I just wanted to make sure it was really stuck to the layer under it. If that makes sense.


