Maybe the inlet needle lever is not set correctly or you have the pump diaphragm and gasket reversed.
You are using an out of date browser. It may not display this or other websites correctly.
You should upgrade or use an alternative browser.
You should upgrade or use an alternative browser.
Roper 3.7 tear down and rebuild
- Thread starter Opihi59
- Start date


Help Support Arborist Forum:
This site may earn a commission from merchant affiliate
links, including eBay, Amazon, and others.
Opihi59
ArboristSite Operative
Maybe the inlet needle lever is not set correctly or you have the pump diaphragm and gasket reversed.
I checked to make sure the diaphragm was seated in the slot in the inlet needle lever on the first go round, and on subsequent takedowns. I had pulled out the needle to make sure it was clean without gunk, it was good. On that side of the carb, I put it just the way it was on disassembly, and it matched comparisons I made online. I have it this way on the inlet needle side: Carb body, gasket, diaphragm, cover. On the other side it is: carb body, diaphragm (flap valves) , gasket, cover.
I am sure I have something not quite right, just can't figure it out, and anyone else on the forum would have it going by now. I feel it is a carb problem but I'm not experienced enough to figure it out. I pulled the whole saw apart down to the basic individual components to make sure I hadn't missed something obvious. I know it is likely simple, I just can't seem to get it together.
The problem I have on these carbs it I alwayd end up bending that inlet needle lever when I pull the old diapharm off, but that usually bends them up and causes a flooding issue. If your lever happens to be set to low it would cause the problem you describe. I can never remember if the gasket goes on top or under the pump diapharm, can not tell you how many carbs I have had to pull back off to switch them. Another place to check is the plastic spacer between the carb and flange for cracks, that spacer should also have a gasket on each side.
Opihi59
ArboristSite Operative
I've got the spacer, it isn't cracked and has itself appropriately sandwiched between 2 gaskets. I skimmed around the gasket/carb body interface with a razor blade to make sure when I pulled it free, I wouldn't bend the inlet needle lever. Since it isn't feeding gas, I don't know whether to pull it and bend the lever down some, or bend it up some just to see if it makes a diff.
Maybe I'll pull it and bend it up some. On that side of the carb, I call it the pump side, the gasket goes against the carb body first, then the diaphragm goes on, then the cover goes on. I'm sure of that part. It's the opposite sequence on the other side of the carb.
Isn't it?????
I don't think I can pull this apart again this weekend, it's let it sit time. I am in the market for a new tank though for this saw--meaning left and right case halves for it. I'm watching ebay for that.
On another note though, on my other Roper non-runner, I replaced the pump side D and G with the old one I pulled out of my Dad's saw, cleaned it out briefly, then thrdew it on the .XXX770 and the bugger ran great........I do have a proper full rebuild kit coming for that saw, but I did get a little success on the Roper side of the pile today, just not my .XXX750 I really want to hear run great again.
That XXX770 is waiting its turn for a new pair of crank seals, carb stuff and then toss chips.
Eccentric
Mister Wizard
I've got the spacer, it isn't cracked and has itself appropriately sandwiched between 2 gaskets. I skimmed around the gasket/carb body interface with a razor blade to make sure when I pulled it free, I wouldn't bend the inlet needle lever. Since it isn't feeding gas, I don't know whether to pull it and bend the lever down some, or bend it up some just to see if it makes a diff.
Maybe I'll pull it and bend it up some. On that side of the carb, I call it the pump side, the gasket goes against the carb body first, then the diaphragm goes on, then the cover goes on. I'm sure of that part. It's the opposite sequence on the other side of the carb.
Isn't it?????
I don't think I can pull this apart again this weekend, it's let it sit time. I am in the market for a new tank though for this saw--meaning left and right case halves for it. I'm watching ebay for that.
On another note though, on my other Roper non-runner, I replaced the pump side D and G with the old one I pulled out of my Dad's saw, cleaned it out briefly, then thrdew it on the .XXX770 and the bugger ran great........I do have a proper full rebuild kit coming for that saw, but I did get a little success on the Roper side of the pile today, just not my .XXX750 I really want to hear run great again.
That XXX770 is waiting its turn for a new pair of crank seals, carb stuff and then toss chips.
The side of the carb with the metering lever is called the metering side. You're correct in that the gasket goes on first, then the diaphragm. When making adjustments to the lever, DO NOT pull the lever so it mashes the needle against the seat (I've seen it happen). You can damage the needle and/or seat, and this will make it flood and run crappy. I find it interesting that Tillotson tells you to just pry against the lever to adjust it. Not the best practice in my experience....
To adjust (bend) the lever, the best (meaning safest and most accurate in my opinion) way is to remove the pivit pin and lever and bend it when it's NOT in the carb. Trial and error. It's a bit of a PITA, but it's worth the trouble. Also, adjusting the lever so it sits higher (farther away from the carb body) when the needle is seated will make the saw run richer. Adjusting the lever so it sits lower will make the saw run leaner.
The other side of the carb (with the 'flapper valves') is the pump side. The diaphragm goes on the carb body first, then the gasket, then the cover.
Edit:
Have you downloaded and read the Tillotson service info? If not, click the links below and have at it. On some HS carbs, the metering lever has forks on BOTH ends. One end fits around the end of the needle, and the other fits into a groove on the 'tit' in the center of the metering diaphragm. The side of the metering diaphragm with the 'plate' on it goes towards the carb body by the way. On other HS carbs, there is only a fork on the end that attaches to the needle, while the other end just rests against the metering diaphragm 'tit'. If you have the 2-fork type lever, be sure you fit the end of the lever into that groove on the diaphragm 'tit'. I just like typing that I guess....
http://www.tillotson.ie/docs/techinfo_HS_US.pdf
http://www.tillotson.ie/docs/HSPartsList.pdf
http://www.tillotson.ie/techinfo-downloads.php
Last edited:
Opihi59
ArboristSite Operative
Thanks Eccentric
I had found the Tillotson site and read thru their color schematics which actually taught me a lot. What I can't seem to remember without continually referencing the site is the proper nomenclature all the time. They have a ton of information on there that has been useful, as well as which diaphragm and gasket kit goes to which carb(s).
I am going to go back thru that site, as well as make sure I take the time to pore thru the links you posted up for my benefit, but I have just got to set this saw aside for next weekend to roll around. Numerous people here on this site have made very generous efforts in helping me by making entries into this thread, as well as sending me parts from their personal collections. I am certain I can get this thing going, also quite certain that there are people on this forum who could have this saw screaming in about 20 minutes. I just gotta let it sit until next weekend and dig into it again.
On this carb model, the diaphragm does have a nipple on it that slots into the forked end of the metering lever. I was extremely careful in separating the gasket/diaphragm from the carb body with a razor blade to make certain that if it did have this type configuration, I wouldn't bend the metering lever by peeling off the diaphragm blindly and damaging that lever. Turned out I was grateful for that caution, and I slipped it out without damage--at least as best as I can tell. I did pull the lever/"axle"/spring/needle combo, cleaned out that orifice, checked the needle tip which showed no evidence of damage or wear, and put that back together before the new D/G went on.
So my plan will be to pull all that apart again next weekend and start adjusting that metering lever by bending it OUT sequentially in tiny increments. This is an easy task even though it is down in the air box and tedious to remove/replace the carb unit, but I want a fresh start.
I have to discover where the pulse orifice is that drives this thing and make sure it's not covered as well. Back when I joined this forum, I had only been inside a lawnmower carb a few times, and what I have learned so far from AS has put me many orders of magnitude beyond that. Thanks guys, for all your help in teaching me.
Opihi59
ArboristSite Operative
It runs...............
The more I passed by my makeshift saw workbench, to mess with the Jeep, the worse I felt about that Saw languishing out there.
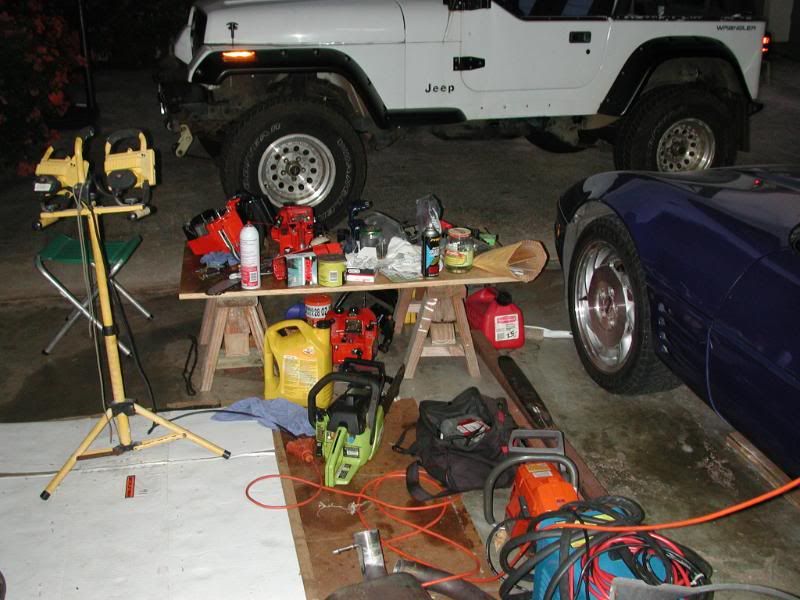
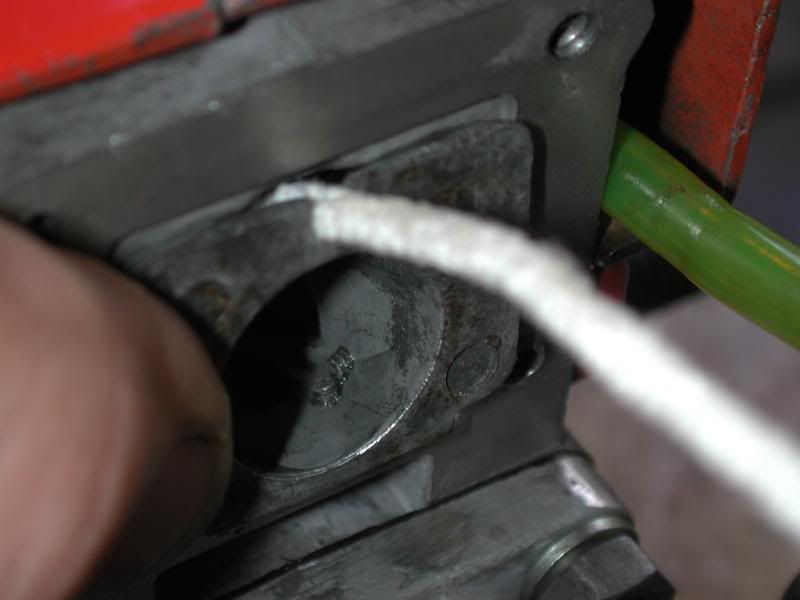
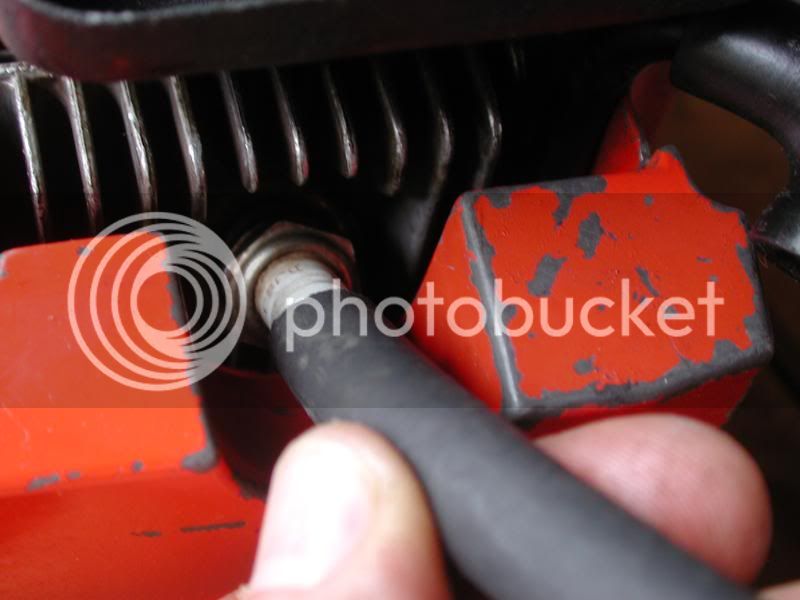
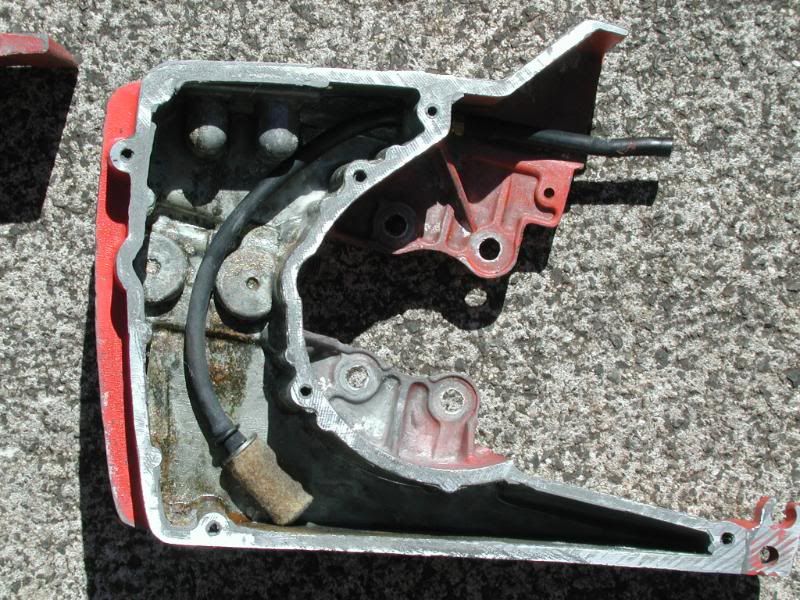
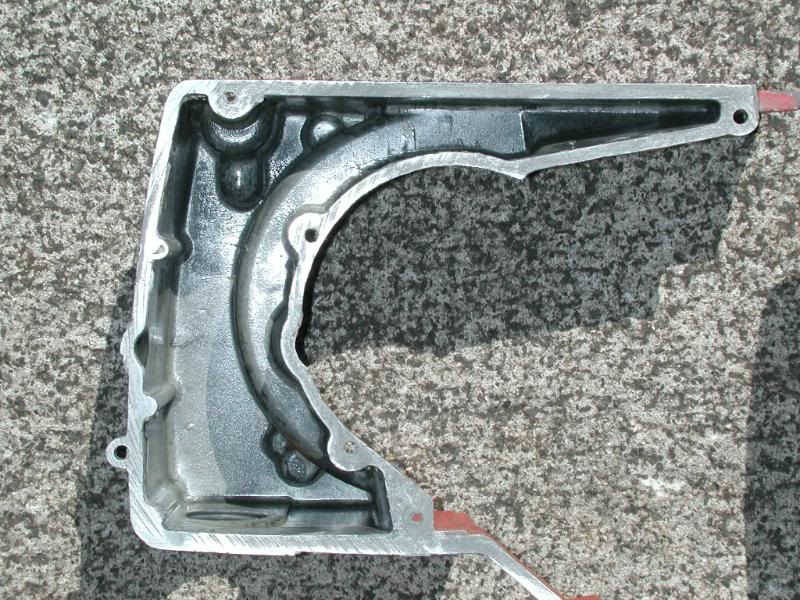
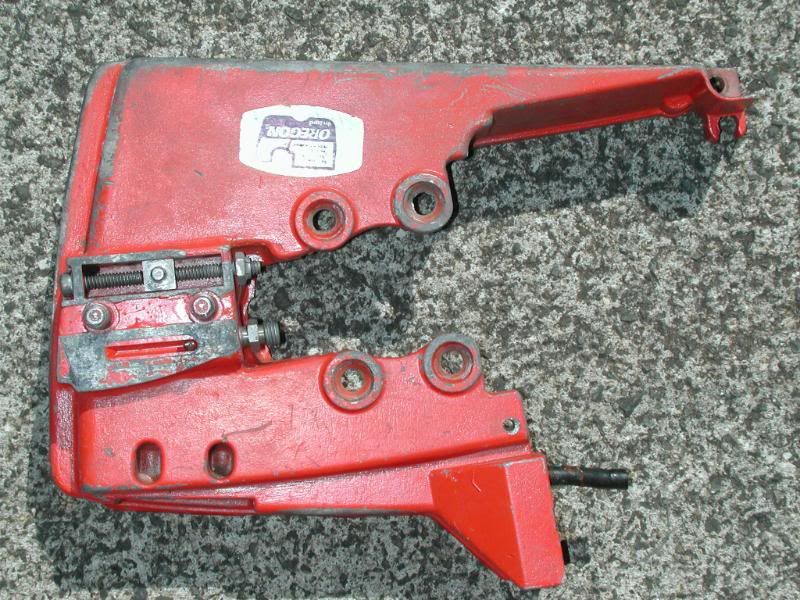
After a bit I was starting to twitch, and wasn't concentrating on other things I was working on, so went back to the saw. Do I have a problem here?? Anyway, it runs now. The problem indeed was the impulse "circuit" but not inside the carb. I had made a cork gasket to replace a decomposed original cork gasket, and had not understood the function of the impulse, and didn't make a hole for it. So, here are some photos.
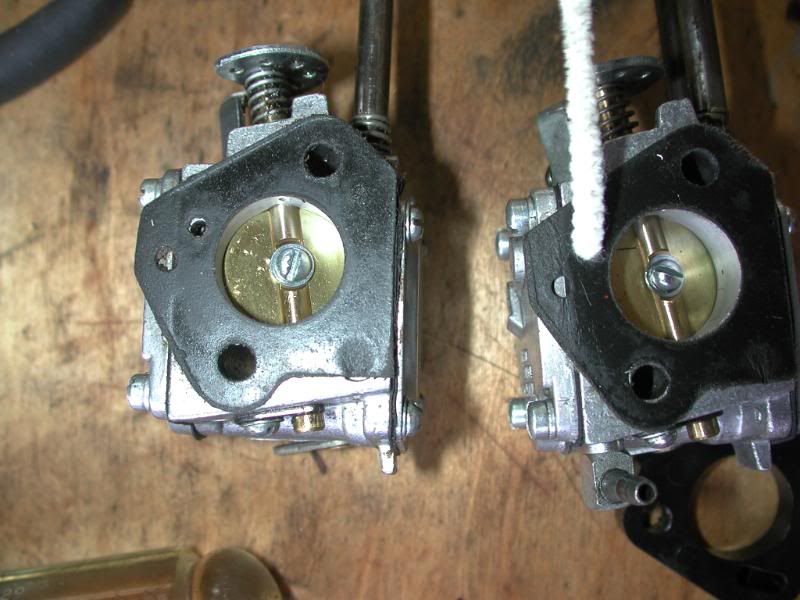
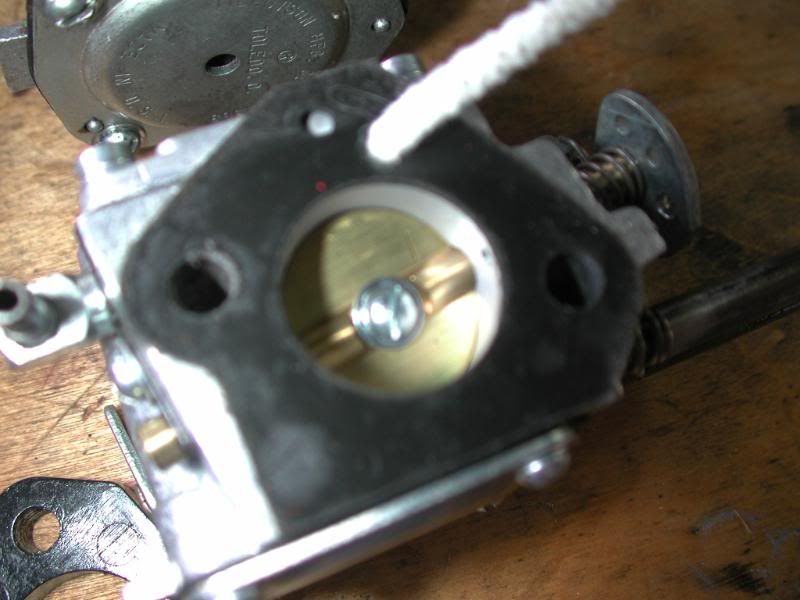
This is the carb I am putting in, the HS 79A, you can see the pipe cleaner thru the impulse hole. Beside it is the original carb with the hole in the same place, just for comparison. And another shot of the same, just closer.
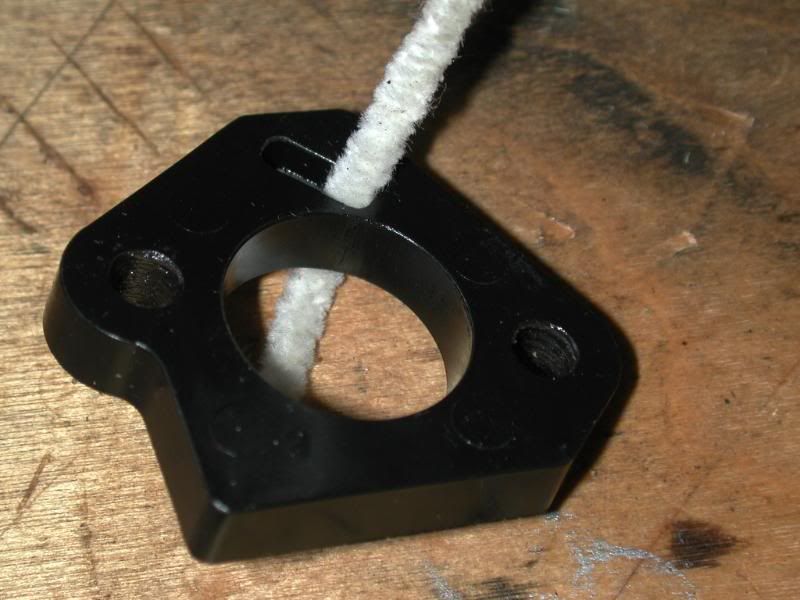
Carb spacer next with the pipe cleaner in the impulse hole.
Air box of the saw, leading into the intake/reed valve system, with the pipe cleaner guess where???
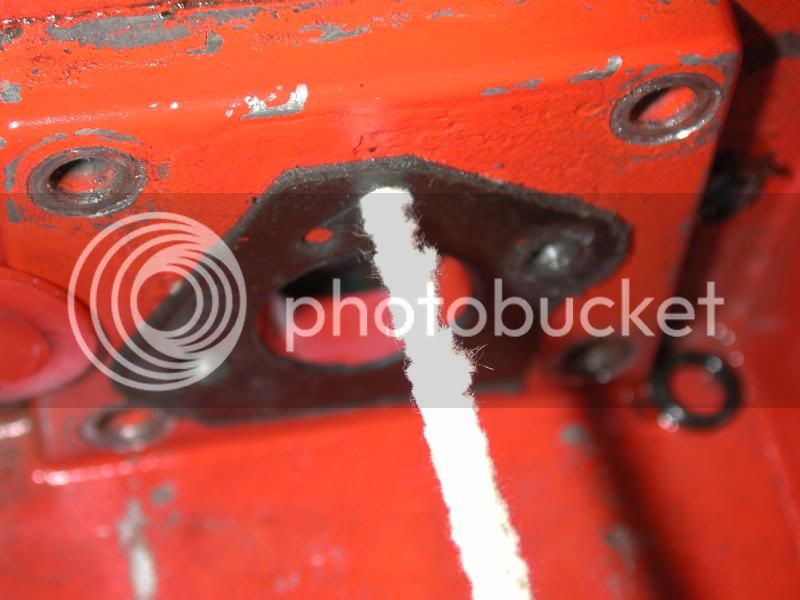
And this is on the back side of the air box at the cork gasket between the airbox and the reed valve system thingey. I suppose you notice that you don't see the pipe cleaner coming thru anywhere.................
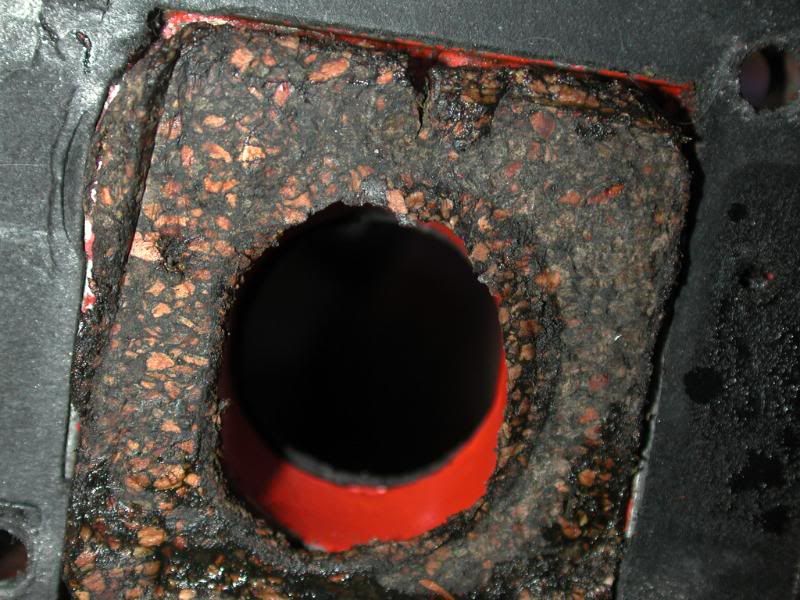
And of course here is the impulse hole in the top of the reed valve assembly.
So of course I made a new cork gasket and put a hole there in the right spot, and put it all back together. It runs. I tried to tune it up some, but it doesn't seem to run real powerfully at high RPM, seems to cut out some. I'm not sure about how much power it is producing, won't know that until I put the bar/chain back on it and throw chips. Maybe next weekend instead of working on getting it to run, now I can take the pile out and see how they perform on chopping up all those Haw'n Ironwoods I felled. I hope to cut them into firewood sized chunks so I can split later for Camp fires up there.
Going to a new page, as I don't want to hit the photo limiter.
The more I passed by my makeshift saw workbench, to mess with the Jeep, the worse I felt about that Saw languishing out there.
After a bit I was starting to twitch, and wasn't concentrating on other things I was working on, so went back to the saw. Do I have a problem here?? Anyway, it runs now. The problem indeed was the impulse "circuit" but not inside the carb. I had made a cork gasket to replace a decomposed original cork gasket, and had not understood the function of the impulse, and didn't make a hole for it. So, here are some photos.
This is the carb I am putting in, the HS 79A, you can see the pipe cleaner thru the impulse hole. Beside it is the original carb with the hole in the same place, just for comparison. And another shot of the same, just closer.
Carb spacer next with the pipe cleaner in the impulse hole.
Air box of the saw, leading into the intake/reed valve system, with the pipe cleaner guess where???
And this is on the back side of the air box at the cork gasket between the airbox and the reed valve system thingey. I suppose you notice that you don't see the pipe cleaner coming thru anywhere.................
And of course here is the impulse hole in the top of the reed valve assembly.
So of course I made a new cork gasket and put a hole there in the right spot, and put it all back together. It runs. I tried to tune it up some, but it doesn't seem to run real powerfully at high RPM, seems to cut out some. I'm not sure about how much power it is producing, won't know that until I put the bar/chain back on it and throw chips. Maybe next weekend instead of working on getting it to run, now I can take the pile out and see how they perform on chopping up all those Haw'n Ironwoods I felled. I hope to cut them into firewood sized chunks so I can split later for Camp fires up there.
Going to a new page, as I don't want to hit the photo limiter.
Opihi59
ArboristSite Operative
So here it is as it now sits, and waits for me to do the next thing to it.
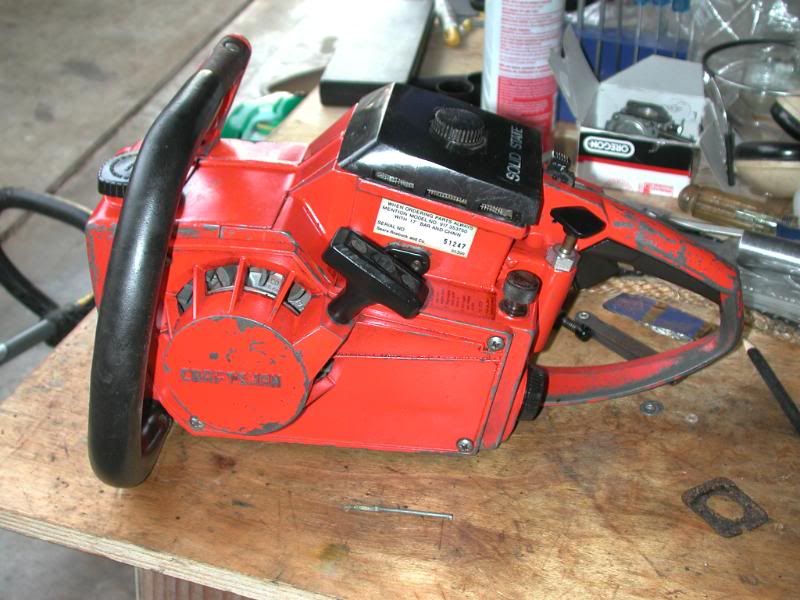
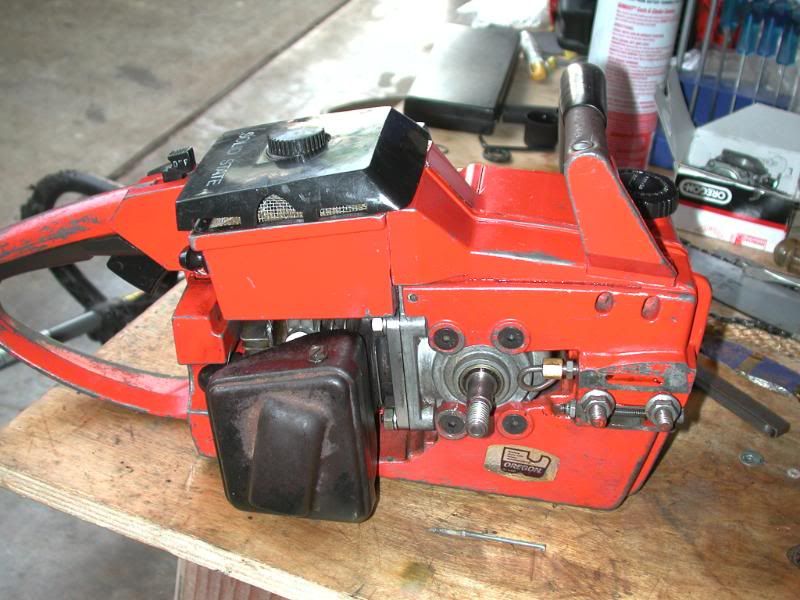
It's a pretty sleek saw for a 3.7, I really like this series and will likely be looking for at least another of this line.
So since I am such a bonehead and didn't know to make a hole for the impulse in the gasket I made, I at least have to share a small trick I use on just about all engines I work on. It is difficult sometimes to get spark plugs to go into the right hole, and frequently the only thing you can barely grab is the tip. You don't really want to try starting the threads in with a socket, as you can't feel if you're cross threading, so I get a length of rubber hose of the appropriate size, mount the sparkplug in that........
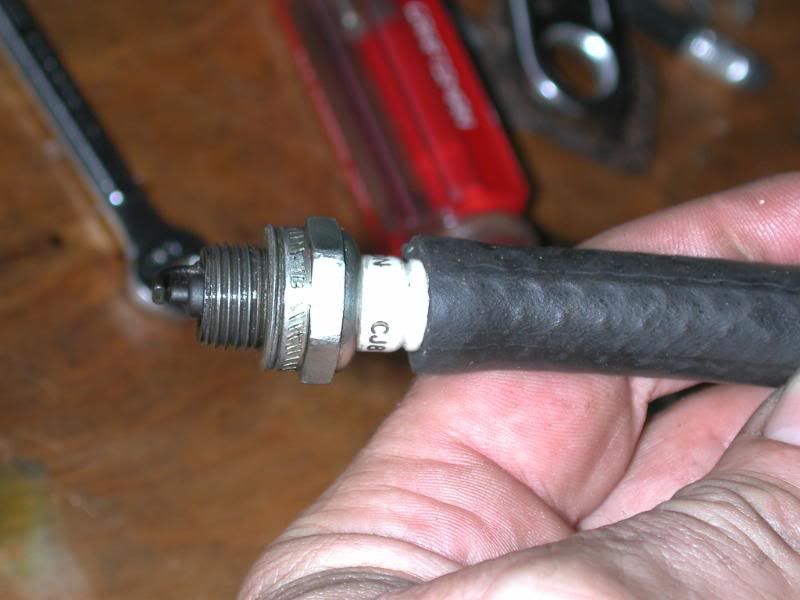
And screw it in that way and run it up "finger tight" before putting a socket on it.
So the truth of the matter is I was unable to put aside the project, even though I was frustrated with it from yesterday, I just couldn't put it down. All my neighbors of course knew right away of my success, so I figure you deserve to as well. I feel considerably better, and feel I can work on tuning a running saw, but I can't really do diddly with a non runner. I don't have a problem here, I can quit any time I want.
It's a pretty sleek saw for a 3.7, I really like this series and will likely be looking for at least another of this line.
So since I am such a bonehead and didn't know to make a hole for the impulse in the gasket I made, I at least have to share a small trick I use on just about all engines I work on. It is difficult sometimes to get spark plugs to go into the right hole, and frequently the only thing you can barely grab is the tip. You don't really want to try starting the threads in with a socket, as you can't feel if you're cross threading, so I get a length of rubber hose of the appropriate size, mount the sparkplug in that........
And screw it in that way and run it up "finger tight" before putting a socket on it.
So the truth of the matter is I was unable to put aside the project, even though I was frustrated with it from yesterday, I just couldn't put it down. All my neighbors of course knew right away of my success, so I figure you deserve to as well. I feel considerably better, and feel I can work on tuning a running saw, but I can't really do diddly with a non runner. I don't have a problem here, I can quit any time I want.
Opihi59
ArboristSite Operative
Koi pond
At any rate, bouyed somewhat by my small triumph over despair, I worked on the Koi pond some, cleaned 3 of the 5 filter systems on it, and here are some totally OFF TOPIC photos of them. I have to take some more as they line up when I feed them like pigs at a trough and breach themselves half-way out of the water doing it. My boys (25, 18, 16) knew I wanted a koi pond, so during one of my 4 tours in Iraq they set one up for me, dug out 8 tons of soil, put in filter system adequate for a family sized swimming pool ($5K), put in some small Koi and now 3 yrs later they are real big. Almost 5 feet deep, I've gone snorkeling in it before to work on the bottom drain when stuff got stuck in it. Pond has a waterfall, etc.


At any rate, bouyed somewhat by my small triumph over despair, I worked on the Koi pond some, cleaned 3 of the 5 filter systems on it, and here are some totally OFF TOPIC photos of them. I have to take some more as they line up when I feed them like pigs at a trough and breach themselves half-way out of the water doing it. My boys (25, 18, 16) knew I wanted a koi pond, so during one of my 4 tours in Iraq they set one up for me, dug out 8 tons of soil, put in filter system adequate for a family sized swimming pool ($5K), put in some small Koi and now 3 yrs later they are real big. Almost 5 feet deep, I've gone snorkeling in it before to work on the bottom drain when stuff got stuck in it. Pond has a waterfall, etc.
Eccentric
Mister Wizard
Looks fantastic. It's your thread, put whatever pics you want in it!
Check carefully the impulse passage from the crankcase to the carb.. Flange gaskets that come with generic repair kits are sometimes off on the hole for the passage.
I had something similar with my first Rem. 75A. The impulse hole was off by an hour (clockwise) or two.
Sigh, you insist on making the same newbie mistakes that I (and many others) have made.
I have to admit I didn't have hardly a clue how a diaphram carb. worked in the beginning.
B.T.W. My S.I.L. (aka Dumbo) has acquired a Jeep.
I shudder when my grandchildren have to ride in it.
Wifey has a tiny goldfish pond in our back yard but so far the ones from the bait shop don't last very long between the heat of summer and the raccoons.
Last edited:
Chris J.
Addicted to ArboristSite
Great Koi pond! We had a friend would kill (probably literally) to have that pond.
Perhaps I'm nitpicky and/or FOS, but I wouldn't use a pipe cleaner in a carb, the pipe cleaner might 'shed' in the carb.
Perhaps I'm nitpicky and/or FOS, but I wouldn't use a pipe cleaner in a carb, the pipe cleaner might 'shed' in the carb.
Opihi59
ArboristSite Operative
Sigh, you insist on making the same newbie mistakes that I (and many others) have made.
I have to admit I didn't have hardly a clue how a diaphram carb. worked in the beginning.
B.T.W. My S.I.L. (aka Dumbo) has acquired a Jeep.
I shudder when my grandchildren have to ride in it.
Wifey has a tiny goldfish pond in our back yard but so far the ones from the bait shop don't last very long between the heat of summer and the raccoons.
Yup, and the reason I felt compelled to check the impulse circuit was that you had mentioned it, and all I could think was "Huh?" So figured I'd better learn more about that since I was really convinced the problem wasn't the way I put in the D/G kit. Judgment comes from experience, and experience comes from bad judgment. I think I'm learning, and hopefully can pass stuff along to
AS. I post up my successes, as well as my numerous failures and the thinking process involved, so hope that it's helpful to someone. I depend on input from experienced sages and mentors such as yourself to get this thing going right.
I wouldn't worry too much about Jeeps. The YJ and TJ series are just about 6" wider stance than the CJ line, so unless it's a hyper modified Jeep, tipping over won't be an issue. Remember that these Jeeps have full frames, and a built in roll bar. There aren't too many vehicles as sturdy as that on the road nowadays. I've pulled my YJ apart down to the basics, rebuilt everything and put it back together and really like it. I feel fine when my boys are driving either it or the TJ Rubicon. Great visibility, etc. However you need to know how to work on stuff if you own an older Jeep. Tons of stuff to fix. Just Expect Every Problem. Jeepforum.com is a really helpful place, full of mature knowledgeable and experienced members just like AS.
Glad to hear you got that saw going and the carb worked out for ya. Good job on the saw and it is looking great.
Opihi59
ArboristSite Operative
Drive sprockets
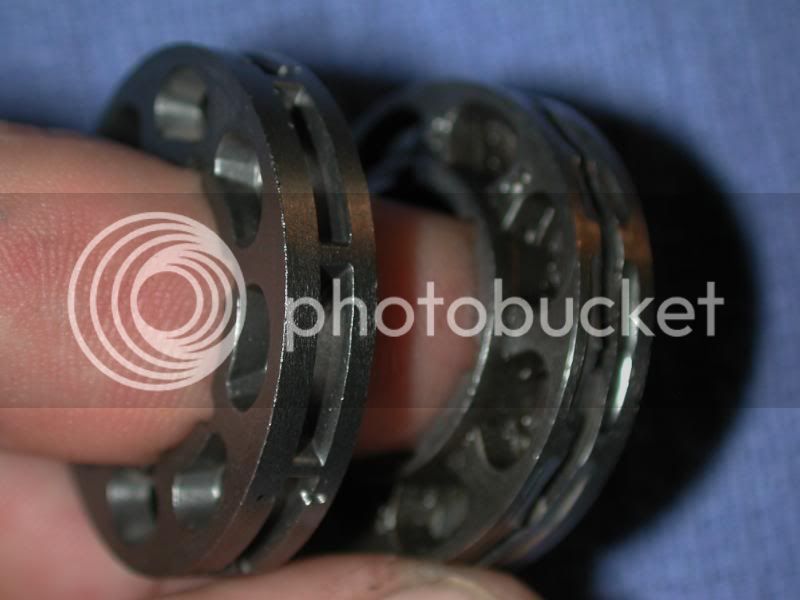
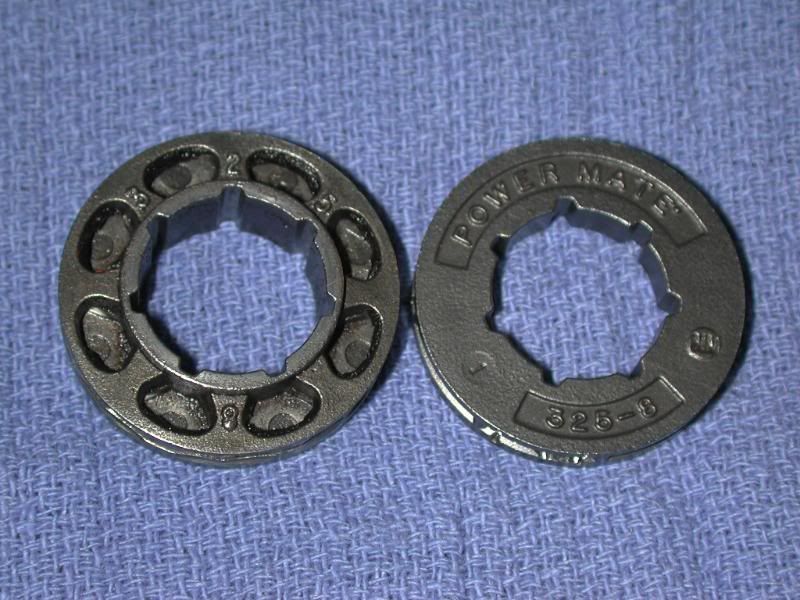
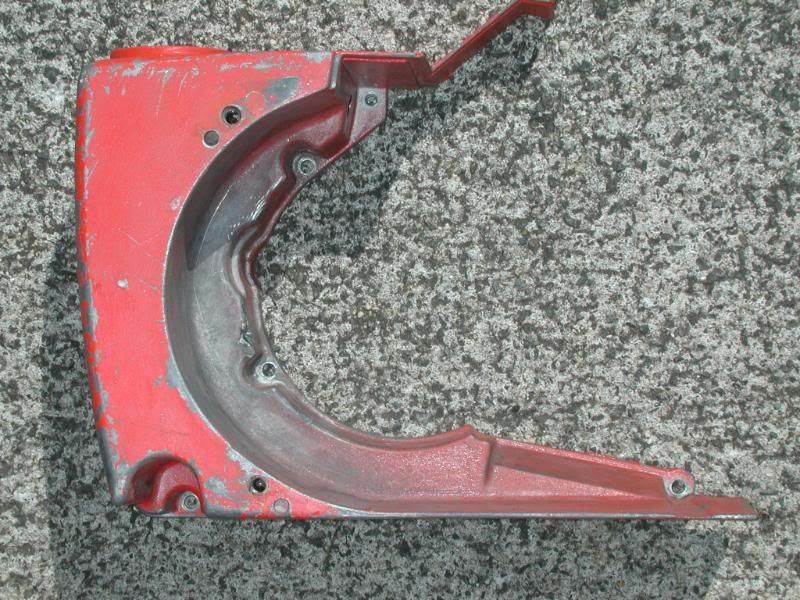
The drive sprockets I ran down arrived, it had been cost-prohibitive to have them mailed out to me directly from the source, but I had them sent to my sister in KY, who then put them in a small USPS envelope and shuttled them on to me. Resultant cost savings of over 60% from what they wanted to mail direct to me via Brown Santa, and that was the only way they'd send it. So the new one is hubbed onto my finger, with the old one at the finger tip. They are identical part numbers, but you can see that the thicker spacer bosses present on the old one are not on the new one.

Once I get this saw tuned up a bit to the point I am ready to reinstall the bar/chain, I'll see how much play there is between the case and the back of the clutch assembly and decide if I need to place a pair of soft spacer washers to limit the back and forth play, like maybe brass ones, or if I should put some non hardened steel spacer washers on there and just spot-weld them with the Mig to the spacer. I know a certain amount of play is there to allow for centering the drive sprocket with the bar/chain, but that seems like it would be way too much play in the new one as compared to the old one, and that is without doing a trial assembly. I may feel it is fine but won't know til I get back into the build. I can't do anything else on this project this weekend as I am awaiting parts to arrive on the slow boat.
The original one though sure was badly worn.
The drive sprockets I ran down arrived, it had been cost-prohibitive to have them mailed out to me directly from the source, but I had them sent to my sister in KY, who then put them in a small USPS envelope and shuttled them on to me. Resultant cost savings of over 60% from what they wanted to mail direct to me via Brown Santa, and that was the only way they'd send it. So the new one is hubbed onto my finger, with the old one at the finger tip. They are identical part numbers, but you can see that the thicker spacer bosses present on the old one are not on the new one.
Once I get this saw tuned up a bit to the point I am ready to reinstall the bar/chain, I'll see how much play there is between the case and the back of the clutch assembly and decide if I need to place a pair of soft spacer washers to limit the back and forth play, like maybe brass ones, or if I should put some non hardened steel spacer washers on there and just spot-weld them with the Mig to the spacer. I know a certain amount of play is there to allow for centering the drive sprocket with the bar/chain, but that seems like it would be way too much play in the new one as compared to the old one, and that is without doing a trial assembly. I may feel it is fine but won't know til I get back into the build. I can't do anything else on this project this weekend as I am awaiting parts to arrive on the slow boat.
The original one though sure was badly worn.
No spacers needed on that rim sprocket. The large amount of endplay won't harm anything.
What you do need is a large diameter (fender) washer on the crankshaft against the sprocket (rim or spur) to keep the chain from jaming against the crankcase should it get too loose and jump ship.
Another J.E.E.P...................... Just Empty Every Pocket!
What you do need is a large diameter (fender) washer on the crankshaft against the sprocket (rim or spur) to keep the chain from jaming against the crankcase should it get too loose and jump ship.
Another J.E.E.P...................... Just Empty Every Pocket!
Opihi59
ArboristSite Operative
Runner!!!!
So I used the saw this weekend, had to stump out a few from the previous felling and clearing Boy Scout Project at Camp Hawkins. It ran fine, pulled the 18" bar/chain combo very well, and threw a ton of chips. Oiler works well, recall this is the manual one you squoosh out the lube with your thumb.
So of course now is the time to thank all the contributors via parts and advice that came my way, shout out to all of you experts who helped make this happen. My well-into-his-80's father who bought this new back in the 70's can get to hear it run again when he makes a trip to the islands in May '12 if he comes with the rest of the family.
I am sure I'll add in more stuff as I find other photos, and I'm actually looking for at least another Roper 3.7 of this ilk, they pop up on ebay from time to time as runners or carcasses and it'd be nice to have another one to re-do.
Note to self--update your sig line as there are THREE runners now.
Cheers!!
OldRoper
New Member
A sight for sore eyes.
Happy 2012 to you in the warm country!
I must say my eyes lit up when I saw your 917.353750 fuel tank in 2 pieces.
My SN 49017 (origional owner) tank has been weeping from the bottom seam for more than a few years now but now with the price of fuel it and I are both crying.
I was about to go down the path of sealing the inside with a tank sealer product until it saw this post. Now I'm thinking of separating the halves and using the YAMABOND 6B, but on close observation it almost looks like the seam is welded!! Did you have much trouble separating the halves after all the mechanical connections were removed?
Your detailed tear down data is just what I needed to point me in this direction. Thanks for your great contribution.
This saw still runs like a charm after 40ish years except for its current fuel consumption.
Tank case halves cleaned up
Sealed back together with this stuff, and you're right, it isn't cheap out here in the Sandwich Isles either.
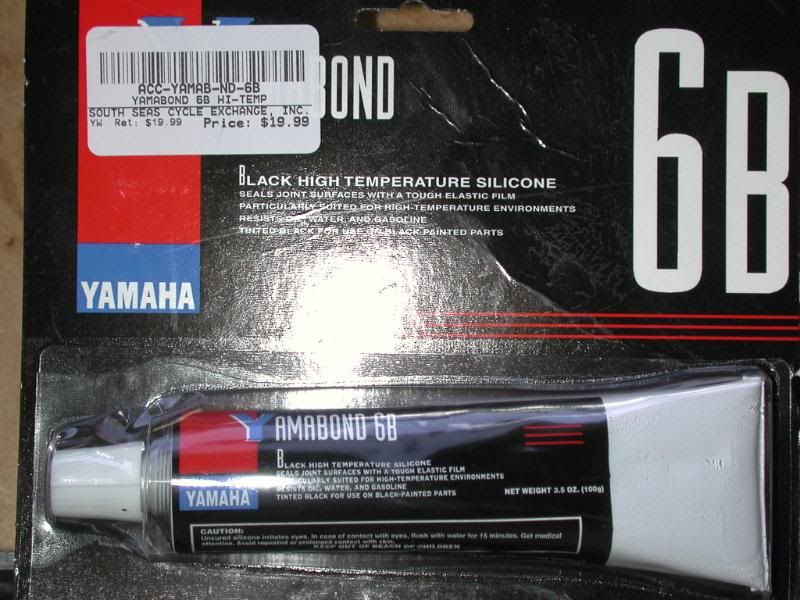
I have some other photos still on the cam, but have a parts motor coming pretty soon that I need. So depending on when parts arrive and when I get a chance to work on this I'll keep posting in the progress. I put a dab of the Yamabond stuff on that damaged area on the flywheel side of the casehalf since I just missed a deal on a parts case on ebay. I figure it should work for however long until perhaps another comes available, but I'm not too awful worried about it. It did have a minor gas leak here it turned out.
Opihi59
ArboristSite Operative
Happy 2012 to you in the warm country!
I must say my eyes lit up when I saw your 917.353750 fuel tank in 2 pieces.
My SN 49017 (origional owner) tank has been weeping from the bottom seam for more than a few years now but now with the price of fuel it and I are both crying.
I was about to go down the path of sealing the inside with a tank sealer product until it saw this post. Now I'm thinking of separating the halves and using the YAMABOND 6B, but on close observation it almost looks like the seam is welded!! Did you have much trouble separating the halves after all the mechanical connections were removed?
Your detailed tear down data is just what I needed to point me in this direction. Thanks for your great contribution.
This saw still runs like a charm after 40ish years except for its current fuel consumption.
Lots of info sent in PM, but I had said those case screws were Phillips head, not so--they are slotted but I'm sure you already saw that. Let me know how the rebuild goes. While you have it down, you could consider replacing rings and the crank seals, but if it still has good compression, just run with what you got and fix the tank. You don't have to break down the motor per Se to get it out of the saw, you can just do the case halfs and put it all back together.
Roper/first post rep coming your way.
Opihi59
ArboristSite Operative
'Nother one
Today USPS dropped off another Roper 3.7 on my doorstep. I now have another project saw to tear into and rebuild and am looking forward to this process since it is another saw of this same product line and now I am an "expert." (Ha, I'm only kidding myself) I need to locate some parts for it so will be cruising feebay etc. These are really nice saws.
On another note, it is really getting ****** cold out here. It was only about 60 this AM for my drive in to work in my doorless/sideless/topless Jeep, I musta had serious snotsicles hanging off my nose by the time I pulled into the parking lot. Only got up to 82 this afternoon as well. I may have to wear shoes now, maybe long pants too for a while. Perhaps something is just wrong with my heater in that Jeep. I'm going to have to go hang out at the beach at Waimea or Waikiki this weekend to recover.