zogger
Tree Freak
I am still intrigued by the idea of a tool like the "jaws of life" for field splitting. Man portable powered wedge..thing...


 Al
AlI just use s 3-lb sledge, but one of those body shop rubber hammers or a dead blow might work even better. Next time I'm at the tool shop I may pick one up. I've never found anything much harder than oak, so I use that. Elm might work well also. These wedges tend to be sacrificial lambs that don't cost much. I get scrap cutoffs of oak from the sawmill for almost nothing. Occasionally I tune up their saws in return.What do you hit them with Doc? Guessing a big faced hammer. I could do well with them while bucking because I use a big, plastic, deadblow Snap-on hammer. Perfect and cost effective for a guy with a good saw and jig or had a friend so equipped.
Just wondering, have you experimented with more split resistant wood like elm or gum, maybe not necessary, just asking?
I am still intrigued by the idea of a tool like the "jaws of life" for field splitting. Man portable powered wedge..thing...
I've since been asked to post a safe way to cut these wedges on a table saw from a wide blank. Here's the jig I made to do it:Wooden wedges are very useful. I use them when splitting wood like elm or sweetgum. I start with a metal wedge and use the wooden wedge to get the metal one out if it gets stuck. Then I can go back with the maul to finish the split without worrying about hitting a metal wedge. Also I can make a wooden wedge to whatever size I want and big ones can sometimes be helpful to finish splitting tenacious wood.
I've cut a few out of dogwood when it is green and let them harden before use. I chamfer the top and they last a lot longer than I would have ever expected.

That's another option. Sleds unfortunately force a higher blade setting and my wedge blanks are often over 2" thick. I've also experimented with duct tape to hold the blank to the triangle jig. Then when I'm through cutting wedges, I remove what's left of the tape. The tape really holds the blank tight to the triangle--even better than my vulnerable fingers can.If you do this a lot, you might want to make dedicated 'sleds' set up at those angles. I knew a guy who made pointed stakes for land surveyors, etc., and he could rip through those like nobody's business, while still keeping his hands clear, and without every having to worry if he set something correctly.
Philbert.
That is very helpful, thank you!I've since been asked to post a safe way to cut these wedges on a table saw from a wide blank. Here's the jig I made to do it:
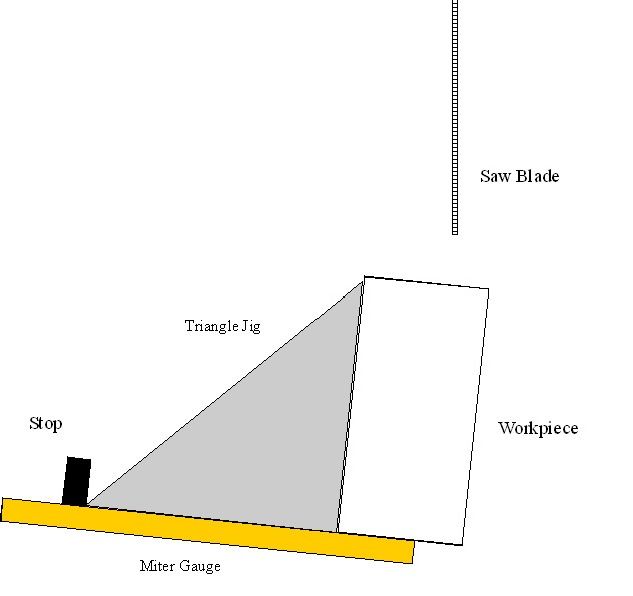
The first cut is made with the miter at 7 degrees. The next cut is made at zero degrees after sliding the stop to the right. The third is back to seven degrees, and so on until the blank is too narrow. You might get one last wedge out with a simple rip cut using the saw's fence. I've found that seven degrees is about optimal, but you may want to try eight or nine. I leave about 1/8" on the sharp end and then sharpen that further with a disk sander for more of a chisel edge.
Using that jig why not just use the fence for the second and 4th piece etc.? It is easy to adjust properly and means only half as many adjustments of the jig's stop on the miter guage.I've since been asked to post a safe way to cut these wedges on a table saw from a wide blank. Here's the jig I made to do it:
The first cut is made with the miter at 7 degrees. The next cut is made at zero degrees after sliding the stop to the right. The third is back to seven degrees, and so on until the blank is too narrow. You might get one last wedge out with a simple rip cut using the saw's fence. I've found that seven degrees is about optimal, but you may want to try eight or nine. I leave about 1/8" on the sharp end and then sharpen that further with a disk sander for more of a chisel edge.
I have done it that way also. You will then need a narrow push stick.Using that jig why not just use the fence for the second and 4th piece etc.? It is easy to adjust properly and means only half as many adjustments of the jig's stop on the miter guage.
Not with the TS, but I do sand them sharp. I usually just use a small stationary disk sander with a 7" dia. disk, a 5" disk sander on the drill press, or just a random-orbit sander. No big deal. The idea is to make a sharper edge on the wedge that will drive into a kerf, even if it's closed. Sometimes the kerf is closed rather tightly from a bar pinch that every sawyer hates. The wedge then frees up the bar. Believe me, it works. Most of the time I can then restart the saw and complete the cut with the wedge in place.Do you sand the faces of the wedges after cutting them with the table saw?
Philbert
Remember that once you have an angled cut on one side of the blank, the fence will supply a cut parallel to that. I suppose you could cut the opposite side of the blank that would then be at an angle. When that's done, however, you no longer have a rectangular blank--you have a parallelogram with no right angles at the corners.Using that jig why not just use the fence for the second and 4th piece etc.? It is easy to adjust properly and means only half as many adjustments of the jig's stop on the miter guage.
Take a look (post 34). Crude but perhaps effective:I think that your wedges are very cool. I have a bandsaw and large belt sander, and would probably use those if I tried to make my own. I am pretty happy with plastic wedges, though, if they were not available, I might try to make some wooden ones.
I would be interested if anyone has a simple and efficient way for making wedges in the field, using just a chainsaw, and perhaps an axe? That is a situation I could easy see myself in: maybe having lost a plastic wedge, or needing 'just one more . . . .".
Philbert
Remember that once you have an angled cut on one side of the blank, the fence will supply a cut parallel to that. I suppose you could cut the opposite side of the blank that would then be at an angle. When that's done, however, you no longer have a rectangular blank--you have a parallelogram with no right angles at the corners.
We tried that when I dealt with those big willows recently, but they just turned to mush once you put the sledge to them.I think that your wedges are very cool. I have a bandsaw and large belt sander, and would probably use those if I tried to make my own. I am pretty happy with plastic wedges, though, if they were not available, I might try to make some wooden ones.
I would be interested if anyone has a simple and efficient way for making wedges in the field, using just a chainsaw, and perhaps an axe? That is a situation I could easy see myself in: maybe having lost a plastic wedge, or needing 'just one more . . . .".
Philbert
That's clearer. I thought you were using the fence with a flat side of the blank against it, the typical ripping configuration. You are simply using the fence as a measuring gauge. As such, the blank must be flipped, so that rules out taping it tight to the triangle.When you turn your miter back to 90º you have it aligned it at a right angle to the fence. Flip the main wood piece, the blank, over and adjust the fence to cut at the narrowest point and you now have that piece of wood you are cutting from at the same angle as if you had moved the miter back to 90º but you didn't need to swing the miter or adjust the stop to get there and you won't need to swing it back to 7º either. The straight side of the jig and the fence are parallel when you have the miter set at a right angle if that helps you visualize it. It is in fact a parallelogram but a special case with angles all being right angles.
To really finish off the wedges, when you are all done cutting out wedges set the miter to cut at 3.5º and cut off the blunt ends without a jig to make them easier to drive into a gap by having equal angles to both faces.
I hope that is clearer.
Yeah, I would not expect much from willow. Any special carving tips?We tried that when I dealt with those big willows recently, but they just turned to mush once you put the sledge to them.
Enter your email address to join: