Roper 3.7 tear down and rebuild

Arborist Forum

Help Support Arborist Forum:

This site may earn a commission from merchant affiliate links, including eBay, Amazon, and others.
Slick idea on the decomp fix and the seals look like they should work fine. There were two different mufflers on these saws and I would say that is why your original cylinder had an extra bolt hole.

Here is the other style muffler.
100_2042.jpg
 
Decomp trigger

That is one mighty nice looking compression release trigger you got there........:drool:

I'm ordering some rings now, things seem to take a long time to pull together, even longer when stuff has to come from the mainland and I really only get dedicated time on the weekends to play with this project.

I never got a response from the ebay seller of that trigger ("kill switch"), I have a few other feelers out and we'll see how they turn out.
 
I wish I could mess with saws all day long but I don't think Wal-Mart would understand me running chainsaws in the produce department. I am heading to Butner NC in the morning to be in a chainsaw demonstration with several other members, this is about all the "real work" my saws ever get. Only hauling 15-16 saws with me this time..........
 
Have a safe and successful trip. If you happen to come across a comp trigger see if you can score it for me.........post up a buncha photos of what you encounter at Butner and any AS members you come across having fun cutting up stuff and demo-ing saws.

I just added a Plasma cutter to my garage, and can't wait to come up with a project for it. Strange how what I do for a living interferes with both my drinking time and all the other things I want to do in my garage.

DSCN8139.jpg
 
Last edited:
Have a safe and successful trip. If you happen to come across a comp trigger see if you can score it for me.........post up a buncha photos of what you encounter at Butner and any AS members you come across having fun cutting up stuff and demo-ing saws.

I just added a Plasma cutter to my garage, and can't wait to come up with a project for it. Strange how what I do for a living interferes with both my drinking time and all the other things I want to do in my garage.

Felling/bucking dogs.
 
Bar/Chain ordered

I ordered Bar/Chain, I suppose they will get here eventually on the slow boat. Bar/chain info from technical services/sales Oregon.

Bar-- 180PXBD082
Chain-- 20BPX074G

"The chain for this saw is a 20BPX074G, 180PXBD082 the bar has been discontinued for about 10 years. you may be able to go on line and find one. My suggestion is to take the bar to a saw shop and see if they can match the motor mount to a current mount. Because of the length of the chain (74 drive links) this will not be available in retail stores.
Best Regards,
Alison Heynderickx
Technical Customer Service
Oregon Cutting Systems, Blount Inc. [email protected]>
503.653.4706
800.223.5168 Toll free
503.353.6423 fax"


I also ordered the rings from the Greek, hope these are the right ones as I ordered 4 of them.

Rings-- Piston Ring 46 x 1.5 mm - Motorbike Scooter Go-Kart | eBay

Of course, there will be pictures, results etc, it may take me a while to get back to it since it takes time to get stuff out here, but in the meantime, always glad to hear commentary from AS.
 
Last edited:
I like that idea, will have to figure out where to bolt them on.

Front of fuel tank has the typical rib but you will have to locate and drill two or maybe three holes for #10 screws. Not much room for anything bigger.

If I still had Autocad, I'd spin you out a design.

Losing access to design software and a large machine shop has been the downside of retirement. But, every day is Saturday.:tongue2:
 
Waiting for parts

So it's been a few days with nothing to show for it. The "new" compression release trigger did get here, so I stuffed that in. It works as expected.

Side by side of new and old, old is on left and it is substantially different. I'm not certain, but for some purpose it may have been modified.

DSCN8177.jpg


DSCN8178.jpg


I replaced the crank seals, this is one of the new ones in. They fit, so we can use that part number for these Roper 3.7 series, and likely some others that I don't know of yet.

DSCN8184.jpg


It may be a while before my new rings arrive on the slow boat, along with some other stuff I need to get this back in action, but figured I'd at least put this up so everyone doesn't think I went into hibernation.
 
I suspect the switch was broken at some point and has just worn smooth over the years. Glad to hear the seals worked and I will have to keep up with that number for the future. The rings I ordered from "the Greek" only took 4-5 days to get to VA, so maybe it will not be such a long wait.
 
Like Christmas

I'm certainly hoping something arrives in the mail tomorrow. I have Monday off, that would be perfect to spend some quality time with my Roper, but chances are, the mailbox will be dry tomorrow. The Dragon Lady will likely have me working on the yard or something lame ladat, and the saw will sit on my makeshift work bench (all the other work spaces I use are choked with other projects....) and collect drifting loose cat hair and spiders.

DSCN8169.jpg
 
I've had the same results on rings from the 'Greek'. Always here in five business days.

At least your vet is clean. Mine is filthy and up to his ankles in chainsaws.

Note to self: Buy car cover.
 
Last edited:
That Vette of mine needs a lot more attention than it has been getting lately....

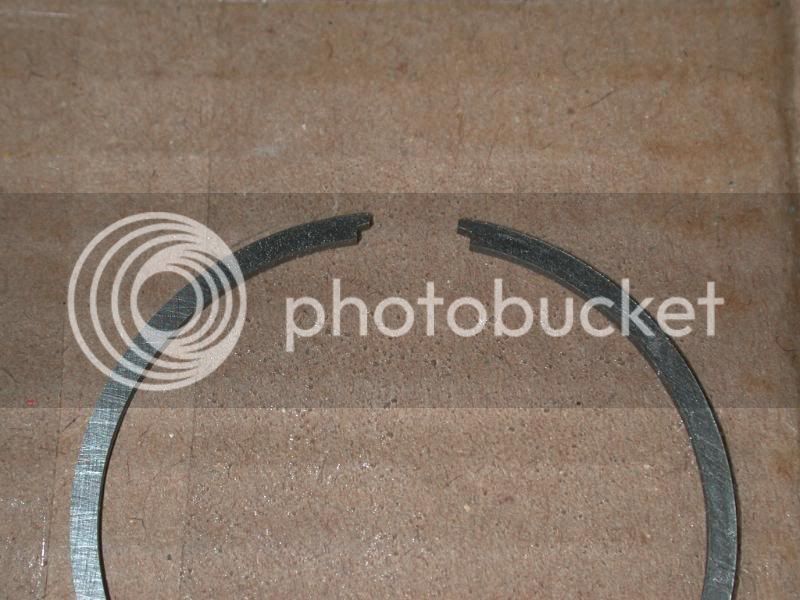
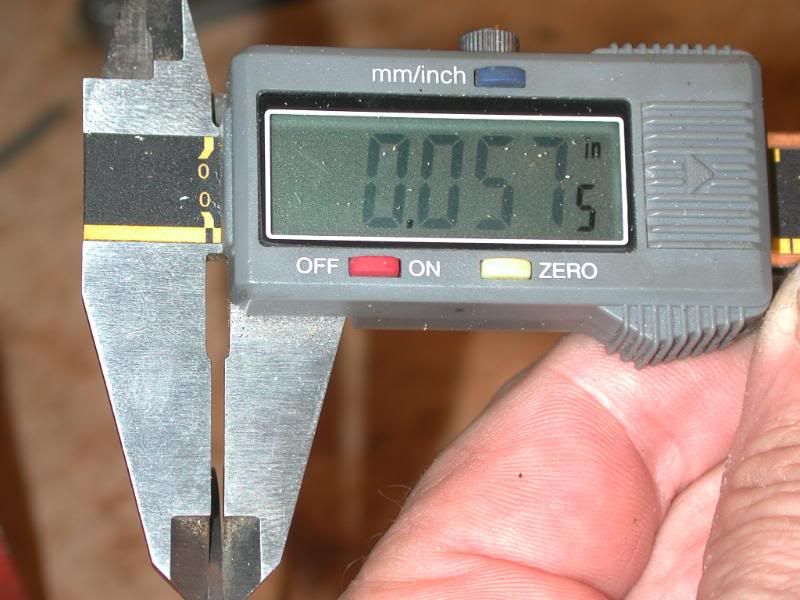
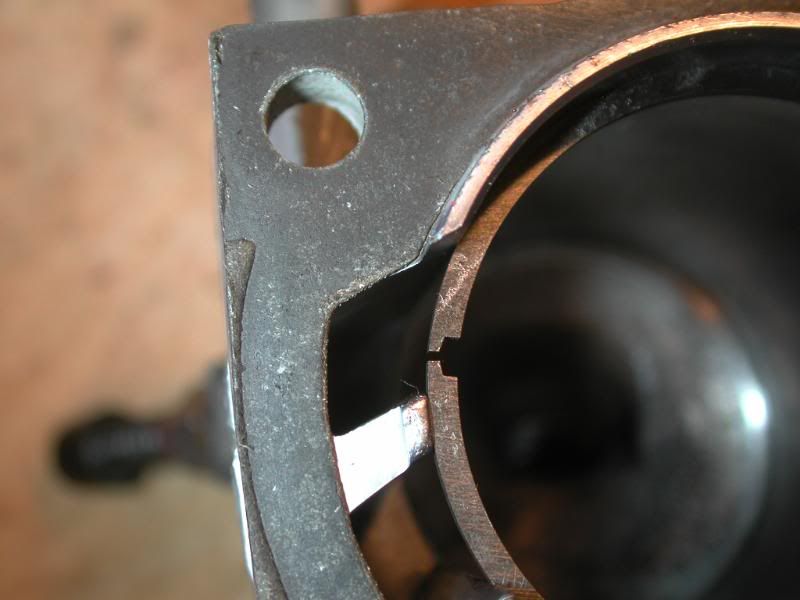
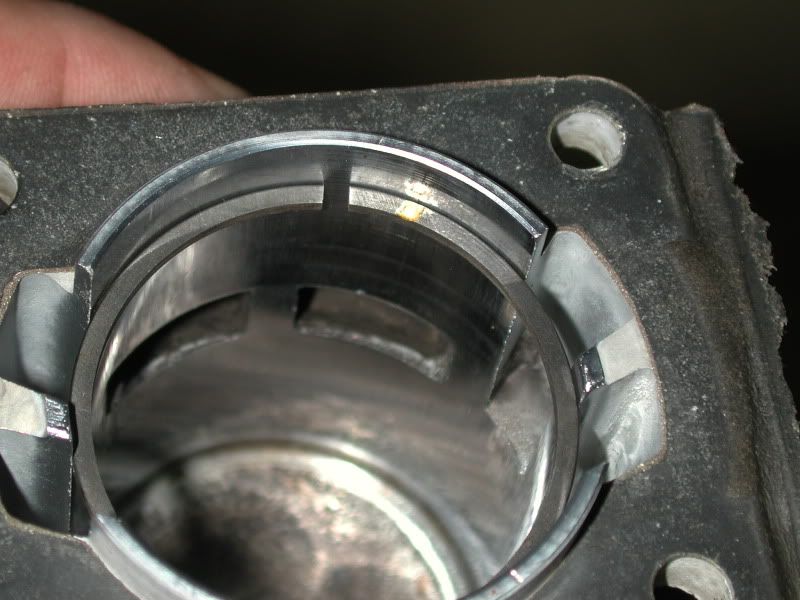
So my rings arrived, direct from Athens (Greece, not Georgia) , mail came very late today so I didn't get them til the sun was going down. Ten Days--faster than I get stuff from the East Coast. I have already installed one set, they fit a lot closer on the end gap than the original rings. Not as tight as I had wanted, they're 0.022 but way closer than the fit before, I have forgotten what that was but it was in the 0.063ish + range. They have a notch for the locating pin cut in the backside of the ring that allows this closer fit. The rings I went with are 46mm X 1.5mm, I was considering getting 47mm X 1.5mm and then filing the gap to where I could get about 0.003-0.005 end gap, and filing a pin clearance cut out as per 67L36Driver but didn't know if this would be feasible with the larger dia rings and if they'd fit the bore properly or make a mess of things. I decided to be on the conservative side as I don't want to trash my saw trying to accomplish something I should have left alone.

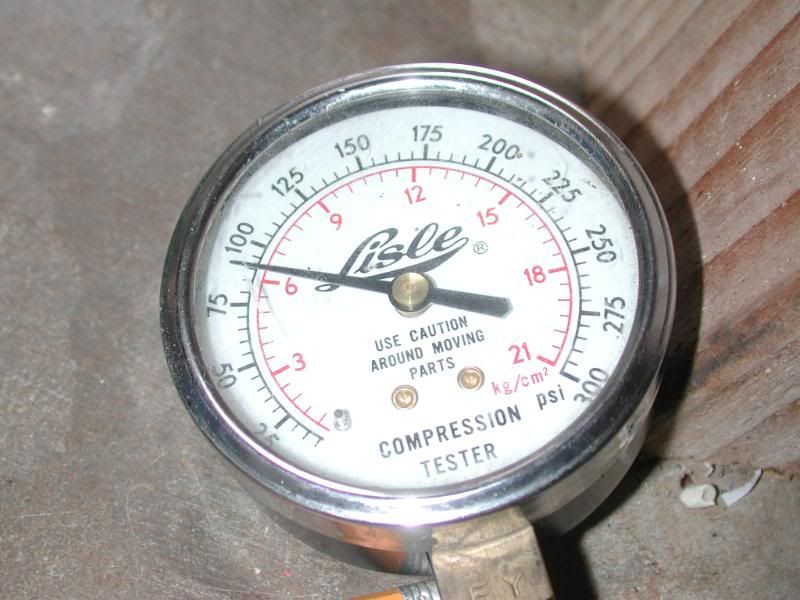
Having gathering tonite for middle son's 18th birthday, so have now put saw things aside to mess with tomorrow. Sunday AM, Church of Roper. You know there will be photos. I hope to get far enough to at least get some compression numbers to compare to the 145 pre-build, if not maybe fire it up, annoy the neighbors, and smoke out that assembly lube I loaded in there.

The little ebay 2.3 cube Craftsman saw I bought on the 27th Sept still hasn't arrived, so it will be next weekend before I get to toy with that prize.
 
New rings

So this is what came in the mail yesterday, you can see they have cutouts for the locating pin.

DSCN8186.jpg


The originals were 0.060, these are 0.057

DSCN8187.jpg


When I fit them in the cylinder to test end gap, this is how it looks, mics out at 0.022

DSCN8188.jpg


Compression test after assembly

DSCN8192.jpg


And this is the compression when the compression release valve is depressed

DSCN8193.jpg


This was the original ring thickness

DSCN8105.jpg


This was the original ring gap

DSCN8116.jpg
 
So now for the rest of the story.....

I fueled it and went for a test run. I got it to fire off numerous times, but it would not stay running; it would just bog down and die when I released the compression release trigger and tried to finger the throttle. Did this numerous times. I managed to yank the knot off the starter rope in the process so had to replace the rope, and then of course my arm/chest got tired since the boys and I got challenged to a bench press contest with my kids (D@mn teenagers...) 2 days ago and I'm still sore. Of course it turned out to be a bit of a frustrating end to the afternoon's work so I decided to do something peaceful and relaxing--giving my youngest son his first driving lesson.

If anyone has some suggestions, let me know. It almost sounds like it isn't getting fuel but remember that it was running good before this final installation of the rings and reassembly, and I also replaced the crank seals since the last time it ran.
 
The situation you describe is usually the sign of a fuel delivery, maybe try resetting the carb needles and try a new plug. If you had a seal leaking it would be more likely that the saw would "race" until you shut it down or it would eventually lean out enough to cut itself off, a bad enough leak and it probably would not even start.
 
I fueled it and went for a test run. I got it to fire off numerous times, but it would not stay running; it would just bog down and die when I released the compression release trigger and tried to finger the throttle. Did this numerous times. I managed to yank the knot off the starter rope in the process so had to replace the rope, and then of course my arm/chest got tired since the boys and I got challenged to a bench press contest with my kids (D@mn teenagers...) 2 days ago and I'm still sore. Of course it turned out to be a bit of a frustrating end to the afternoon's work so I decided to do something peaceful and relaxing--giving my youngest son his first driving lesson.
If anyone has some suggestions, let me know. It almost sounds like it isn't getting fuel but remember that it was running good before this final installation of the rings and reassembly, and I also replaced the crank seals since the last time it ran.

Glad I don't have to go there again.:laugh:

Try opening up the 'L' jet a quarter to half turn.
 
Testing #2

So I am a firm believer in the following--if you did something ("fixed"/modified/changed) and it doesn't run like before, then likely whatever you fixed/modified/changed is the first thing to suspect.

That being said, I spent some more time pulling the cord. On 2nd pull it burbled, and on 3rd it ran a bit. Next try I got it to run and flipped off the compression release and nailed the throttle a few time gently. It ran for a bit, idled but on giving it gas on another attempt, it bogged down and died like it was over choked. Over about a 20 min period it seemed like it ran better and better (longer, and even idled a bit) but it still bogged and died. It did cough out some thick stuff from the exhaust onto the concrete, but progressively less and less. May have been the grease from packing in the needle bearings from the wrist pin, and the 2 stroke oil I used for assembly lube. I am going to let it sit for a while and mess with it again later on. Here is a photo of my carb, I suppose it needs an adjustment since the compression has changed, but there is only an idle speed adjustment and a single needle adjustment available. This was a pre-teardown photo so it is clean now, and with a new fuel line. but the only adjustment besides idle is the shaft coming out the bottom of the picture. I am hoping someone can tell me more about this carb.

DSCN8052.jpg


You can see the screwdriver slot of that shaft coming thru the grommit in a lateral view.

DSCN7957.jpg


Son #3 did real well on his first driving lesson, I teach everyone on a clutch (that's all we have actually) so that's the first thing to master. He did real well, took off smooth first time and then for about the first 15-20 times but then he likely got a bit careless or cocky and had a few lurching starts (chirp, chirp, chirp.....) I don't quite need a Cervical collar or a Miami J collar but this is the 3rd son and about the 15th person I've taught how to drive a clutch. I went down to the waterfront Pearl Harbor over on the Western side where there is a huge concrete pad that used to floor a warehouse. Warehouse is gone. The pad and surrounding area is populated by a cluster of Pacific Golden Plovers locally known as Kolea. They winter here from the Arctic and fly back around March/April timeframe to lay their eggs and raise a family. We did this for an hour while the Kolea watched us apprehensively and nervously scurried out of the way as we lurched by. They stake out a patch of ground and don't seem to move more than about 50' from their spot. They yielded to the Jeep though. More on Kolea on another installment.
 
I am hoping someone can tell me more about this carb.

DSCN8052.jpg


You can see the screwdriver slot of that shaft coming thru the grommit in a lateral view.

DSCN7957.jpg

That's the 'L' (low speed) jet adjustment. Turn it out 1 1/2 turns from lightly seated and you will be in the ballpark. If it bogs/dies when you pull the trigger turn it out a tad more. If it still bogs/dies when you pull the trigger start out at 1 turn from lightly seated.

Looks like you may have a fixed High speed jet on the Tilly. Is there a blind hole to the right of your 'L' needle?
 
B.T.W.

That link from the carb to the plunger needs a small flat washer against the cotter key for the link to bear against. Without a flat washer the cotter key and link will jam the throttle open. B.T.D.T. Scary.

Plunger controls rate of oil flow to the bar.
 
Back
Top