Doug, I think if you tee'd the case drain to any of the return lines at the tank, you should be able to get by. I would probably use a larger tee than the return hose to dump the return an drain thru just to elminate any back pressure. Not sure on back pressure limits for case drains, I am wanting to say the shaft seals are only rated for around 75psi. You certainly dont want to run the drain thru a filter with any other return oil as that pressure can easily double the 75psi limit of the seals. Also, case drain oil can be dumped straight into the top of the tank, above oil level without causeing foaming issues. Case drain oil flow shouldnt be any more than pouring oil out of a can into the fill cap, ie. low flow and low pressure. If you already have a large flow of oil coming out of your case drain lines, you have already blown your motor seals and might as well plan on rebuilding the drive motors.
You are using an out of date browser. It may not display this or other websites correctly.
You should upgrade or use an alternative browser.
You should upgrade or use an alternative browser.
Advanced hydraulics dual pump splitter build diesel mower conversion
- Thread starter sam-tip
- Start date


Help Support Arborist Forum:
This site may earn a commission from merchant affiliate
links, including eBay, Amazon, and others.
Found this. Motor case drain max pressure is 50 psi. An OEM option for motor is case drain check valve. I do have a 5 psi check valve. Running it to tank is best option.
Put new seals in drive wheel motors an ran case drain to bottom of oil tank. Ran the line up over above tank level and then down to bottom of tank.
Wheels didn't leak over night like before. Still a few tiny leaks to case down. Some might just be the oil I spilled refilling the tank.
Wow was it humid last night splitting. Moving wood to a shady spot for tonight's splitting. Working on some wild cherry wood.
Needed a big fan last night.
Wheels didn't leak over night like before. Still a few tiny leaks to case down. Some might just be the oil I spilled refilling the tank.
Wow was it humid last night splitting. Moving wood to a shady spot for tonight's splitting. Working on some wild cherry wood.
Needed a big fan last night.
I use these:
https://www.amazon.com/XPOWER-P-230AT-Speeds-Outlets-2-3-Amp/dp/B00BY48UU8
As long as you are in the path of it, you are good. Check out this vid:
You can see the red one at the start of this video. I have since gotten another one. They have dual outlets on them, so you can daisy chain them, or plug other things into them, plus they have a built in circuit breaker for the outlets. I run them off my little Yamaha 2k watt generator.
sweepleader
Chainsaws and Fire Trucks, perfect.
Ran the line up over above tank level and then down to bottom of tank.
If the drain goes up forming a high loop that can trap air, you need to be able to bleed the air out to minimize the back pressure. If there is an air bubble at the top, the oil will have to be pushed up and the bubble down to get oil to flow over the top, not good. This could be worse than going to the top of the tank if the bubble is big enough.
About a 8 to 10 inch loop. The tank is above the wheels for ovious reasons.
Would it be odd if I put a hitch on the back to pull my super split to the wood pile behind this splitter. Lift and bust up the bigger stuff then finish with the super split for speed.
Would it be odd if I put a hitch on the back to pull my super split to the wood pile behind this splitter. Lift and bust up the bigger stuff then finish with the super split for speed.
sweepleader
Chainsaws and Fire Trucks, perfect.
Would that be a split shift situation? :{)
The drain hose would present less pressure to the wheel motors if it went UP all the way to the tank and entered below the oil level, rather than up above the tank then back down. I suggested the tank drain as you said there were no more openings in the tank to use. With the potential of trapping air above the oil level you run the risk of increased pressure in the drain line. I think you would be better off going up all the way with no down even if you have to go into the top of the tank above the oil level. If the top part of the loop can drain into the tank, that is, it can get air in to allow the bubble to breath, you would be better off than if the bubble were trapped by the oil level in the tank. If you cannot reroute the hose, you might vent the top of the loop with a tee and a breather, so long as it can drain into the tank and not push oil out the breather. That would prevent a bubble forming in the top of the loop. I don't know how much flow there is in that drain line, that might be an issue if a breather were installed.
The drain hose would present less pressure to the wheel motors if it went UP all the way to the tank and entered below the oil level, rather than up above the tank then back down. I suggested the tank drain as you said there were no more openings in the tank to use. With the potential of trapping air above the oil level you run the risk of increased pressure in the drain line. I think you would be better off going up all the way with no down even if you have to go into the top of the tank above the oil level. If the top part of the loop can drain into the tank, that is, it can get air in to allow the bubble to breath, you would be better off than if the bubble were trapped by the oil level in the tank. If you cannot reroute the hose, you might vent the top of the loop with a tee and a breather, so long as it can drain into the tank and not push oil out the breather. That would prevent a bubble forming in the top of the loop. I don't know how much flow there is in that drain line, that might be an issue if a breather were installed.
It's only be odd if you added a hitch and didn't use it.About a 8 to 10 inch loop. The tank is above the wheels for ovious reasons.
Would it be odd if I put a hitch on the back to pull my super split to the wood pile behind this splitter. Lift and bust up the bigger stuff then finish with the super split for speed.
You could always use it to pull Cece's wagon, for her to ride in and supervise.......unless she already has a Captain's chair somewhere else on the splitter.
Doug, I dont think you need to worry about a loop in your case drain return. as long as there is not any kind of restriction in the return line, any air should be easily pushed out at 4-5psi, unless your loop is several feet above the tank. A case drain isnot supposed to have any appreciable amount of flow, if its running a full stream of oil, you still have oil bypassing the seals in the wheel motors. Also, a case drain return can be plumbed above the tank oil level with out any problems.
And why in the world would you want to connect a super split behind this splitter, , I dont see how yo can keep up with just the one splitter, much less with two, unless you plan on a extra set of hands to help., I have seen as many as two resplitting rigs hooked up behind wood processors, but these where real high capacity machines and you had two people at the end of the wedge picking up the large pieces from the conveyor for resplitting. I have watched them for hours and every body stayed very busy when this machine was in oeration.
And why in the world would you want to connect a super split behind this splitter,
, I dont see how yo can keep up with just the one splitter, much less with two, unless you plan on a extra set of hands to help., I have seen as many as two resplitting rigs hooked up behind wood processors, but these where real high capacity machines and you had two people at the end of the wedge picking up the large pieces from the conveyor for resplitting. I have watched them for hours and every body stayed very busy when this machine was in oeration.Mrs. Sam-Tip
ArboristSite Operative
- Joined
- Jan 27, 2014
- Messages
- 190
- Reaction score
- 658
Pulling a splitter behind a splitter makes me think of these three words to describe Doug.Doug, I dont think you need to worry about a loop in your case drain return. as long as there is not any kind of restriction in the return line, any air should be easily pushed out at 4-5psi, unless your loop is several feet above the tank. A case drain isnot supposed to have any appreciable amount of flow, if its running a full stream of oil, you still have oil bypassing the seals in the wheel motors. Also, a case drain return can be plumbed above the tank oil level with out any problems.
And why in the world would you want to connect a super split behind this splitter,
"Overkill is underrated."
Sent from my SM-G920R4 using Tapatalk
ChoppyChoppy
Tree Freak
On my skid steer the case drains gave filters. Wonder why? S250 Bobcat
I have read a lot of bad things about filters on case drains.
I have used a TW-6 w/log lift to split large rounds into manageable chunks, and re-split with an SS. Lots and lots of extra handling and work.
Re-splitting on the TW was not much better, until I had the four-way wing lengthened to make a shelf.
What I found works best for re-splitting large rounds is this sequence.
First split: 4-way lowered all the way. On a TW this will yield about a 4" lower split. Leaves two humungous split pieces setting on top of the wing. Without the wing lengthened, these pieces flop over onto the out feed, and you have to chase them, and reposition them on the front side of the wedge. With the 4-way, log lift, and table grate it is sometimes awkward with a hundred pound split.
Second split: Okay, big pieces still on top of 4-way wing. Now raise the 4-way, which untraps the lower pieces. Re-split each of these if necessary, using a pulp hook to snag them and pull them back, setting one aside on the log lift.
Third: Then pull the closest huge top piece onto the horizontal log lift. Pull the second piece back on the beam using a pulp hook. Lower the 4-way, and repeat.
Re-splitting with the SS generally involves picking the large splits from the TW off the ground to re-split. With oak, that's about 5,800 pounds per cord.


Top photo: Did not split into halves, but you get the idea. Without the wing a lot of the big chunks end up on the ground.
jrider's splitter has a similar 4-way shelf design, although I did not know that a year and a half ago when I had mine welded up.
No SS needed for the big stuff.
Re-splitting on the TW was not much better, until I had the four-way wing lengthened to make a shelf.
What I found works best for re-splitting large rounds is this sequence.
First split: 4-way lowered all the way. On a TW this will yield about a 4" lower split. Leaves two humungous split pieces setting on top of the wing. Without the wing lengthened, these pieces flop over onto the out feed, and you have to chase them, and reposition them on the front side of the wedge. With the 4-way, log lift, and table grate it is sometimes awkward with a hundred pound split.
Second split: Okay, big pieces still on top of 4-way wing. Now raise the 4-way, which untraps the lower pieces. Re-split each of these if necessary, using a pulp hook to snag them and pull them back, setting one aside on the log lift.
Third: Then pull the closest huge top piece onto the horizontal log lift. Pull the second piece back on the beam using a pulp hook. Lower the 4-way, and repeat.
Re-splitting with the SS generally involves picking the large splits from the TW off the ground to re-split. With oak, that's about 5,800 pounds per cord.
Top photo: Did not split into halves, but you get the idea. Without the wing a lot of the big chunks end up on the ground.
jrider's splitter has a similar 4-way shelf design, although I did not know that a year and a half ago when I had mine welded up.
No SS needed for the big stuff.
Sandhill, I do similar to what you do with large splits. I do have a 6way wedge but on really large rounds, I also leave the wedge below center of the round. My main wedge is 24in tall fully lifted so I end up with 6 reasonable size splits and then 2 larger halfs that need respliting. I dont have extensions on my wings so the top halfs will fall off the wedge, but I usually will grab one half before it falls and then run it thru the 6way again and then have to pick the other half up to resplit it. About 3 passes and I usually have 18 useable splits. I have also been know to stack 2, sometime 3 pieces on top of each other to run thru the wedge at the same time.
20 hours on splitter and another fix is needed. Broke the 4 way wedge.
Will be sending back for metal testing and rebuild. Broke on some cherry wood.
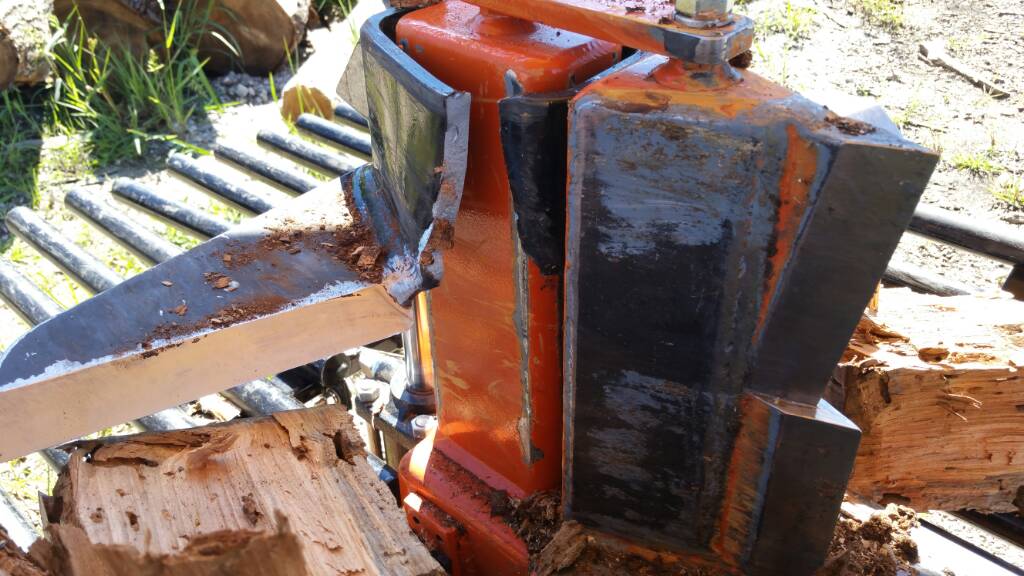

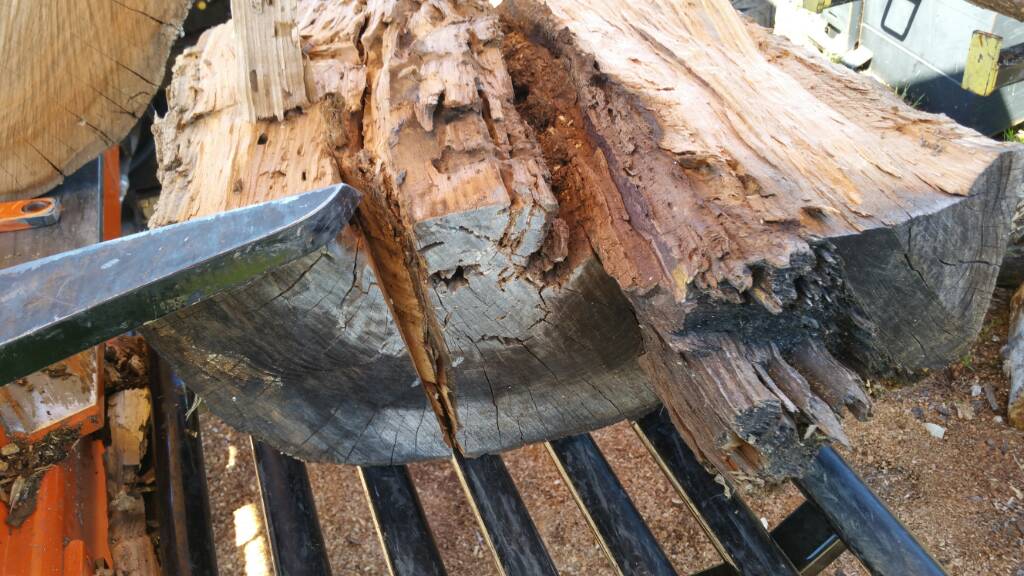

Will be sending back for metal testing and rebuild. Broke on some cherry wood.
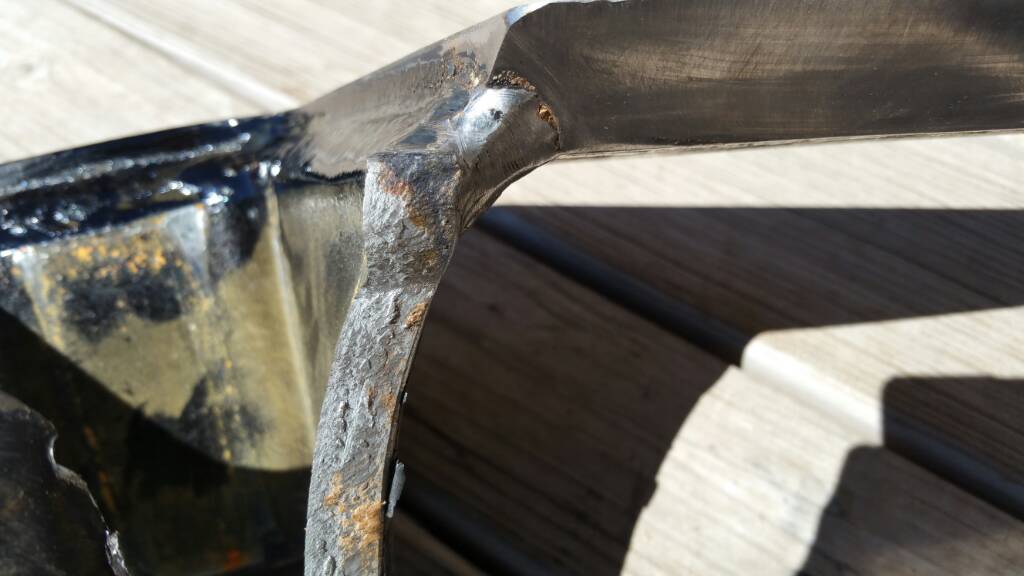
Dough, take a look at the bridge that Sandhill added to his wing,, bottom pic in his post. I think you might have to add something similar to yours. As for the wings breaking, I cant blow up the pic for a better look, but it sort of looks like the weld had a little bit of under cut where the ripping started and might be the cause. I am not a welding expert so take my comment as an opinion, not a fact.
sweepleader
Chainsaws and Fire Trucks, perfect.
Looks to me like the cutting edge of the wing is below the deck when the 4 way is retracted, gets it out of the way when not in use. Also looks like that design combined with the one way taper of the wing's cutting edge puts the force of the split all concentrated on that weld. Like muddstopper said, there looks to have been a crack started at the weld which might be pretty hard to correct with the design chosen. I would want to add steel below the wing, maybe raise the spitting deck where the log lays to allow the wing to stay below. I would think about re-beveling the wings to get the cutting edge higher up. All would be attempting to move the major force up into the middle of the steel rather than concentrated on a weld on an inside corner at the edge of the lifting ring. Might be very hard to do with the main beam in the way... Sharpening the wing by reducing the leading edge angle might reduce the force on the wing enough to help. Maybe the wing could be redesigned so that it connected together in front of the lifting ring, so the cutting edge on one side was one piece with the cutting edge on the other side. They would then transmit the force that broke this unit directly across to the other side without any welds inbetween....
Best of luck, this is a great machine. I am also not a welding expert but I play one on weekends.
Best of luck, this is a great machine. I am also not a welding expert but I play one on weekends.
My best photo before paint


sweepleader
Chainsaws and Fire Trucks, perfect.
Looks like you have the thickness of the wing in front there where the wings could be one piece all the way across the splitter. You can see from these pics how far the cutting edge is from the weld and how big the notch is that concentrates the load on the weld. Since you are making up a new unit you might make the wings a foot or more deep, to the left in the bottom picture, to wrap all the way around the post. Cut a hole in the wings to take the support post, so the one piece wing goes across in front too without a break. Doing that would likely improve the strength 10 or 20 times. A friend once calculated the strength of a tow hook vs a ring made of the same material, the ring was 7 times stronger, I think you have a similar situation here. If you double bevel the cutting edge it will not tend to dig into the split on the bottom and try to cut across the grain. It also looks like the wing is angled forward, if so, that puts the initial force way out toward the end, adding leverage taken by the weld. I would angle it back so the start of the spit is right at the weld removing the leverage and dropping the load. Too much angle and the vertical split with just dump the pieces off without making the 4 way split, I don't have a suggestion for that problem. Perhaps if the wings were strengthened they could still be angled forward.
Similar threads
- Replies
- 93
- Views
- 4K
- Replies
- 17
- Views
- 2K
- Replies
- 28
- Views
- 3K