hey nate, try this. i've copied and paraphrased from another publication. this is how to check by using a multimeter
1. check spark plug, boot, and wire from coil for continuity
Set the multimeter into the ohms function. Use the range button to manually select the 40 k range. (Auto ranging may not work here due the inductance of the coil). Now, touch one probe tip to the engine block and the other to the metal connector inside the plug wire cap. The meter should read the resistance of the coil and HV wire in series. Good readings will range from 3 k to 15 k. Higher readings mean a poor connection, which typically occurs either where the HV wire connects to the coil or at the other end where the HV wire connects to the spark plug clip inside the cap. A reading of OL means an open circuit or break in the electrical path. If a bad reading is indicated, double check to make sure you are making a good connection with both test leads.
2. check condenser
If your multimeter does not have the capacitance function, use the resistance (ohms) instead. This test is best performed with the capacitor removed from the engine. Start by shorting the capacitor by touching the lead to the case. Now, touch one probe to the lead and one to the case without touching the probe tips or exposed capacitor parts with your fingers. Watch the meter reading as the capacitor charges up. A reading of OL in the ohms function means the capacitor is not leaking or shorted, i.e., it’s probably good. Now reverse the test leads and repeat the test. The results should be the same.
If your multimeter does have the capacitance funcion - Disconnect the condenser lead, then place the multimeter in the capacitance function and hold one test lead to the capacitor case and the other to the terminal. Do not touch both leads simultaneously with your fingers because the resistance through your body will cause reading errors. A typical range of good readings would be .015 micro Farads to .030 micro Farads. A reading of OL (overload) in the capacitance function means the capacitor is shorted. A very low capacitance reading probably means the capacitor is open. Capacitors are not normally repairable so a bad reading will likely mean a trip to the parts store.
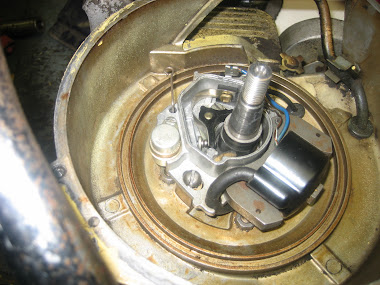
3. check points
Locate the breaker points and examine the contact surfaces. For proper operation the breaker point contact surfaces should be clean and shining. Make an electrical resistance test with your digital multimeter before attempting to clean the contact surfaces. This will allow a before and after indication. Note that the points are in parallel with the primary coil. When the points are open the resistance across the coil and points in parallel will be about 1.0
ohm (the coil’s wire resistance). When the points (with clean contacts) are closed the
resistance will fall to a value of 0.1 ohms to 0.2 ohms
. Any oil or corrosion on the point contact surfaces will raise the resistance and reduce the primary coil current, which subsequently weakens or kills the spark.
Measure the contact resistance as follows: place the multimeter in the ohm function and hold the probe tips tightly together to obtain a reference reading with the tips shorted. The reading should show between 0.0 ohms and 0.3 ohms, note the value. This is the reference reading.
Now place the probe tips on opposite sides of the point contacts when the points are in the closed position. The meter should now read no more the 0.1 ohm
greater than
the reference reading. Higher readings indicate contamination on the contact surfaces. If the contact surfaces are pitted, the best choice would be to replace the points. If
you can’t install new ones, then carefully clean the ones you’ve got. The object here is to remove all contamination without damaging the underlying metal.
The preferred cleaning method is to scrape the contact surfaces with a sharp carpet-layer’s knife, followed by a wiping with solvent on a clean cloth. Filing will sometimes
work but there is a risk of damaging the underlying metal which will shorten the life of the contacts. In any event do not use sandpaper. The grit will embed itself in the contact metal, rendering the points useless.
If you want a quick fix to get the engine running, try the “old-timers point cleaning trick” as follows: With the crank shaft positioned so that the points are closed, pry the
breaker arm open and insert a clean business card between the contact surfaces. Release the breaker arm so that the points grip the end of the card and then drag
the card through its width, wiping the contacts in the process. The card has two properties which make it work. It is absorbent enough to remove oil and gently
abrasive enough to remove surface contamination.
When you think the cleaning is complete, verify the results by repeating the electrical resistance test. Before leaving the points, make a visual inspection of the gap
in the open position. A typical specification would be 0.020 inches but you should determine the gap for your saw.
1. check spark plug, boot, and wire from coil for continuity
Set the multimeter into the ohms function. Use the range button to manually select the 40 k range. (Auto ranging may not work here due the inductance of the coil). Now, touch one probe tip to the engine block and the other to the metal connector inside the plug wire cap. The meter should read the resistance of the coil and HV wire in series. Good readings will range from 3 k to 15 k. Higher readings mean a poor connection, which typically occurs either where the HV wire connects to the coil or at the other end where the HV wire connects to the spark plug clip inside the cap. A reading of OL means an open circuit or break in the electrical path. If a bad reading is indicated, double check to make sure you are making a good connection with both test leads.
2. check condenser
If your multimeter does not have the capacitance function, use the resistance (ohms) instead. This test is best performed with the capacitor removed from the engine. Start by shorting the capacitor by touching the lead to the case. Now, touch one probe to the lead and one to the case without touching the probe tips or exposed capacitor parts with your fingers. Watch the meter reading as the capacitor charges up. A reading of OL in the ohms function means the capacitor is not leaking or shorted, i.e., it’s probably good. Now reverse the test leads and repeat the test. The results should be the same.
If your multimeter does have the capacitance funcion - Disconnect the condenser lead, then place the multimeter in the capacitance function and hold one test lead to the capacitor case and the other to the terminal. Do not touch both leads simultaneously with your fingers because the resistance through your body will cause reading errors. A typical range of good readings would be .015 micro Farads to .030 micro Farads. A reading of OL (overload) in the capacitance function means the capacitor is shorted. A very low capacitance reading probably means the capacitor is open. Capacitors are not normally repairable so a bad reading will likely mean a trip to the parts store.
3. check points
Locate the breaker points and examine the contact surfaces. For proper operation the breaker point contact surfaces should be clean and shining. Make an electrical resistance test with your digital multimeter before attempting to clean the contact surfaces. This will allow a before and after indication. Note that the points are in parallel with the primary coil. When the points are open the resistance across the coil and points in parallel will be about 1.0
ohm (the coil’s wire resistance). When the points (with clean contacts) are closed the
resistance will fall to a value of 0.1 ohms to 0.2 ohms
. Any oil or corrosion on the point contact surfaces will raise the resistance and reduce the primary coil current, which subsequently weakens or kills the spark.
Measure the contact resistance as follows: place the multimeter in the ohm function and hold the probe tips tightly together to obtain a reference reading with the tips shorted. The reading should show between 0.0 ohms and 0.3 ohms, note the value. This is the reference reading.
Now place the probe tips on opposite sides of the point contacts when the points are in the closed position. The meter should now read no more the 0.1 ohm
greater than
the reference reading. Higher readings indicate contamination on the contact surfaces. If the contact surfaces are pitted, the best choice would be to replace the points. If
you can’t install new ones, then carefully clean the ones you’ve got. The object here is to remove all contamination without damaging the underlying metal.
The preferred cleaning method is to scrape the contact surfaces with a sharp carpet-layer’s knife, followed by a wiping with solvent on a clean cloth. Filing will sometimes
work but there is a risk of damaging the underlying metal which will shorten the life of the contacts. In any event do not use sandpaper. The grit will embed itself in the contact metal, rendering the points useless.
If you want a quick fix to get the engine running, try the “old-timers point cleaning trick” as follows: With the crank shaft positioned so that the points are closed, pry the
breaker arm open and insert a clean business card between the contact surfaces. Release the breaker arm so that the points grip the end of the card and then drag
the card through its width, wiping the contacts in the process. The card has two properties which make it work. It is absorbent enough to remove oil and gently
abrasive enough to remove surface contamination.
When you think the cleaning is complete, verify the results by repeating the electrical resistance test. Before leaving the points, make a visual inspection of the gap
in the open position. A typical specification would be 0.020 inches but you should determine the gap for your saw.
")