Tool Forum

Arborist Forum

Help Support Arborist Forum:

This site may earn a commission from merchant affiliate links, including eBay, Amazon, and others.
A quick tip for refilling lighters or any little butane torches. . . Throw them in the freezer an hour before you fill them. The torch or lighter will fill to capacity with one squirt from the can, as apposed to doing it several times. :)

Great tip!

Thanks!

7
 
Electronic vs. Mechanical Measurement Devices

Sorry to "cross-post", but should have posted here in the first place. (Here's the extent of the content so far from the general Chainsaw Forum.)

In shopping around for some basic measurement instrumentation, I've noticed a huge price

difference between the old school mechanical calipers, micrometers, and depth gauges,

and the newer "all-in-one" digital gadgetry.

Are the digital combo devices generally available at AutoZone, Advance, etc., any good?

I picked one up for $39 claiming a +/-0.02mm/0.001in (<100mm) accuracy with

0.01mm/0.0005in. repeatability. While the repeatability spec seems good, the +/- 0.001

seems a little sloppy (potentially 2 thousandths) -- especially after reading the thread

on piston clearance I ran across while searching "calipers".

TIA for any thoughts or advice on the subject.

Poge
__________________
"We have met the enemy, and he is us."


The import digital calipers are mostly all the same, regardless of

who sells them. I use the HF calipers daily and they work just fine for calipering.

However, calipers are not micrometers.

I use calipers for measuring lengths and heights and depths. I use calipers for quick

and dirty diameter measurements. They are also adequate for measuring squish solder,

though I use a mic since it is just as easy and more reliable.

For diameters that really matter, like measuring a piston diameter, or measuring a

cylinder bore with telescoping gages, I use a real micrometer, not a caliper.

You are lucky to get +/-.001 out of a set of calipers. I will

trust my Starrett 0-6 to just about that (really +/- .0015) but they are a set of $139

calipers.

To measure inside of .001 you need micrometers for OD and at the least telescoping gages

for ID. A dial bore gage is best, as it takes "feel" out of the equation.


.

Poge
 
I made these back late last year and posted them over in the milling forum. Thought you guys might like seeing them here too though.

attachment.php


attachment.php


attachment.php


attachment.php


The Juniper is just from a nice little scrap piece I had left over from milling some small trunks up for 1" stock.

The Birch awl handle is from a spalted crotch I cut from a small downed tree. It's nicely figured and still really good and hard. I got it at the perfect time. The file handle is also birch but is just spalted a bit, no figuring or anything special. All got a few coats of polyurethane for protection.
 
Those are beautiful!! What did you use for the steel in the awls' and hook??

Old 5/32" round file steel. I spun them in the drill with some grinding stones and emery cloth until the riffles were ground off smooth and then kept going finer with the sandpaper to polish them a bit - I left the riffles on the section that would be inserted into the handle though. Because of the twist in the riffles you can pretty much thread it in to a well-matched hole and it holds very well. I don't really know much about tempering and hardening steel though, so I can't speak for the durability and strength of the hook - it is sharp as a needle though! It doesn't get used much anyway and actually will likely end up with my fly-tying tools so I'm not really worried about it. I do have a couple small books about blacksmithing small hand tools like this, so it's just a matter of getting into it a bit more and remembering what I've read. My various torches do fine for heating pieces of this size but I have been on the lookout for something good to salvage to build a small forge out of. I have a few small blower fans to choose from to feed one with, so it's just a matter of finding some kind of old basin etc. to use and then getting some time to devote to it.
 
Last edited:
Old 5/32" round file steel. I spun them in the drill with some grinding stones and emery cloth until the riffles were ground off smooth and then kept going finer with the sandpaper to polish them a bit - I left the riffles on the section that would be inserted into the handle though. Because of the twist in the riffles you can pretty much thread it in to a well-matched hole and it holds very well. I don't really know much about tempering and hardening steel though, so I can't speak for the durability and strength of the hook - it is sharp as a needle though! It doesn't get used much anyway and actually will likely end up with my fly-tying tools so I'm not really worried about it. I do have a couple small books about blacksmithing small hand tools like this, so it's just a matter of getting into it a bit more and remembering what I've read. My various torches do fine for heating pieces of this size but I have been on the lookout for something good to salvage to build a small forge out of. I have a few small blower fans to choose from to feed one with, so it's just a matter of finding some kind of old basin etc. to use and then getting some time to devote to it.

That's what I thought you made them out of. . . I saw part of the teeth sticking out of the handle, but wanted to ask to make sure. If you want help with hardening and tempering, just ask.

I made a nail for my 50' Spencer tape yesterday. . . I didn't have any horseshoe nails handy, and wanted to try something different anyway.

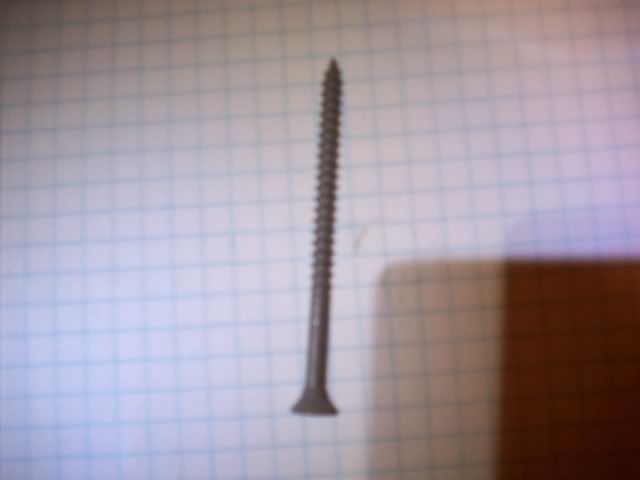
I took a deck screw ( I knew it was hardened) and heated it up to an orange (this baked off the paint and inner galvanizing I didn't know was there). Even though I didn't know what type of alloy it was, it doesn't stop me from experimenting with it to see what can be done.

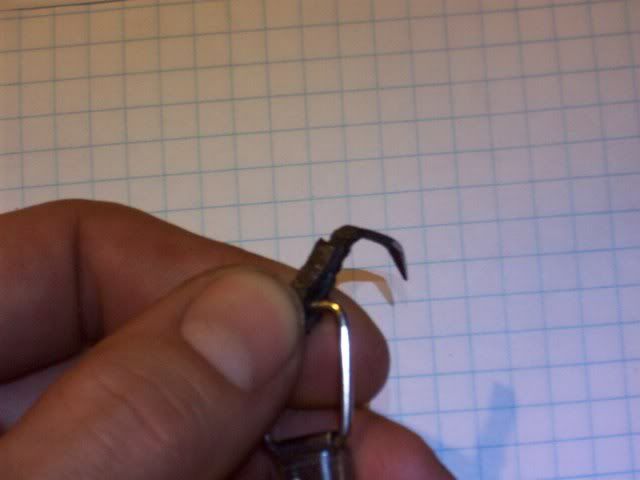
I annealed it and began pounding out the shape I wanted. You can still see the screw 'bumps' where it connects to the tape. After two hardening quenches, they both proved that it got hard, but not quite as hard as a file, but good enough for my purpose. I probably could have left it 'as-quenched', but tempered it just to avoid any brittleness.

Once hardened in a bucket of water, I immediately cleaned up the tip with a file, which made the tip how I wanted it, and also exposed shiny metal to watch the color during temper. I wanted the portion that was to be bent over the tape-loop to be soft, and the hook to be hard.

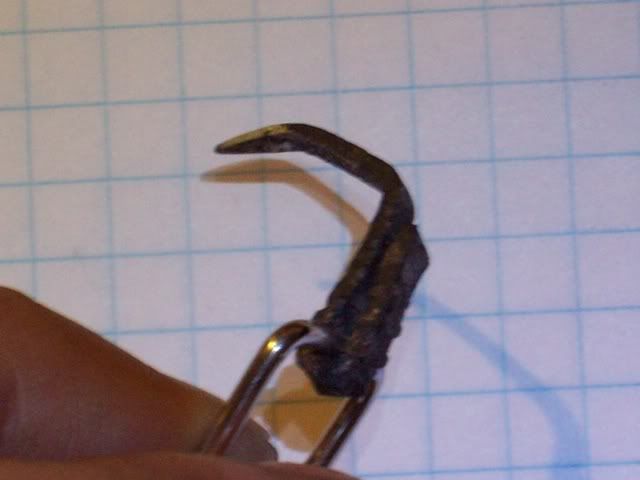
I ran the color from the bent portion toward the hook. . . I tempered to a greyish-black on the bend and let it run out to a blue on the hook. A quick dip in the water cooled her off.

The results were the portion I wanted to bend is pliable but not weak, and the hook was as hard as I'll ever need it to be, but retains flexibility.

Overkill for a dumb tape hook? . . Yup. Fun to do anyway, and it only took a few minutes? . . Absolutely.

100_0347.jpg


100_0353.jpg


100_0356.jpg
 
That I'll argue with ya. I've used alot of different brands of tools, & for the most part I'll take my Snap On tools over anything else. Yes they are more money, but in the long run they've paid for themselves. I use them all day everyday though.

I'm glad I can't afford Snap-On hand tools or use them every day. I can't imagine the frustration and sore hands I'd have at the end of the day.
my Arthritis would have me laid up for a day.

the sharp handles on the wrenches really cut into my hands.
and the preciseness of the box end or open end are a bear to slip over a nut that is not perfect. Any little burr will stop a snap on cold in it's tracks.

I found the best thing they were for was for freeing up a stuck nut/bolt... take a file, clean up the head, and fit the box on... A Snap-On will never round a bolt head. And they are a work of art!
 
Seeing as Brad's posting pics of Awls I thought I'd some similar items

Ebony and home milled Redgum marking gauges.
attachment.php


Home milled redgum, sheoak and apricot handles
attachment.php


Apricot handles (I bought the blades but did the rest of the metal work.
attachment.php


Apricot handle plan makers floats - Hand tempered O1 tool steel blades
attachment.php


Luthiers kit - using home milled sheoak Japanese saw handle, redgum chisel handles. Free Tingle wood on the chisel plane and purchased marking curly jarrah handles - one of the few pieces I paid real money for.
attachment.php
 
Nice grinder! Never heard of the brand before, but then again I don't own that much "german engineering" either! What's the funky shield kinda thingy around the disc though? :confused: LOL. I'm not sure I could even find the guards for any of mine anymore. They tend to come off right away, for better or worse. I wouldn't mind them so much if there was some sort of quick-release, like a cam lock etc., to make it easier to reposition the guard without having to whip out the screwdriver.

Quick note on Metabo, do not over look their cordless drills. I'm lucky that their dist/repair center is close to me. They use a used tool guy I deal with to off load their rebuilds (wonderful prices :) ).

After picking up a few of their grinders/drills, they've earned my loyalty.
 
Bob

Great handles you have made for those tools!Your a wonder from down under.
Wood and metal skills combined ,they go great togeather for sure
Lawrence
 
Metabo

Quick note on Metabo, do not over look their cordless drills. I'm lucky that their dist/repair center is close to me. They use a used tool guy I deal with to off load their rebuilds (wonderful prices :) ).

After picking up a few of their grinders/drills, they've earned my loyalty.
Great tip on the Metabo tools Paul!
Lawrence
 
Dang Bob. . . Them's some beautiful tools!! You AU and NZ guys are very lucky to have such gorgeous wood in your back yards!

Excellent job as always!! You never sacrifice form over function. :clap:
 
Last edited:
What was this old tool used for??

It came from a local auction. It was very rusty and I used my battery charger and soda water to de-rust it. I was told it could have been some type of animal catcher. As for hogs or cows clamped in their nose or mouth. It is about 15" long and looks to be cast iron. It has some markings, but I can't make out what it says. If it was used to catch some type of critter, I sure would have hate being that critter.
042640x480.jpg

It looks simular to the cow "tang" , but these normally have two equal jaws (as the left side) and match up. We had a plier like that in our slaughterhouse to control cattle (placed in the nose holes), but I was no fan of it....the cows didn't like it too much and would turn crazy most of the time. Older folks tell me it worked great to control heavy bulls, but they need to get used to it first.
 
Last edited:
Back
Top