You are using an out of date browser. It may not display this or other websites correctly.
You should upgrade or use an alternative browser.
You should upgrade or use an alternative browser.
Tool Forum
- Thread starter WesternSaw
- Start date


Help Support Arborist Forum:
This site may earn a commission from merchant affiliate
links, including eBay, Amazon, and others.

nanuk
ArboristSite Guru
It came from a local auction. It was very rusty and I used my battery charger and soda water to de-rust it. I was told it could have been some type of animal catcher. As for hogs or cows clamped in their nose or mouth. It is about 15" long and looks to be cast iron. It has some markings, but I can't make out what it says. If it was used to catch some type of critter, I sure would have hate being that critter.

I've used the nose pliers on bison, and can tell you that thing is not it. too light, and not even. and nose pliers have balls on the end so as not to cut the nose.
those appear to be used to pry something, as the jaws are offset and one has a flat, other rounded. perhaps to push something through.... like setting a hot rivet in a hole, prior to hammering?
Kingsley
ArboristSite Guru
:agree2:I've used the nose pliers on bison, and can tell you that thing is not it. too light, and not even. and nose pliers have balls on the end so as not to cut the nose.
those appear to be used to pry something, as the jaws are offset and one has a flat, other rounded. perhaps to push something through.... like setting a hot rivet in a hole, prior to hammering?
The ends of the handles look like they function as a part of the tool. May be used to put springs on. Almost looks like a brake drum tool.
:agree2:
The ends of the handles look like they function as a part of the tool. May be used to put springs on. Almost looks like a brake drum tool.
Thats what I was thinking too, why the hooks on the end of the handles? Gotta be a purpose.
blackoak
Addicted to ArboristSite
I'm pretty sure this thing is to old to work on any modern things.:agree2:
The ends of the handles look like they function as a part of the tool. May be used to put springs on. Almost looks like a brake drum tool.
blackoak
Addicted to ArboristSite
I think they were put there to keep your hand from sliding off the ends of the handle as you were pulling or lifting whatever you had gripped with it.Thats what I was thinking too, why the hooks on the end of the handles? Gotta be a purpose.
Kingsley
ArboristSite Guru
What do you consider modern? Steam engines and ag equipment have been around for a long time. This may have been a special tool for them. If we really want to know what it is we should put it on a blacksmith forum and see what they think.
WesternSaw
Addicted to ArboristSite
Hoof Tools-Blackoak
I'm no tool Guru for sure but I think it looks like something a Farrier would use.
As in horse hoof tools.Maybe some of the members here with horses would know.Like member got6ponies.
Lawrence
I'm no tool Guru for sure but I think it looks like something a Farrier would use.
As in horse hoof tools.Maybe some of the members here with horses would know.Like member got6ponies.
Lawrence
Well its got my interest, I have been around a lot of old and odd tools myself, pounded out quite a few also growing up and working in the blacksmith shop. Made several nose tongs for area farmers but that`s not the pattern we used. I guess its a specialty tool and not an easy one to figure either. There was considerable pains taken to produce it knowing the little bits of knowledge I picked up while pounding iron, this tool was made a little better than a lot of stuff coming from the backwoods forges where utilitarianism were more important than looks.
Pioneerguy600
Pioneerguy600
Dang Bob. . . Them's some beautiful tools!! You AU and NZ guys are very lucky to have such gorgeous wood in your back yards! Excellent job as always!! You never sacrifice form over function.
Cheers guys! Yeah we have some very interesting wood and even better there are some rare trees in the outback that very few people still know very little about.
I have a few of hand tool making principles that I usually use that I thought you might like to know.
1) I think even simple tools should look good. Users will generally look after tools that look good more than tools that look ordinary.
2) Tools should to feel right. I know I am much more likely to pick up and use something that looks good and feels right. When I'm prototyping I often stand there with my eyes closed and feel and handle the tool.
3) Tool should come apart as much as possible without compromising strength and function. This is so any bits that break can be repaired, tool can be more easily modified, and bits like metals etc can be re-polished.
I also have a strange quirk of using one part of a tool to make the other. For example, when I make fine chisels, I make the blade first and then use the blade to cut out the hole in the handle.
My other foolishness is to end up several layers deep when tool making. So I start making one tool but to complete it I need another jig or another tool so I start making that and then I need another jig or another tool to finish that. So I often start out making one tool and end up with a tool plus 2 other gismos or tools.
tdi-rick
Addicted to ArboristSite
Quick note on Metabo, do not over look their cordless drills. I'm lucky that their dist/repair center is close to me. They use a used tool guy I deal with to off load their rebuilds (wonderful prices).
After picking up a few of their grinders/drills, they've earned my loyalty.
I'd take Metabo over DeWalt any day. Great power tools.
tdi-rick
Addicted to ArboristSite
I still can't rep you Bob, so I'll say it here, great tools again !
Fella's, those plier like things look like a bit like a hoof tester.
A hoof tester is used as the name implies, one half presses against the wall, the other against the sole to test for soreness, lameness, (abscesses) etc.
Fella's, those plier like things look like a bit like a hoof tester.
A hoof tester is used as the name implies, one half presses against the wall, the other against the sole to test for soreness, lameness, (abscesses) etc.
Brmorgan
Addicted to ArboristSite
- Joined
- Apr 22, 2008
- Messages
- 3,248
- Reaction score
- 348
Brace & Bit Collection
A question Lawrence asked me made me think of my small Brace & Bit drill collection:

The longest bit in the center is slightly over 2' long, threaded on the tail end, and a flat-bottomed cutter on the tip. It is NOT broken that way. I can't really figure out how it would feed very well. My favorite bit is the old hand auger bit just below the long one. I need to turn a nice wooden handle on the lathe for it. I was sure I had a couple other smaller bits like this one along with some other old auger bits, but I couldn't find them for the life of me tonight. At the top are two modern 1" X 18" auger bits the electricians use to drill through studs for cable runs. They're often treated as sundries and new bits are factored into the price of every job, so they often get tossed out after jobs even if they're in great shape. A quick touchup with a diamond hone on the bottoms of these and they cut like new.
I think I paid $2 for one of the braces, $5 for another, and the other two on the bottom in the photo were freebies. The top one on the left with the rounded chuck says "Millers Falls Made In USA, NO. 1322 10 in." on it.
The one on top with the hex chuck is my favorite. It has really nice oak handles and works really smoothly despite the rust, which is really more of a patina at this point. I'd like to restore the handles to bring the grain and ray fleck out again, but I'm not sure I want to really de-rust the metal. This is my favorite part of this one:


The ratcheting mechanism is so simple to operate and IMO just mean looking. Both tabs in is totally locked, both out is free spinning, and either one in on its own will ratchet in the appropriate direction.
A question Lawrence asked me made me think of my small Brace & Bit drill collection:
The longest bit in the center is slightly over 2' long, threaded on the tail end, and a flat-bottomed cutter on the tip. It is NOT broken that way. I can't really figure out how it would feed very well. My favorite bit is the old hand auger bit just below the long one. I need to turn a nice wooden handle on the lathe for it. I was sure I had a couple other smaller bits like this one along with some other old auger bits, but I couldn't find them for the life of me tonight. At the top are two modern 1" X 18" auger bits the electricians use to drill through studs for cable runs. They're often treated as sundries and new bits are factored into the price of every job, so they often get tossed out after jobs even if they're in great shape. A quick touchup with a diamond hone on the bottoms of these and they cut like new.
I think I paid $2 for one of the braces, $5 for another, and the other two on the bottom in the photo were freebies. The top one on the left with the rounded chuck says "Millers Falls Made In USA, NO. 1322 10 in." on it.
The one on top with the hex chuck is my favorite. It has really nice oak handles and works really smoothly despite the rust, which is really more of a patina at this point. I'd like to restore the handles to bring the grain and ray fleck out again, but I'm not sure I want to really de-rust the metal. This is my favorite part of this one:
The ratcheting mechanism is so simple to operate and IMO just mean looking. Both tabs in is totally locked, both out is free spinning, and either one in on its own will ratchet in the appropriate direction.
Brmorgan
Addicted to ArboristSite
- Joined
- Apr 22, 2008
- Messages
- 3,248
- Reaction score
- 348
Some more hand tools
I dug these up from an old thread in the milling forum:
A spalted Birch scribing knife I made a couple years ago.

The blade is hand-ground from a piece of planer knife steel. It's extremely hard and the tip is almost scalpel-sharp - it will penetrate my skin with no effort at all. It's a single bevel with a flat back so I can follow a straight-edge with it.
A try square:

The handle is Walnut, half sapwood and half heartwood, salvaged from a pallet. I milled a small 1/8" thick Brass plate for the edge, and the blade is made from 1/8" thick headrig bandsaw steel. It's extremely hard and stiff, which is why I never really bothered taking the time to polish it a great deal.
A depth gauge for bowl making etc.:


The base is Red Oak, 6" long and also salvaged from a pallet, and the lock knob is turned from a small highly-figured Birch root burl scrap. All metal parts are Brass so they don't mar each other. The main rod is 1/4" diameter and 14" long (so it can measure up to 12" deep) and runs through two brass bushings that I inserted into the central hole, and the brass screw that's set in the knob was hand-threaded from the same 1/4" brass rod stock.
I dug these up from an old thread in the milling forum:
A spalted Birch scribing knife I made a couple years ago.
The blade is hand-ground from a piece of planer knife steel. It's extremely hard and the tip is almost scalpel-sharp - it will penetrate my skin with no effort at all. It's a single bevel with a flat back so I can follow a straight-edge with it.
A try square:
The handle is Walnut, half sapwood and half heartwood, salvaged from a pallet. I milled a small 1/8" thick Brass plate for the edge, and the blade is made from 1/8" thick headrig bandsaw steel. It's extremely hard and stiff, which is why I never really bothered taking the time to polish it a great deal.
A depth gauge for bowl making etc.:
The base is Red Oak, 6" long and also salvaged from a pallet, and the lock knob is turned from a small highly-figured Birch root burl scrap. All metal parts are Brass so they don't mar each other. The main rod is 1/4" diameter and 14" long (so it can measure up to 12" deep) and runs through two brass bushings that I inserted into the central hole, and the brass screw that's set in the knob was hand-threaded from the same 1/4" brass rod stock.
Metals406
Granfodder Runningsaw
Neat tools Brad!
WesternSaw
Addicted to ArboristSite
Great Work
Brad,great job on those tools you made! You have talent! On another note,I'm the opposite to you, when I see rust it has to go.Mind you I like the patina that forms on copper pieces and have to subdue myself from removing it.
Has anyone tried that molasses rust removal tip yet.I was thinking of doing a before and after test,but just can't seem to find the time.
Lawrence
Neat tools Brad!
+1
I really like that depth gauge. I have been meaning to make me one for some time.
Metals406
Granfodder Runningsaw
Brad,great job on those tools you made! You have talent! On another note,I'm the opposite to you, when I see rust it has to go.Mind you I like the patina that forms on copper pieces and have to subdue myself from removing it.
Has anyone tried that molasses rust removal tip yet.I was thinking of doing a before and after test,but just can't seem to find the time.
Lawrence
Lawrence,
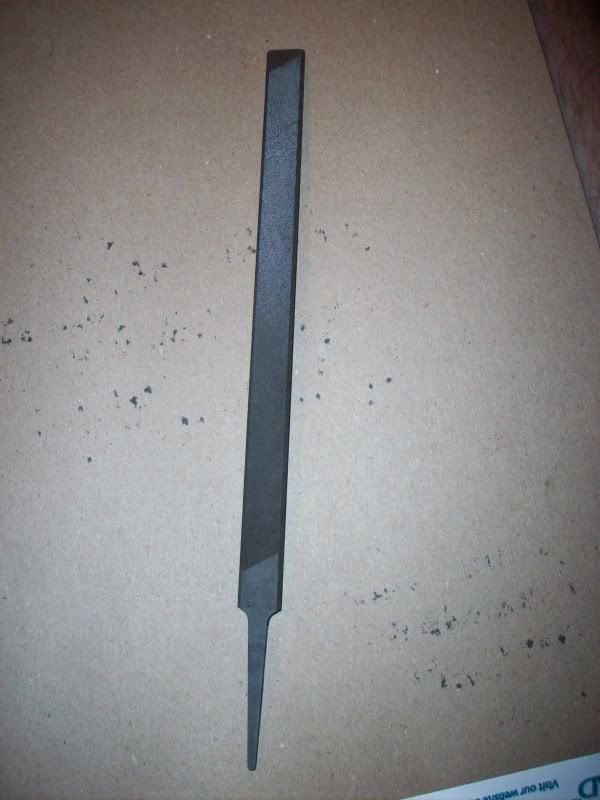
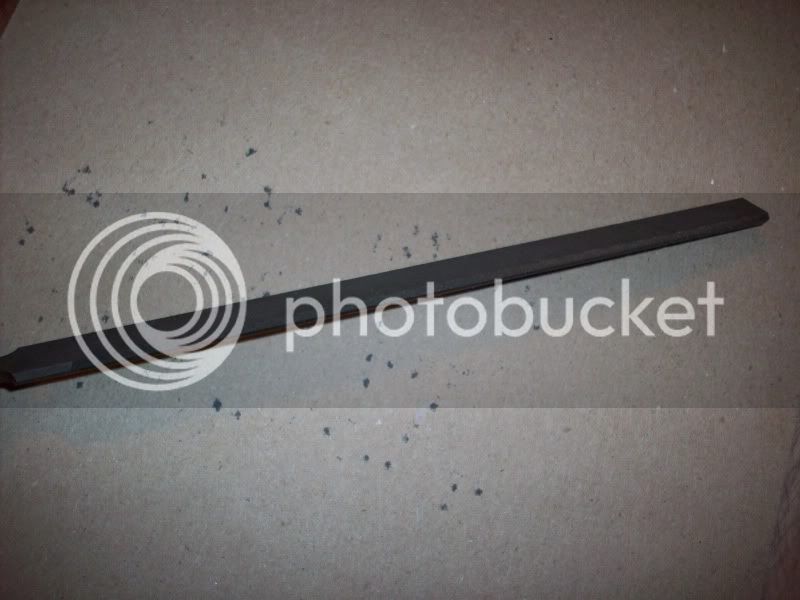
I haven't tried the Pure Molasses trick, but I did try the acid trick for a file. I had a used 6-sided flat file I had for square filing. It stopped cutting effectively, so it got relegated to sitting on the bench outside.
It sat there all winter, and had some rust on the surface, but nothing too terrible. I had heard that they "resharpen" files with an acid bath.
Well, the only acid I had that I wanted to use in the house was white vinegar. I let the file sit in the vinegar for 20-24 hours, and I'm very pleased with the results.
By the end of yesterday, I noticed the rust had been lifted from the file, and was either settled to the bottom or floating. when I woke up this morning, I noticed shiny metallic bits floating on the surface.
I pulled the file out, and gray metallic was coming off the file, almost like a grease consistency. The file also had a very caustic smell, it reminded me of muriatic acid smell.
I scrubbed the file with an old tooth brush and dish soap, until the gray stopped coming off the file. I then set the file on the wood stove long enough to see the moisture lift at an accelerated rate. It was just warm enough to spray it with a nice coat of WD-40.
The file does feel like it has it's teeth back too!! I think I'll throw it back in the saw box for another round of sharpening.
WesternSaw
Addicted to ArboristSite
White Vinegar and Metals406
Nate,Thanks for your information and pictures on the rust removal!From the pictures you posted the file looks like the new steel gray colour that files seem to have when you but them new.Wonder if lemon juice would work is it not acidic as well.I think that I heard of using a cut side of lemon to rub on carbon steel knife blades to remove rust.I am not positive on this tip as I have never tried it. If anyone wants to correct me, feel free to do so!Rust was one of the main reasons they quit using carbon steel blades in the meat industry,as when I started in that line of work there was still a great number of manufacturers still using carbon steel.We used to keep the rust at bay with mineral oil.As the years passed stainless steel was getting better at holding an edge and was introduced more and more in the industry.
Lawrence
Similar threads
- Replies
- 15
- Views
- 2K
- Replies
- 8
- Views
- 2K